The main parts of the Eclipse interface.
Sound Synthesis in Java
Copyright © 2015 Evan X. Merz. All rights reserved.
To download the source code in this book, visit http://www.evanxmerz.com/
The Beads Library as well as the associated documentation can be found at http://www.beadsproject.net/
17. Creating Granular Soundscapes
Welcome to the world of sound synthesis! It's dangerous to go alone, but with this book as your guide, you'll be making sounds from scratch as soon as possible.
This book is a follow-up to my 2011 book Sonifying Processing: The Beads Tutorial. That book introduced the Beads library specifically within the Processing ecosystem. It is aimed primarily at visual artists who are interested in sound and musicians who are interested in multimedia. Since writing that book, I realized that there are a lot of programmers and musicians who also love modular synthesizers. These people hang out on the r/synthesizers subreddit, and read the Create Digital Music blog. They often spends thousands of dollars on modular synthesizers, or learn to create synthesizers using environments like Max, Pure Data, Tassman, or Reaktor. All of those are great systems, but with the exception of Pure Data, they are expensive. Also, each one requires a special set of programming skills. Max, Pure Data, Tassman, and Reaktor are all based on similar concepts, but each is its own unique system. This book is an attempt to teach sound synthesis using only free open source software and the most universally taught programming language, Java.
This book is aimed at a wide audience. I started it with the intention of aiming only at advanced programmers, but I've added content that should make it a good tutorial for even beginner programmers. This book will be much easier for readers who have taken an introductory Java course, but a beginner programmer should be able to follow along if they supplement the early chapters with other java tutorials online.
You don't need to know anything about music to work through this book. You might have more fun if you have a MIDI keyboard and can play it. I used the Korg NanoKey and the Korg NanoKontrol while writing this book, but the keyboard examples should work with any MIDI keyboard. Still, I think some of the most interesting synthesizers are created by people who come from a non-musical background, and most of this book does not require a MIDI keyboard at all.
This book is written by and for explorers and experimenters. I'm not a guy who can explain the science of sound or the deep mathematical connections between all this stuff. I'm a guy who loves to experiment with code, and I hope to share my enthusiasm with you in the pages of this book.
This book is a pretty comprehensive source on basic synthesis techniques in java, but there are many websites and books that offer other perspectives on closely related material. You may find these valuable as you work through this book, or if you want to go further after reading this book.
The Computer Music Tutorial by Curtis Roads is how I first learned about synthesis. It has been the standard synthesis textbook since the 1990s. At this point, it is somewhat dated, but it still offers a reasonably comprehensive look at computer music technology.
Musimathics by Gareth Loy is an examination of the elegant math that underlies our perception of music.
Designing Sound by Andy Farnell is about using synthesizers to simulate sounds that are generated by real world objects. The code is written in Pure Data, but the concepts are valuable to anyone who wants to really understand sound synthesis.
Synth Secrets by Sound on Sound is probably the most comprehensive source on general synthesis techniques on the web. The series began way back in 1999, but the concepts are still mostly the same.
If you're more interested in hardware synthesizers, the synthesizers subreddit is very active and full of people who are passionate about synthesizing sound.
In this chapter I will walk you through how to set up your programming environment. If you haven't done this before, then this may not be particularly easy. You should reserve about an hour of free time to download and install all the different pieces of software you will need. Luckily, everything I will recommend is free, and you will only have to install everything once.
If you are already familiar with Eclipse and Java basics, then skip ahead to the section called "Hello, Beads!".
The first thing you need is a way to write Java programs. I strongly recommend Eclipse. Eclipse is an integrated development environment (IDE). That means that it can be used as the central place to write software, even if the software brings together many libraries, tools, media assets, or other things. All your code can be written in Eclipse and run with a simple press of the play button.
There are many other IDEs. Some programmers prefer NetBeans. Artists like to use Processing, which is a simplified version of Java with a built-in IDE. You are welcome to use whatever tools you prefer to write Java code. Java code is not dependent on how you write it. It simply depends on having a Java Runtime Environment (JRE)to compile and run the code.
I recommend Eclipse for several reasons. First, it is used by most companies that develop in Java. This means that the skills you learn while creating synthesizers can be transferred to real job skills when you are done. Second, it is very similar to other popular IDEs, including Visual Studio and NetBeans. So your skills with Eclipse will transfer to those environments as well. Finally, Eclipse is relatively easy to use.
Eclipse can be downloaded from eclipse.org. Download the latest version of Eclipse. As of this writing, eclipse is not distributed as an installer, rather it is distributed as a zip file. You should unzip it and put the unzipped folder wherever you install programs on your hard drive. I put mine in C:\Program Files (x86)\Eclipse.
I like to have a desktop shortcut for the programs I use frequently. Add a desktop shortcut if you like. In Windows, this can be done by right-clicking on the executable file, which should be called eclipse.exe, then clicking Send To, then Desktop. Double click the new desktop shortcut to launch Eclipse.
I am assuming you already have a JRE installed on your computer. Typically, Java programs are compiled using a Java Development Kit, which is a separate piece of software. However, any computer that can run Java programs must have a JRE, which can also be used to compile and run Java programs in Eclipse. Since most computers run Java in some way, I am assuming that Jave is already installed. If it is not, then you need to install the latest version of Java. If you search for "java download" then follow the link to java.com/download, it should provide you with an installer that will do most of the work.
At this point, if everything has gone smoothly, then when you double click the shortcut for eclipse it should prompt you for your workspace location. This is the place on your hard drive where Java code will be stored. It can be anywhere you like. Somewhere in your documents folder is fine. I like to create a separate directory for my Java code that is called "java", but this is not necessary. The only thing that is necessary is that you remember where you put your workspace. When we save and load audio files, they will be loaded by default from a path relative to your workspace.
To make sure that your installation of Eclipse is working, you need to write your first program and run it.
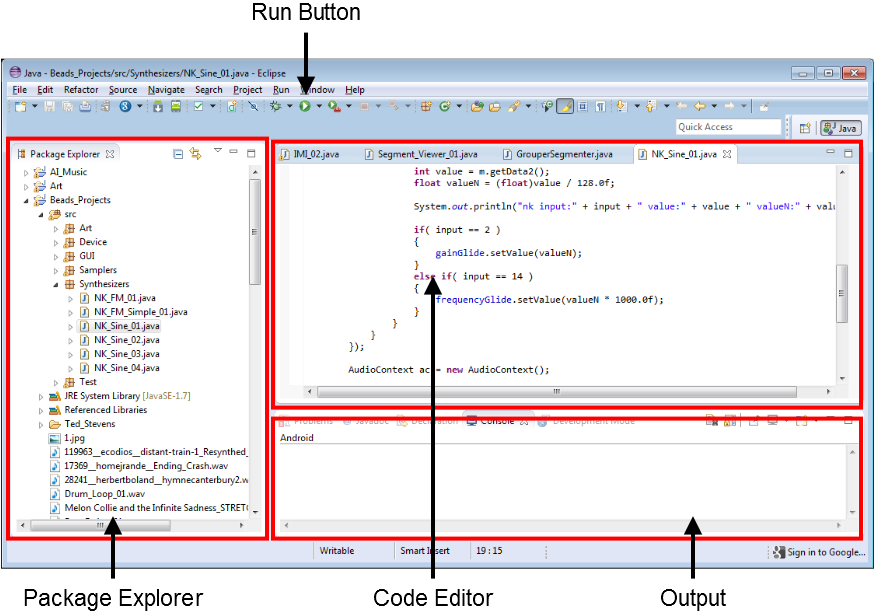
When you first launch Eclipse, it may look very intimidating. Don't worry, there are only four things on screen that really matter, and they're shown in this diagram. Even if you version of Eclipse doesn't look exactly like this diagram, it should still have these four sections.
The main parts of the Eclipse interface.
The Code Editor is the big main area of the program. It looks a bit like a tabbed version of notepad. The code editor is where you will edit code files. To create, manage, and select code files, you will use the Package Explorer on the left side. To run your programs, you will use the green run button in the toolbar at the top. It should have a play icon on it that is similar to the one on your DVR. The output from your programs will appear in the output section at the bottom, however, the output section is also tabbed. To see the output of a program, make sure you have the Console tab selected.
The Package Explorer is the only element that is complex, and encapsulates many features that you will need to use. Primarily, you should think of the Package Explorer as the place where you create new code files and organize them into hierarchical groupings.
The top level code group in Eclipse is called a Project. A project is a container for all the code that relates to one piece of software. Within each project are several packages. Packages are containers for code files that all relate to one part of the software. So if you were writing a new text editor, you might create a new project in Eclipse. Then you might create separate packages for the GUI, file management, and special features. Projects, packages, and code files are managed from the Package Explorer window. It will also be used to access the settings for your projects.
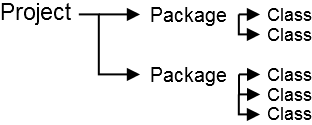
A project can have many packages. Each package can have many classes.
To create a new project, right click in the Package Explorer, then mouse over New, then click Java Project. This project will contain all of the code you create as you work through this book. Give the project whatever name you like. The project will be stored in a directory of that name, with each package in a subdirectory. My project is called "Sound_Synth_Java". Then click Finish. You should now see a folder in your Package Explorer that is labelled with your project name.
Now we need to create a package. Right click on your project and create a package called "getting_started", or something similar. We will put all the introductory code files in this package, and giving the package a descriptive name will tell you where to look for these files if you need to reference them later.
Now we will create the typical first program in any programming language, the Hello, World program.
First you must create a java file for your code. Right click on your package, then mouse over "New" and click "Class". A class is a container for code about one specific thing. In this example we will create a class called "Hello_World" that will contain all the code for our program. In the name field, enter "Hello_World", then click the checkbox below labeled "public static void main(String[] args)", then click "Finish".
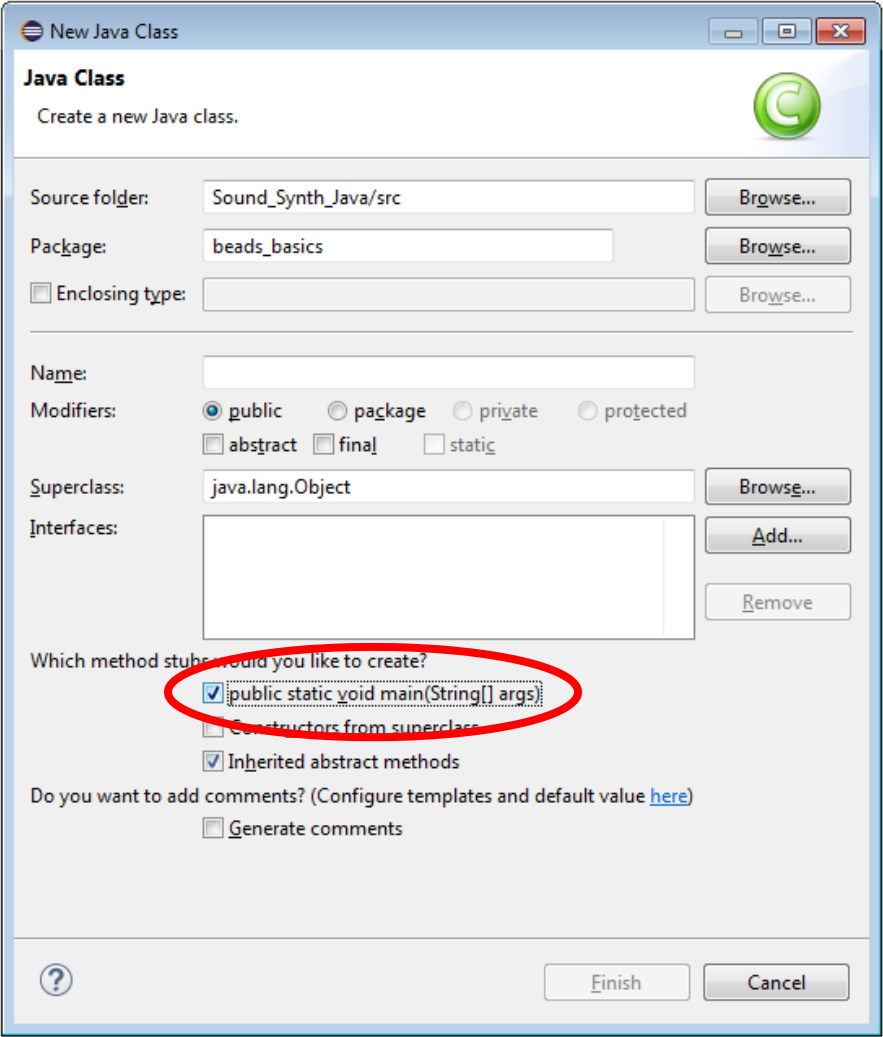
Check this checkbox to have Eclipse start the main method for you
A method is a block of code within a class that can be executed. When we clicked the checkbox for "public static void main(String[] args)" we added a method called "main" to our java file. The "main" method is the method that is run by Java when it tries to run your program. We will put our code in this method.
You only need to add the following line of code to this program.
System.out.println("Hello, World!");
This line calls a method named "println", which means print line. This method is within an object called "out" that is in a class called "System". The text enclosed in double quotes is what we tell the system to print.
Click the green run button in the toolbar at the top of the Eclipse window. If everything went right, then you should see "Hello, World!" printed in the output portion of the window.
Here is the full code listing. There should also be a package declaration at the top of your code file. Just leave that as Eclipse creates it. You can download this file online at evanxmerz.com/soundsynthjava/code/Hello_World.java.
public class Hello_World
{
  public static void main(String[] args)
  {
    System.out.println("Hello, World!");
  }
}
Congratulations on writing your first Java program! If you hit a bump in the road, don't be discouraged! There are always answers on the web. Your first step should always be to use a search engine to search for the error you are getting. Usually that will point you to a website like StackOverflow, where someone has answered a similar question in the past.
So far you've taken the steps necessary for writing general purpose programs in Java, but you haven't done anything related to making sound. Unfortunately, the Java library doesn't contain great resources for synthesizing sound, so we must turn to an external library. Beads is a fantastic option, and it is the topic of this book, but there are other mature sound synthesis libraries for Java, including JSyn.
Go the Beads website at http://www.beadsproject.net/ and click the link under "Downloads" that says "Beads Library". Unzip the file, then copy the "beads" folder into a memorable place on your hard drive. I put it in my "java" folder. Make sure you remember this directory, as you will need to browse to it in the next step.
Next we need to link the Beads library to your project in Eclipse. Back in Eclipse, right click on your project, then click "Properties". Select "Java Build Path" then click on the button labelled "Add External JARs". A JAR file is a Java library. Browse to where you installed beads, then click on the "library" folder. You may only need one or two of these files, but I typically hold shift to select them all, then click "Open". Then click "OK" at the bottom of the "Java Build Path" window. Now your project knows how to find the Beads library on your hard drive.
Now we will build a short program using Beads to make sure that everything is working. Right click on your package, mouse over "New" then click "Class" and name it "Hello_Beads". Make sure to click the checkbox below to add the main method, then click "Finish".
In the code editor, add the following four lines to your main method where we added the call to println in the Hello, World program.
AudioContext ac = new AudioContext();
WavePlayer wp = new WavePlayer(ac, 440.0f, Buffer.SINE);
ac.out.addInput(wp);
ac.start();
It's okay if you don't understand exactly what's going on here. We will go over it in the next chapter. After you've entered these lines, use the keyboard shortcut Ctrl+Shift+O. This shortcut will automatically add the links to the Beads library that are necessary to run the program. After doing this, my final code listing looks like this, plus a package declaration at the top that I've left out.
import net.beadsproject.beads.core.AudioContext;
import net.beadsproject.beads.data.Buffer;
import net.beadsproject.beads.ugens.WavePlayer;

public class Hello_Beads
{
  public static void main(String[] args)
  {
    AudioContext ac = new AudioContext();
    WavePlayer wp = new WavePlayer(ac, 440.0f, Buffer.SINE);
    ac.out.addInput(wp);
    ac.start();
  }
}
For each example in this book, I've included a link to download the file online, but I encourage you to type the code in yourself. Going through the code line by line and typing it in will help you understand exactly how all the parts come together to form the whole. You can download this file online at evanxmerz.com/soundsynthjava/code/Hello_Beads.java.
When you run this program, you should hear a tone generated by your speakers. If you don't, first check to see that your speakers are on and connected. If that doesn't work, then start searching the web for the error message you are getting.
Note that this program will generate this tone endlessly unless you stop it. To stop execution of your program, click the red square stop button right above the output portion of Eclipse.
Remember, if you have any problems along the way, you can post your question to the Beads community, The Beads mailing list is probably the best place to look for help http://groups.google.com/group/beadsproject. That list is monitored by myself, beads creator Ollie Bown, and many other Beads contributors.
Before we can start creating sound, we need to know a little bit about it. Specifically, we need to know how sound is represented on a computer. In this chapter I will go over the basics of digital sound. The concepts in this chapter are vital to understanding digital synthesis.
If a tree falls in the forest, and nobody is around to hear it, does it make a sound?
No.
Sound is a sensory phenomenon. Sound is an internal representation created by our brains in response to auditory stimuli. When a tree falls in the forest, it generates vibrations in the air. The tree bumps into air molecules, which bump into other air molecules, and so on until some vibrating air molecules hit our ears. When these vibrations hit our ears, they are turned into an electrical signal which is then interpreted by our brain and turned into something we can understand: sound.
So when a tree falls in the forest, it certainly makes vibrations in the air. If no creature is around to hear it though, it does not make any sound.
Sound is our way of making sense of the world. Vibrating air molecules relay information that is important to our survival. If the air vibrates chaotically, like the crashing of a giant redwood tree, then we become afraid and move away from the sound. If the air vibrates in a regular pattern, then we hear musical tones, and interpret those human-made sounds as inviting or relaxing or thrilling.
As synthesizer programmers, our job is to mold the vibrations into something that we like. Maybe you want to generate a wall of chaotic noise, or maybe you want to simulate the sound of an orchestra. But before we can get to that, we need to know what sounds looks like in digital form, and how it gets into that form.
A transducer is a piece of equipment that converts one form of energy into another. In sound synthesis, the two transducers we commonly use are microphones and loudspeakers. Microphones convert vibrations in the air into a continuous electrical voltage. The voltage oscillates analogously to how the air oscillates, which is why we call it an analog signal. If you were doing analog synthesis, then this would be the complete signal path into your machine. In digital sound, however, the analog signal is passed through an analog to digital converter, or ADC. The ADC essentially transcribes the voltage at regular intervals. It converts the voltage to a single number that varies over time, and samples this number very quickly. In fact, a typical ADC transcribes the voltage at least 44,100 times per second.
A young human can hear sounds with frequencies up to around 22kHz. In other words, a young human can perceive sounds that oscillate 22,000 times per second. In order to represent vibrations up to that frequency, a digital audio file must contain at least 44,100 numbers per second of audio. This may sound like a lot, but it pales in comparison to the billions of operations per second that can be executed by a typical microprocessor.
After the ADC does its job, the audio is represented as a long series of numbers. These numbers can be stored on the hard drive in a format such as WAV audio, or they can be modified using digital signal processing techniques, or they can be played and turned into sound again.
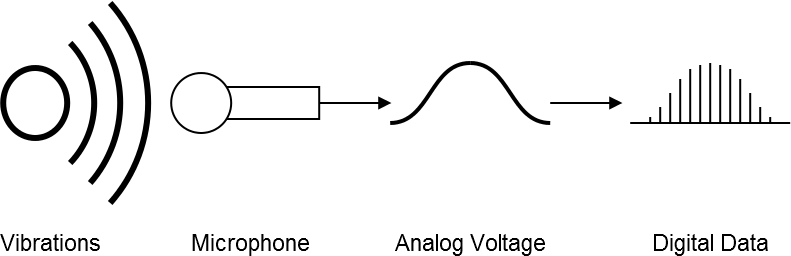
The process of converting vibrations in the air into a digital signal
To convert a digital audio signal into sound again, the process is simply reversed. The digital sound goes through a digital to analog converter, or DAC. This converts the numbers into a continuous voltage by interpolating between each number. The voltage is then sent to a loudspeaker, which is essentially just a much larger dynamic microphone.
It is easy enough to generate data that can be turned into sound. You could use any equation you like, stock prices, temperature readings, or anything else that generates numerical data. These techniques, however, mostly result in noise. The problem in synthesizing sound is generating numbers that are interpreted in a targeted way. So most of this book is about recipes for generating sound that is aesthetically pleasing to humans.
Sound can be represented in two different ways, the time domain, and the frequency domain. The time domain is the form in which sound is stored in an audio file. It represents changes in sound pressure levels over time. A graph of sound in the time domain is called a waveform. A waveform is useful as a way of storing audio data, but it isn't very revealing to most viewers, unless it is very simple.
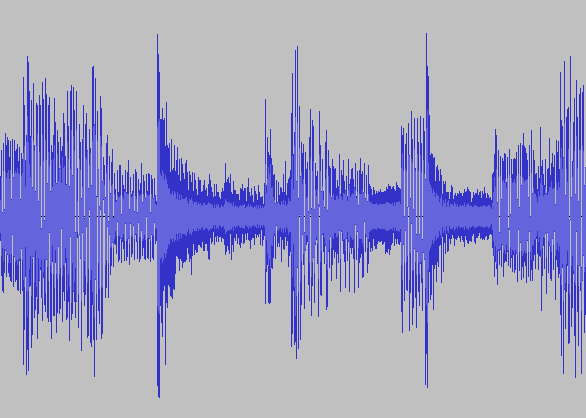
A waveform representation of a short segment of music
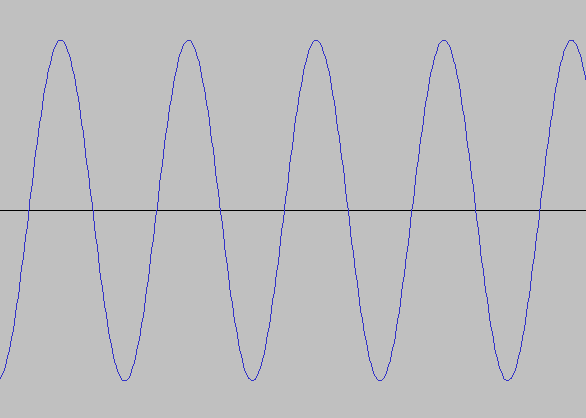
A waveform representation of a sine wave
A graph of sound in the frequency domain is called a spectrogram, or just a spectrum. It represents the frequencies that are present in a sound. Spectrograms will be used often in this text to show the frequencies in a synthesized sound. Most synthesized sounds have distinct peaks in the spectrum that reveal the frequencies that give the sound its unique timbre.
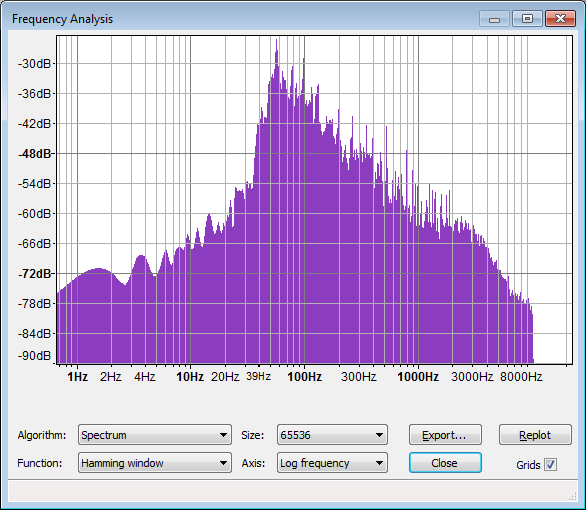
A spectral representation of a short segment of music
A spectral representation of a sine wave
In this chapter, I cover the basic concepts of building digital synthesizers. I explain the AudioContext, WavePlayer, and Gain classes, which are fundamental to any Beads synthesizer.
The concept of the unit generator is a vital concept to all computer music paradigms. Max, Pure Data, Super Collider, Nyquist, Reaktor, Tassman, and even many standalone synthesizers build sounds using unit generators. Unit generators are building blocks of an audio signal chain. A single unit generator encompasses a single function in an audio synthesis or analysis program.
A unit generator is a bit like a software version of a module in a modular synthesizer. A modular synthesizer has modules for generating tones, filtering out certain frequencies, and changing the gain. Analogous unit generators exist in the Beads library.
Software unit generators were pioneered by Max Mathews in the late 1950s with the Music-N computer music languages. At the time, Mathews was digitizing sound in order to study call clarity in the Bell telephone network. He created software for analyzing phone calls, and as a side project, he wrote the Music-N languages for creating computer music.
Unit generators were not an entirely new concept. Even Ada Lovelace recognized the importance of modularity in computation when she envisioned subroutines in the 19th century. Unit generators can be thought of as subroutines that take input, do something to it, then send the results out of their outputs. The input data can be audio data or control data. Audio data is music or sound. Control data is numerical information.

A unit generator
Guitarists are also familiar with the concept of unit generators, but they just refer to them as guitar pedals or effect pedals. For instance, on a delay pedal, a guitarist plugs his guitar into the input, then plugs the delay output into his amplifier. After he turns the knob to the delay time desired, he can play his guitar through the delay pedal. The knobs are the control inputs, while the guitar cables send analog audio data to and from the pedal.
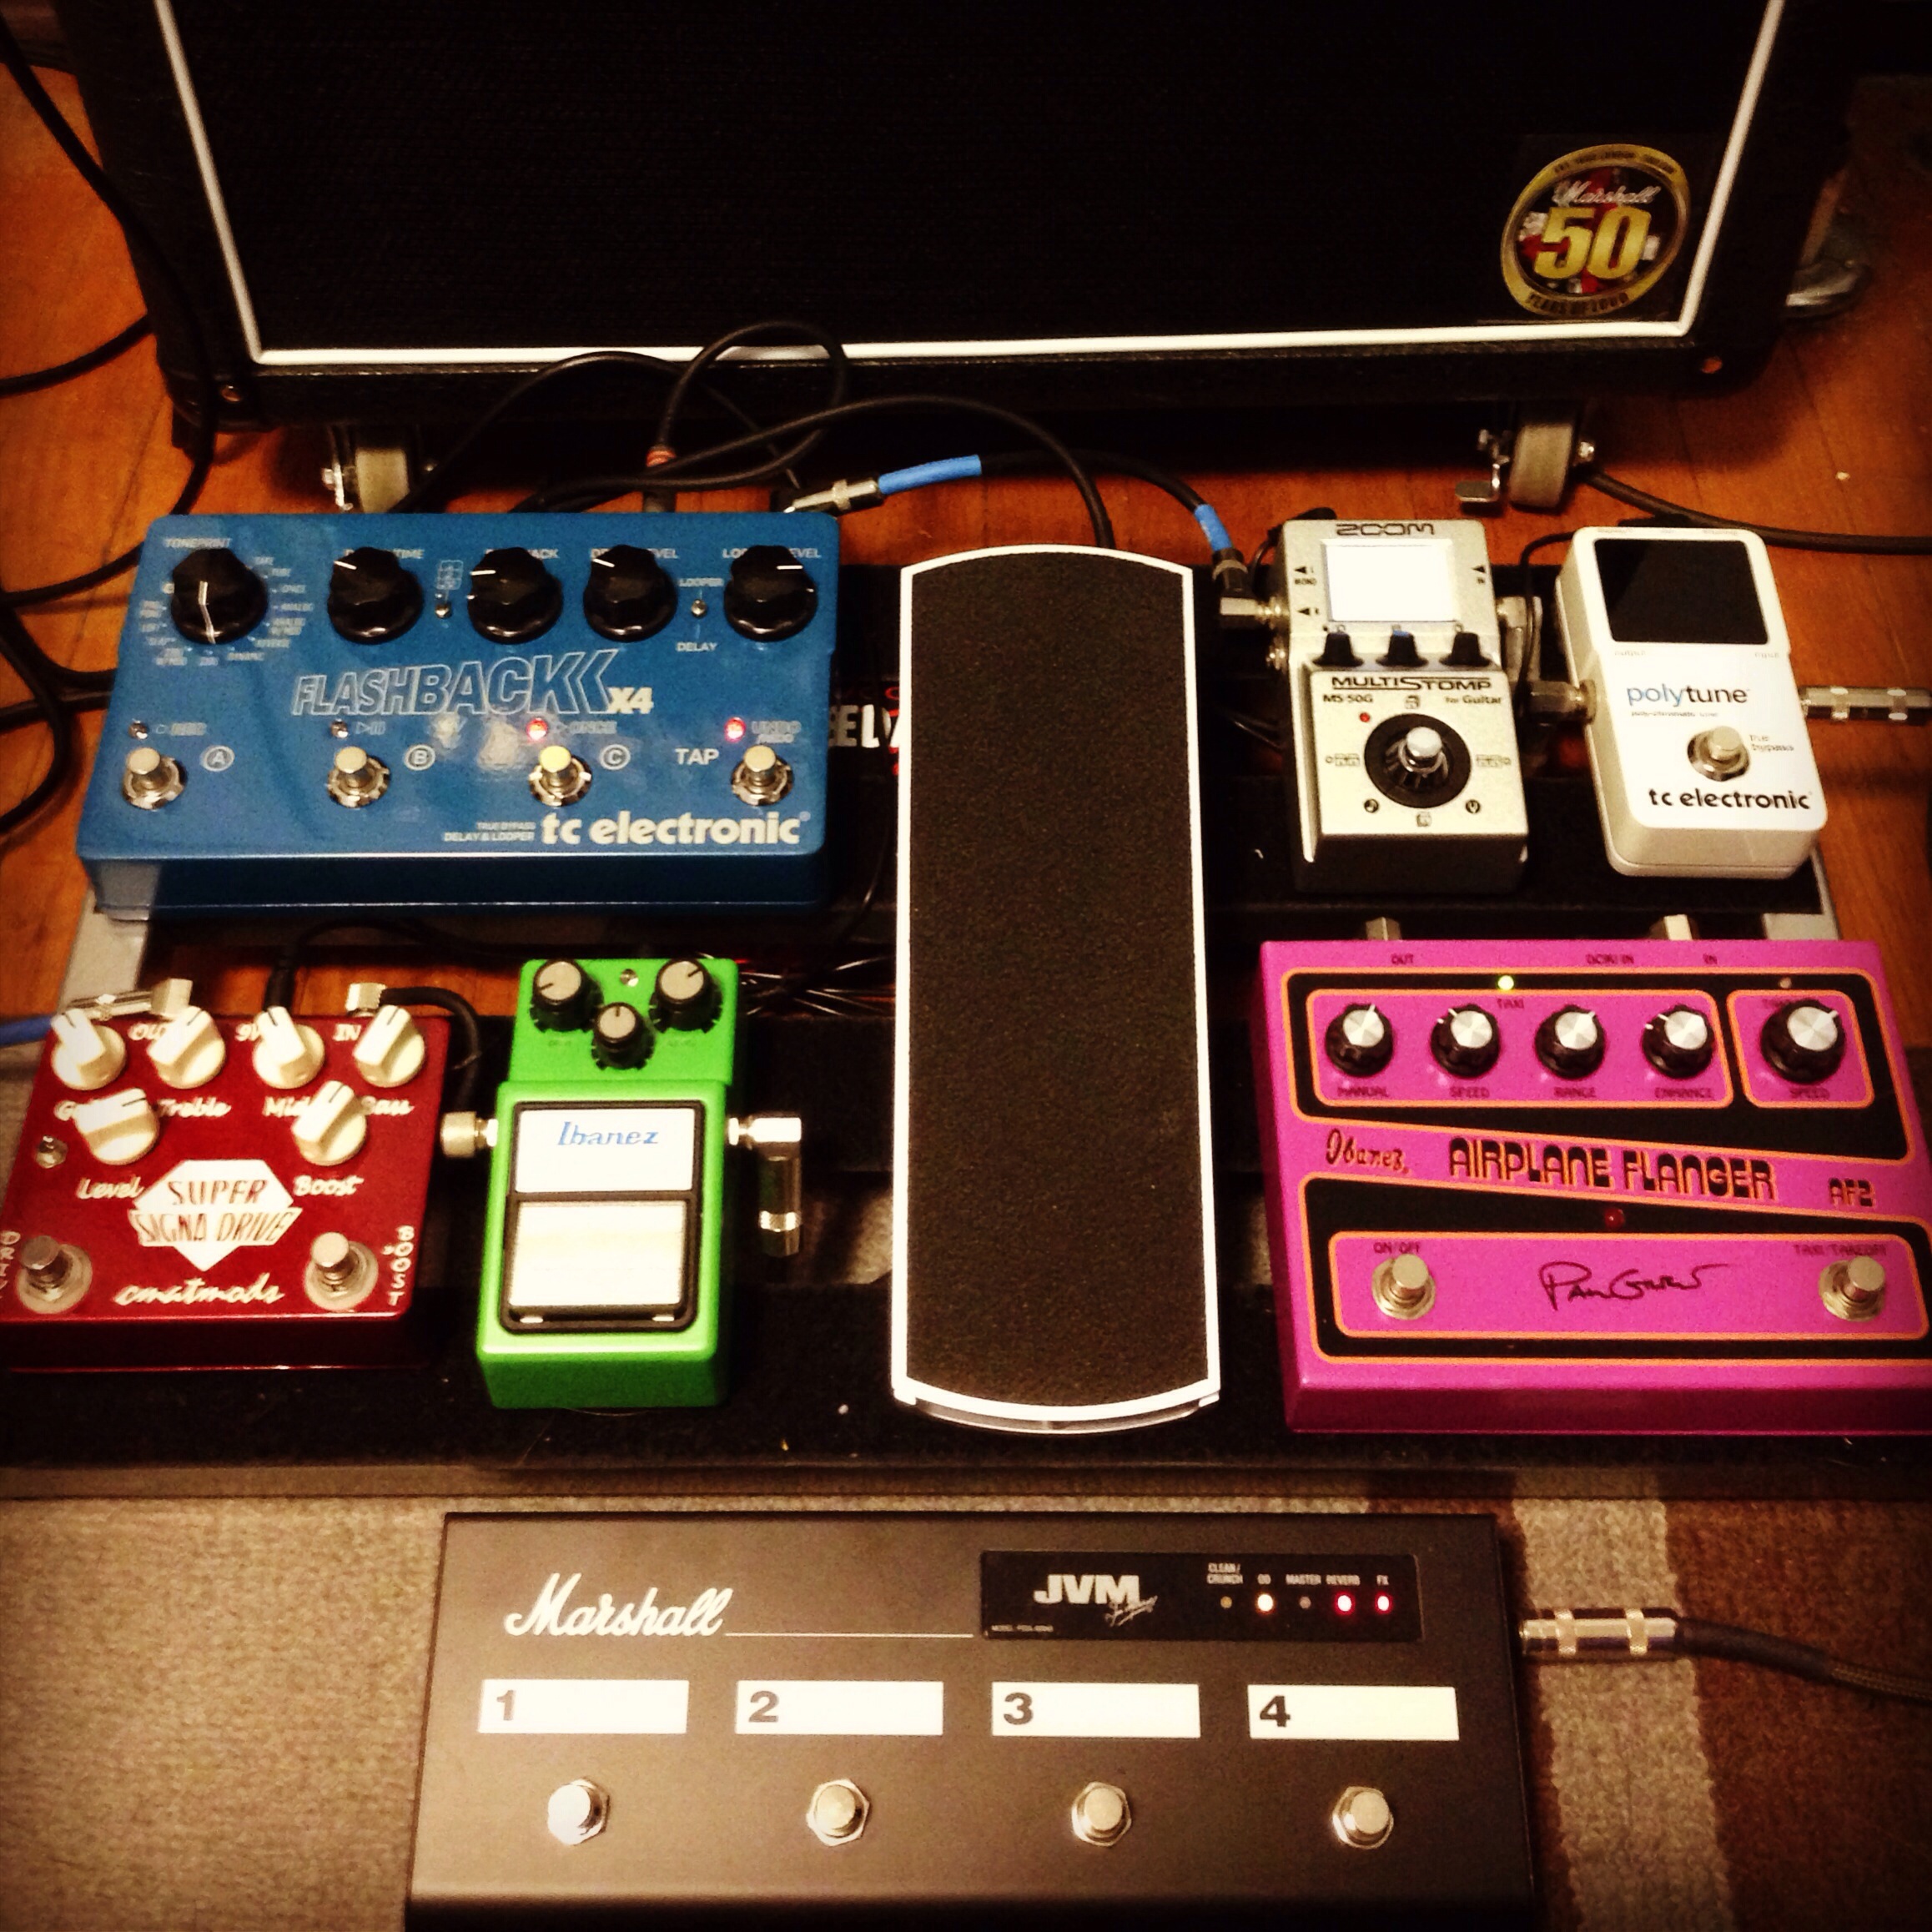
Effect pedals from Wikimedia Commons
Synthesizers are constructed in Beads using a series of unit generators. By plugging one unit into the next, we can create complex sound processing routines without having to understand all the underlying math. Everything in the Beads library is encapsulated into unit generators, which are referred to as beads.
The core of the Beads library is the AudioContext class. You will create one AudioContext object for each Beads program. It manages the audio format, and communicates with the sound card using an attribute called "out" that is the master output.
An AudioContext can be created using the AudioContext constructor. The constructor creates a connection to the computer's audio hardware, allocates memory for audio processing, and manages the audio processing threads.
ac = new AudioContext();
Audio processing can be started by calling the start routine.
ac.start();
The AudioContext on its own doesn't create any sound. The AudioContext sends audio data to the speakers, but before it can do that, your software must send some audio into the AudioContext.
In the "Hello, Beads" program you instantiated an instance of the WavePlayer class using the following line of code.
WavePlayer wp = new WavePlayer(ac, 440.0f, Buffer.SINE);
Then you connected it to the AudioContext with the following line. This line directs output from the WavePlayer to the AudioContext, and on to the speakers connected to your computer. The addInput method can be called on any UGen that accepts input.
ac.out.addInput(wp);
When you ran the program, you heard a tone. The tone you heard is called a sine wave. The WavePlayer class is a tone generator. It is capable of generating tones at various frequencies using several different waveforms. A waveform is just a short buffer of audio data. If drawn as a graph, the waveform reveals a characteristic shape that determines the timbre of the resulting tone. A sine wave is called that because the waveform is a graph of a the sine function, oscillating smoothly between evenly spaced peaks and troughs.
The WavePlayer constructor specifies three arguments. The first argument is the AudioContext object that manages audio output. The second argument is the starting frequency of the WavePlayer. The frequency is passed as a float, which is less precise than a double, but uses only half the memory. Because it is a float, you must append "f" to indicate that the value is not a double. The third argument is the waveform. Built-in options for the waveform include Buffer.NOISE, Buffer.SAW, Buffer.SINE, Buffer.SQUARE, and Buffer.TRIANGLE.
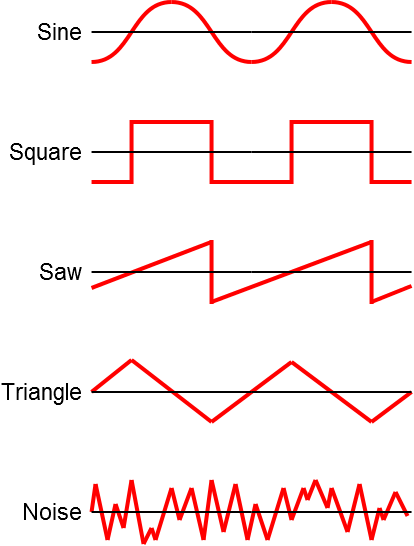
Waveforms that are available in the Buffer class.
If you wanted to create a WavePlayer to generate a square wave at 100Hz, you would use the following line of code.
WavePlayer wp = new WavePlayer(ac, 100.0f, Buffer.SQUARE);
Since Beads is open source software you can create any buffers you like and pass them to a WavePlayer. To do so, you must extend the BufferFactory class.
The "Hello_Beads" example generates a sine wave oscillating at 440Hz. It is connected directly to the AudioContext. This is fine for an example, but typically we need to control the gain, or loudness, of each unit generator in a program. To do that, we will use the Gain class.
The Gain object can be inserted between unit generators to control the volume of the signal passed between them. Gain objects are instantiated with a constructor that has three parameters. The first parameter is the master AudioContext for the program. The second parameter is the number of inputs and outputs for the gain object. This will usually be 1. The third parameter is the starting value of the Gain object.
In this line of code, a Gain object is instantiated with one input at a starting volume of 0.2, or 20%.
Gain g = new Gain(ac, 1, 0.2f);
Typically, to connect the audio output from one unit generator into the audio input of another unit generator, you will use the addInput method. In the "Hello_Beads" example, we used the addInput method to connect the WavePlayer directly to the AudioContext. To connect a WavePlayer, wp, to a Gain object, g, we call the addInput method on g, passing wp as an argument. Then we connect the Gain to the AudioContext using a call to the addInput method on the AudioContext.out object.
g.addInput(wp);
ac.out.addInput(g);
A volume at a fixed value is not particularly useful. We would like the components in our synthesizers to change in loudness over time. The Glide class is used to smoothly interpolate a parameter from its current value to a new value over a set period of time. The javadoc for Glide says that it "ramps between given values over a given duration." A Glide can be used to control the volume of a Gain object, or the frequency of a WavePlayer, or almost any other synthesis parameter.
The Glide constructor takes three arguments. The first argument is the master AudioContext instance for the program. The second argument is the start value of the Glide. The third argument is the glide time. The glide time is how long it should take to interpolate to the next value in milliseconds.
The following Glide instance will start at 0.0f, then take 100 milliseconds to glide to a new value.
Glide g = new Glide(ac, 0.0f, 100.0f);
To ramp the Glide to a new value, call the setValue method with the new value as an argument.
g.setValue(1.0f);
So to create a new Glide and ramp to 1.0f over 1000ms, we could use the following two lines.
Glide g = new Glide(ac, 0.0f, 1000.0f);
g.setValue(1.0f);
The following graph shows how the parameter would change over time. In the next section I will show you how to connect a Glide object to a synthesis parameter.
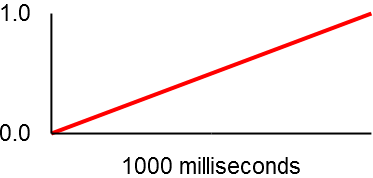
Gliding from 0 to 1 over 1000ms
Before creating this program, I created a package called "beads_basics". I will use this package to organize all the code I write for this chapter. This chapter will only contain a single example, but it will be useful if you organize the code in each upcoming chapter into its own package. This way you will know how to find each example.
I called this program "Glide_Example". It builds on the "Hello_Beads" example but adds gain control using a Glide object. Here is the code for the example. All of this code should go in the main method.
  // create an AudioContext
  AudioContext ac = new AudioContext();

  // create a sine generator
  WavePlayer sine = new WavePlayer(ac, 440.0f, Buffer.SINE);

  // create a Glide to control the gain - give it 5000ms ramp time
  Glide gainGlide = new Glide(ac, 0.0f, 5000.0f);

  // create a Gain to control the sine volume
  Gain sineGain = new Gain(ac, 1, gainGlide);

  // add the sine generator as an input to the Gain
  sineGain.addInput(sine);

  // add the Gain as an input to the master output, ac.out
  ac.out.addInput(sineGain);

  // begin audio processing
  ac.start();

  // ramp the gain to 0.9f
  gainGlide.setValue(0.9f);
You can download this file online at evanxmerz.com/soundsynthjava/code/Glide_Example.java, although I encourage you to type it in by hand.
I left the comments in this file to show the purpose of each line. The new code deals with the Glide and the Gain. The Glide is instantiated first, then it is passed into the constructor for the Gain object. Recall the arguments for the Gain constructor. The first argument is the AudioContext, the second is the number of inputs, and the third is the starting gain value.
Glide gainGlide = new Glide(ac, 0.0f, 5000.0f);
Gain sineGain = new Gain(ac, 1, gainGlide);
By replacing the starting gain value with another unit generator, we tell the program that the unit generator passed in as an argument should control that value. So in this case, the gain value is controlled by the Glide object called gainGlide.
In this section I'm going to introduce additive synthesis, and show you how to build additive synthesis tones using Java and Beads.
In 1807, Jean-Baptiste Joseph Fourier published a theorem that is now known as the Fourier Theorem. Fourier showed that any continuous function can be broken down into a sum of sine waves. In other words, by using sine waves as building blocks, we can build up any continuous signal, such as a sound wave, no matter the complexity of the sound.
This result makes intuitive sense. A sine wave is a wave that oscillates at a single frequency. It is a very simple sound. It is only natural that complex sounds such as musical instruments, or speech, can be made up of many simple sounds.
Additive synthesis is any type of sound-generating algorithm that combines sounds to build more complex sounds. Some forms of additive synthesis may combine elemental tones such as sine, square, and triangle waves. Other forms of additive synthesis combine more complex building blocks, such as fragments of recorded audio. Some form of additive synthesis can be found in most synthesizers. Further, additive synthesis is an old concept that has been used by humans for millenia.
The earliest additive instruments are the pipe organs from the middle ages. When air is routed through a pipe organ, each pipe generates a different set of frequencies. By pulling various register stops, the organist can create additive timbres that add the sounds of multiple pipes. This concept was electrified in Thaddeus Cahill's Telharmonium in the early 20th Century, then refined in Hammond Organs. Today, additive synthesis is everywhere, and although additive techniques have taken a backseat to other synthesis techniques, they're still an important part of our synthesis toolbox.
In fact, you can make simple additive synthesis tones using an audio editor such as Audacity. Open Audacity, then click the "Generate" menu, then click "Tone". This will present you with options for generating basic tones such as sine waves. Select "Sine", enter "440" for frequency, and "0.5" for amplitude. Make sure the duration is greater than zero and click "OK". Then repeat the process for a sine wave at 880Hz. Now you should have two audio tracks in Audacity with two separate sine waves. When you click the play button, you should hear the combination of the two tones. If you click "Tracks" then "Mix and Render", then you will get a new track that is the combination of the previous tones. You've just done additive synthesis manually! The new track should look something like the third track shown here, when you zoom in all the way.
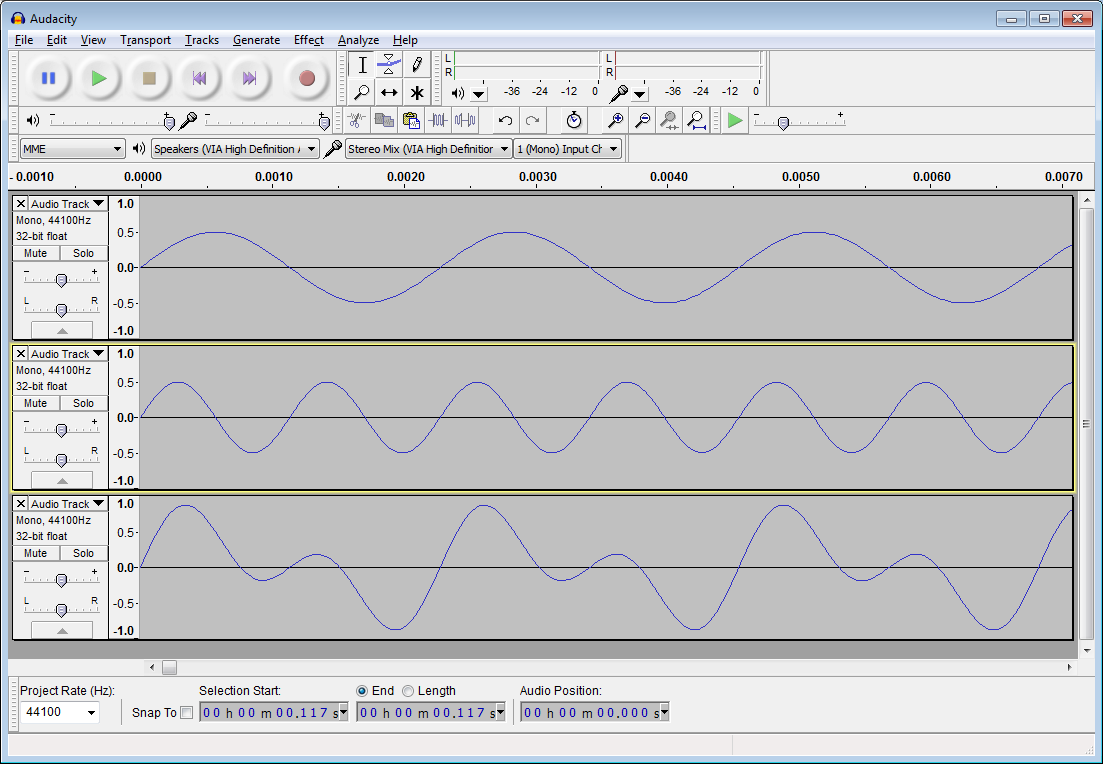
Additive synthesis in Audacity
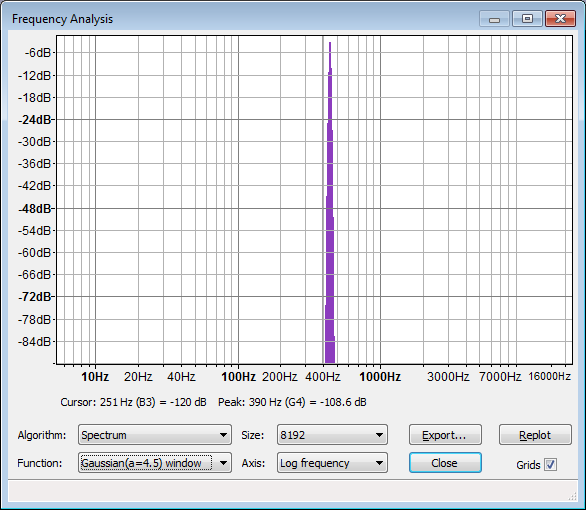
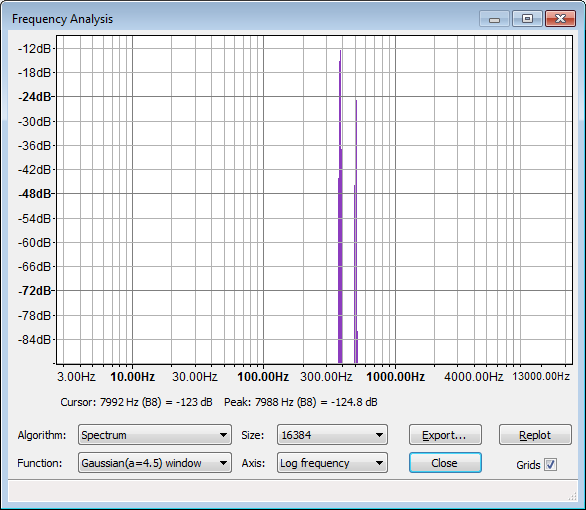
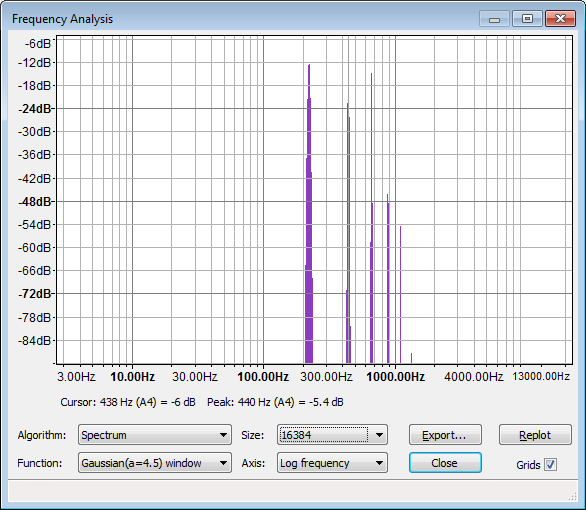
You can also use Audacity to analyze the sound you've generated. Click "Analyze", then "Plot Spectrum". This should open up a graphic that looks something like the following image.

Frequency spectrum of an additive synthesis tone
Notice that the spectrum has two peaks. These peaks occur at 440Hz and 880Hz respectively. There may seem to be some additional frequencies present in the sound, but this is a side effect of the accuracy limit of frequency analysis. An additive tone only has the frequencies that are put into it. So if you combine sine waves at 440Hz, 880Hz, 1000Hz, and 1200Hz, then the resulting sound will be a combination of only those four frequencies.
For this reason, you may choose to use more complex sounds as base sounds. Other waveforms such as triangle, saw, or square, contain more frequencies than the one that is present in a sine wave. Either way, it's important to know that when using additive synthesis you can only every get out the components that you put into a sound.
When combining elemental sounds such as a sine waves, some combinations sound harmonious, while others sound dissonant. This is a result of the human perceptual apparatus, but it also embodies a nice mathematical relationship between the frequencies in a sound.
In synthesis terms, the lowest audible frequency in a sound is called the fundamental frequency. When you press a key on a piano, or play a pitch on a violin, the pitch you play is identified by its fundamental frequency. For instance, A440 is the A that has a fundamental frequency of 440Hz, and serves as the standard for tuning western musical instruments. We identify any pitch at 440Hz as an A, but 440Hz isn't the only frequency present in any natural instrumental sound. Other frequencies are added to the sound based on the way the sound was generated, and where it was generated.
The other frequencies in a sound are called partials. Partials can be harmonic or inharmonic. If the frequency of a partial is an integer multiple of the fundamental frequency, then it is called a harmonic partial, or just a harmonic for short. If the frequency of a partial is not an integer multiple of the fundamental frequency, then it is an inharmonic partial. For example, a tone at 880Hz would be a harmonic partial relative to the fundamental frequency at 440Hz. A tone at 700Hz would be an inharmonic partial.
Harmonic partials tend to sound pleasing, while inharmonic partials tend to sound grating. Harmonic partials also tend to blend with the fundamental frequency, while inharmonic partials are sometimes perceived as separate sounds. We can demonstrate this by building an additive synthesizer that plays two sine waves, and setting them to harmonic or inharmonic intervals.
The following code shows the simplest additive synthesizer that I could create. It simply instantiates two WavePlayers and connects them both to output. I set the frequencies at 440Hz and 880Hz, a harmonic ratio of 1:2. With those settings, the sounds may seem to merge into one tone. Try setting the second WavePlayer to 620Hz, or another non-integer ratio, and listen to the resulting timbre.
AudioContext ac = new AudioContext();

// create the first WavePlayer and connect it to the output
WavePlayer wp1 = new WavePlayer(ac, 440.0f, Buffer.SINE);
ac.out.addInput(wp1);

// create the second WavePlayer and connect it to the output
WavePlayer wp2 = new WavePlayer(ac, 880.0f, Buffer.SINE);
ac.out.addInput(wp2);

ac.start();
You can download this code online at evanxmerz.com/soundsynthjava/code/Two_Tones.java.
The following diagram shows how the unit generators are connected in this additive synthesis example.

Unit generators in the additive synthesis patch
You might notice that there is no object that does the additive synthesis in this example. The sine waves are actually summed by the ac.out object. By simply routing both WavePlayer unit generators into the same output, we can combine the signals and create an additive tone.
With the power of Java, Beads, and a modern computer, we are not limited to merely two sine waves. An additive synthesizer in Beads can contain an arbitrary number of WavePlayers up to several hundred before memory and processing time start to become an issue.
In this example I replaced the two WavePlayer objects with an array of type WavePlayer. I also created an array of type Gain. Then I used a loop to instantiate each WavePlayer, connect it to its Gain, then connect the Gain to the main output.
The frequency of each WavePlayer is a multiple of the fundamental frequency. This is done purely out of convenience. You could use any equation you like to set the frequency on each WavePlayer, or you could unroll the loop and hard code each frequency.
With the "count" variable I set the number of WavePlayer objects to ten, but you should experiment with this number. How many WavePlayer objects can you instantiate before the program stutters or crashes?
AudioContext ac = new AudioContext();

// set the number of WavePlayers
int count = 10;

// initialize the arrays
WavePlayer[] wp = new WavePlayer[count];
Gain[] g = new Gain[count];

// use a loop to set up each WavePlayer
for( int i = 0; i <: count; i++ )
{
  // create the WavePlayer and the Gain - use math to set frequence / volume
  // try changing Buffer.SINE to Buffer.SQUARE
  wp[i] = new WavePlayer(ac, 440.0f * (i+1), Buffer.SINE);
  g[i] = new Gain(ac, 1, 1.0f / (i+1));

  // connect the WavePlayer to the Gain, and the Gain to ac.out
  g[i].addInput(wp[i]);
  ac.out.addInput(g[i]);
}
ac.start();
You can download this code online at evanxmerz.com/soundsynthjava/code/WavePlayer_Array.java.
Additive synthesizers are very easy to create. Due to their simplicity, additive synthesis is widely implemented in some form in most synthesizers. Still, the tones generated in the previous examples sound pretty rudimentary. At this point we're still missing a lot of tools in our toolbox. In the next few chapters we will look at some tools that will improve all of our synthesizers.
Building synthesizers that play one tone at a set frequency is not particularly useful. We would like to trigger our synthesizers in a more natural way, using a digital instrument like a piano keyboard, or a dj controller with knobs, sliders, and buttons. In this chapter I'm going to introduce MIDI, and show how you can trigger your synthesizers using MIDI device code that I've already created.
MIDI, which is pronounced like city, stands for Musical Instrument Digital Interface. It was created in the early 1980s to allow devices to exchange information relating to a musical performance. For example, a pianist might want the keyboard to send the key presses to a synthesizer which will generate sound in response. Devices can exchange musical information in real time by sending and receiving MIDI events using MIDI cables, or MIDI events can be stored in a MIDI file for later use. Most modern MIDI devices also support MIDI emulation using a more common USB connection.
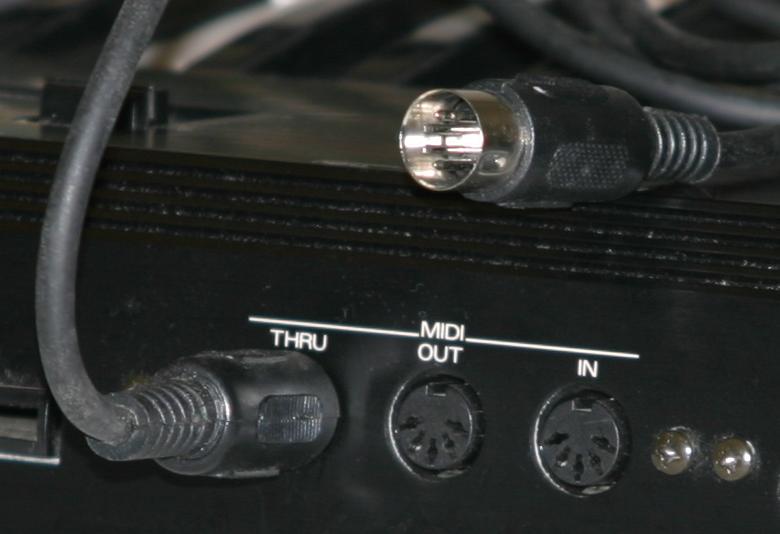
Midi ports and cable from Wikimedia Commons
The Java library contains a number of classes that make accepting live MIDI input a bit easier. These classes include MidiDevice, MidiMessage, MidiSystem, Receiver, ShortMessage, and Transmitter. All of these classes can be found in the javax.sound.midi package.
Unfortunately, this code can be rather cumbersome, and since it's a distraction from our real task of writing synthesizers, I will provide classes that should make MIDI input even easier. These classes are long, so the full code listings can be found in the appendix, or online at MidiKeyboard.java, MidiKeyboardConfigure.java, MidiController.java, and MidiControllerConfigure.java. The MidiKeyboard class wraps around a keyboard type MIDI device that sends note on and note off events. The MidiController class wraps around input from a MIDI device that sends controller events such as knob and slider movement. These classes may not be perfectly suitable for your device, but using the configure programs, you should be able to do what is needed for the exercises in this book.
Start by copying the classes from the appendix or by downloading the files from the web. Remember, each class must go into a file with the same name as the class. Copy them into whatever package you are using, and don't forget to add a package declaration to the top of each file if you aren't using the default package. Once that is done, you should be able to use each class like any other class in Java.
If you created the classes correctly, then you should be able to run the program in MidiKeyboardConfigure.java. Connect your MIDI keyboard, then run that program. It will prompt you for the device you'd like to use for keyboard input. Enter the number of the device then press enter. This will save a configuration file into your user directory that will be used whenever you instantiate an object of type MidiKeyboard.
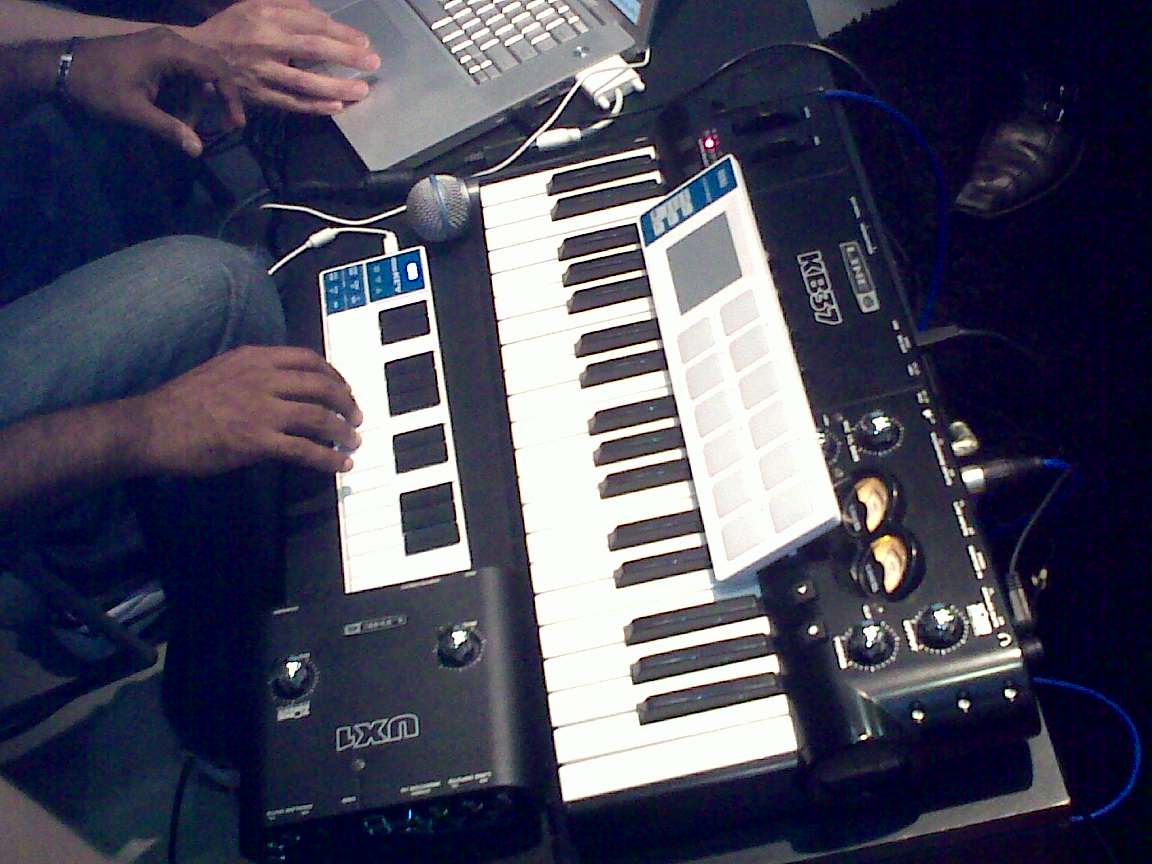
Midi devices from Wikimedia Commons
To receive MIDI input in your program you need to instantiate an object of type MidiKeyboard. Since you ran the configuration program to select your MIDI device, it will automatically know which device to look at for keyboard input.
In this example we will create a simple single oscillator synthesizer that responds to key presses by changing the pitch and gain of that oscillator. Start with the glide example from an earlier chapter. Copy it into a new file called Hello_Midi.java.
Start by modifying the program to take it out of a static context. When objects are used in a static context, they are not instantiated. This means that they do not have access to any instance variables. In this program we want to instantiate several objects and use them in various methods, so we will need to instantiate our program.
I took the variable declarations out of the main method and moved them into the class itself. This makes them instance variables. Then I moved all the code from the main method into a method called "setup". In the main method I simply instantiated an instance of the program and called the setup method. At this point, your program should look something like this.
  WavePlayer sine;
  Gain sineGain;
  Glide gainGlide;

  public static void main(String[] args)
  {
    Hello_Midi synth = new Hello_Midi();
    synth.setup();
  }

  // construct the synthesizer
  public void setup()
  {
    AudioContext ac = new AudioContext();

    sine = new WavePlayer(ac, 440.0f, Buffer.SINE);

    // set up the Gain and Glide objects and connect them
    gainGlide = new Glide(ac, 0.0f, 50.0f);
    sineGain = new Gain(ac, 1, gainGlide);
    sineGain.addInput(sine);
    ac.out.addInput(sineGain);

    ac.start();
  }
Before we can handle key presses, we need to be able to do something with those key presses. When a key is pressed, our program will receive the midi pitch number of the key that was pressed. Our program needs to convert that number into the frequency at which our oscillator should oscillate. To do this, I added a method called pitchToFrequency that applies a conversion equation I found online.
  private float pitchToFrequency(int midiPitch)
  {
    /*
     *  MIDI pitch number to frequency conversion equation from
     *  http://newt.phys.unsw.edu.au/jw/notes.html
     */
    double exponent = (midiPitch - 69.0) / 12.0;
    return (float)(Math.pow(2, exponent) * 440.0f);
  }
Converting the frequency is not enough though. When a key is pressed the program should set the frequency of the oscillator, then raise the volume. When a key is released the program should turn the volume back to zero. This is encapsulated in the keyDown and keyUp methods shown here.
  public void keyDown(int midiPitch)
  {
    if( sine != null && gainGlide != null )
    {
      sine.setFrequency(pitchToFrequency(midiPitch));
      gainGlide.setValue(0.9f);
    }
  }

  public void keyUp(int midiPitch)
  {
    if( gainGlide != null )
    {
      gainGlide.setValue(0.0f);
    }
  }
Finally, we need to actually connect MIDI events to these methods. Our program will create an instance of the MidiKeyboard class, then handle the events that are created whenever a key is pressed or released. In the MidiKeyboard class I coded these events as ActionEvents. An ActionEvent is a generic event that can be defined by the context of use. All we need to do is write an ActionListener that will listen for key presses and respond to them.
I created an anonymous ActionListener implementation that responds to key presses by calling the keyDown and keyUp methods. It's okay if you don't understand some of what is going on here. Copy the code into the setup method and try to get it working. There are a lot of resources online relating to events, listeners, and anonymous classes in Java. I encourage you to look up some of these resources and read them if you have a chance. However, most of the code will relate to building graphical user interfaces, so it will be very different from what we are doing here.
The following code shows how to instantiate a MidiKeyboard object and add an ActionListener that will handle keyboard input.
    // set up the keyboard input
    MidiKeyboard keys = new MidiKeyboard();
    keys.addActionListener(new ActionListener(){
      @Override
      public void actionPerformed(ActionEvent e)
      {
        // if the event is not null
        if( e != null )
        {
          // if the event is a MIDI event
          if( e.getSource() instanceof ShortMessage )
          {
            // get the MIDI event
            ShortMessage sm = (ShortMessage)e.getSource();

            // if the event is a key down
            if( sm.getCommand() == MidiKeyboard.NOTE_ON && sm.getData2() > 1 )
            {
              keyDown(sm.getData1());
            }
            // if the event is a key up
            else if( sm.getCommand() == MidiKeyboard.NOTE_OFF )
            {
              keyUp(sm.getData1());
            }
          }
        }
      }
    });
If you entered all this code correctly, then you should have a simple synthesizer that responds to keyboard input in a rudimentary way. Run it and play your MIDI keyboard. If you play a simple melody such as Mary Had a Little Lamb then you may think the instrument sounds a bit like an organ on a carousel. This makes sense because pipe organs are simple additive synthesizers as well.
You can download the complete code file online at evanxmerz.com/soundsynthjava/code/Hello_Midi.java.
Remember, if you are getting bugs in your program, then you probably made an error in transcribing it or copying it into your project. Don't get frustrated! Errors like that are a very normal part of the programming process. Your first step should always be entering the error message into a search engine. Usually the search will point you to a solution to your problem on StackOverflow or some similar site.
Our first MIDI-enabled synthesizer is not very promising. You can only play one note at a time. Instruments that can only play a single pitch at a time are called monophonic. There are many monophonic synthesizers, and we shouldn't necessarily view this as a drawback of the program. Still, even if we want to create only monophonic synthesizers, the key presses need to be handled more gracefully.
Using the previous program, if you pressed a C, then pressed a D, then released the C, it would silence the D. This is not desired behavior. We want the program to only turn off the oscillator if the most recently pressed key is released.
We can improve the playability of the program by adding a variable to store the last key pressed, then modifying the keyUp method to only turn off the oscillator if the key up matches the last key pressed.
I added a variable of type int called lastKeyPressed as an instance variable of the program, then I modified the keyDown and keyUp methods as shown.
  public void keyDown(int midiPitch)
  {
    if( sine != null && gainGlide != null )
    {
      lastKeyPressed = midiPitch;
      sine.setFrequency(pitchToFrequency(midiPitch));
      gainGlide.setValue(0.9f);
    }
  }

  public void keyUp(int midiPitch)
  {
    if( gainGlide != null && midiPitch == lastKeyPressed )
    {
      gainGlide.setValue(0.0f);
    }
  }
This adjustment should make the program relatively playable using a MIDI keyboard.
You can download the complete code file online at evanxmerz.com/soundsynthjava/code/Improved_Midi.java.
The program still only supports monophony. Supporting polyphony is a little bit tricky and can be slightly different depending on the type of synthesis you are using. Since an oscillator can only play one frequency at a time we can't possibly support polyphony without adding more oscillators. There are multiple strategies for doing this. You can create an array of oscillators then mark when each is being used or is free. You could also create an array of oscillators for each key that can be pressed, but this will only be practical on very simple synthesizers such as this one. Another strategy is to create a new oscillator every time a key is pressed, but this strategy introduces slightly more delay into the process.
The other more significant problem with this program is the delay between when a key is pressed on the MIDI keyboard and when a sound is heard through your computer speakers. This lag is usually called latency. Ideally we would like to build synthesizers that respond immediately to key presses, and have zero latency. Unfortunately, this is impossible using a purely software based architecture as we are using here. Every time a key is pressed, the keyboard must be polled by the USB port, then the message must be converted from USB to MIDI, then it must be relayed to the proper system device, which will send it to the Java Virtual Machine that is running your program. This latency has nothing to do with Beads, so there is no way to write a Beads program to eliminate this latency.
This doesn't mean that Java and Beads are impractical for building synthesizers. It just means that using them live in a traditional performance setting is probably off limits. You can still render audio files from a Java program and load them into your sampler or you can build less traditional synthesizers. The latter strategy is my preferred usage of Java and Beads. I want to explore new ways of making sounds with my software, rather than recreate the same sounds that can easily be created by off-the-shelf synthesizers. If you plan to use your synthesizers in a way that isn't synchronized with a live band, then the small amount of latency is usually irrelevant.
I encourage you to try and modify this example to make it polyphonic.
In this chapter I'm going to introduce one of the final ingredients that is necessary to build any practical synthesizer: envelopes.
Envelope is an old-fashioned term. Today we mostly use it to describe a container for a letter. Since snail mail is not as common as it used to be, even this usage isn't heard every day. If you search Google for the word envelope, however, it will return two definitions, and the second one is the one that applies to synthesis.
envelope - 2. a covering or containing structure or layer
In synthesis, an envelope is used to constrain or control an aspect of a synthesizer. Envelopes are commonly applied to the gain of a sound to control the volume over time. An Envelope is a bit like a programmable Glide. In Beads, a Glide is used to interpolate from one parameter value to another. An envelope can be programmed to glide smoothly to several parameter values over set periods of time.
Envelopes are made up of multiple segments. Each segment represents a transition from one value to another. One common type of envelope is called an attack-release (AR) envelope because it has two segments named attack and release respectively. The attack segment moves from the starting value of 0 to the envelope maximum, which is usually 1. The release segment moves from 1 back to 0. When this is applied to the gain of a sound it will smoothly fade in during the attack, then smoothly fade out during the release. Typically, however, the attack is a very short duration, while the release is somewhat longer. This corresponds to real world sounds like the sound of a note on the piano. The note starts very abruptly, then fades out much more slowly.
Another common type of envelope is called an attack-decay-sustain-release envelope (ADSR) because it has four segments with those names. The attack and release serve the same function as in the AR envelope. The decay is the length of time it takes the envelope to transition from its maximum point to the sustain level, which will be maintained for the duration of the sustain segment.
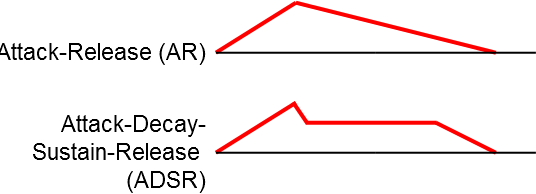
Two common envelope types
Although these two are the most common types of envelopes, envelopes can have any number of segments that move to any values.
Envelopes are commonly used to control the gain of a sound, or part of the sound. In this example the program will instantiate an object of type Envelope and use it to control a Gain object.
The Envelope constructor takes two arguments. As usual, the first argument is the master AudioContext object. The second argument is the starting value.
Envelope gainEnvelope = new Envelope(ac, 0.0f);
After constructing it, we want to connect the Envelope to the value of the Gain. To do this, we must remember the Gain constructor. The Gain constructor takes three arguments, the AudioContext, the number of inputs, and the starting value. Connecting the Envelope to the Gain is the same as connecting a Glide. Simply replace the starting value in the Gain constructor with the Envelope you want to use to control it.
Gain sineGain = new Gain(ac, 1, gainEnvelope);
To tell an Envelope to do something you must call the addSegment method. The addSegment method takes two arguments. The first argument is the value to move to. The second argument is the length of time in milliseconds over which the envelope should move to that value.
The main difference between a Glide and an Envelope is that an Envelope can execute many segments in order. When you call the setValue method on a Glide, it immediately glides to that value. When you call the addSegment method on an Envelope it will only execute that segment when it has finished all earlier segments.
At the bottom of this example there are two calls to addSegment. The first call ramps to 0.9 over 500 milliseconds. The second ramps back to 0.0 after 500 milliseconds. Because this envelope has two segments that simply go up and back down, it is an attack-release or AR envelope.
Because the ramp time is so long, relative to how we hear sound, this program should create a tone that quickly fades in and out.
Again, this code is based on the glide example from an earlier chapter, but I replaced the Glide with an Envelope.
    // create an AudioContext
    AudioContext ac = new AudioContext();

    // create a sine generator
    WavePlayer sine = new WavePlayer(ac, 440.0f, Buffer.SINE);

    // create an Envelope to control the gain
    Envelope gainEnvelope = new Envelope(ac, 0.0f);

    // create a Gain to control the sine volume
    Gain sineGain = new Gain(ac, 1, gainEnvelope);

    // add the sine generator as an input to the Gain
    sineGain.addInput(sine);

    // add the Gain as an input to the master output, ac.out
    ac.out.addInput(sineGain);

    // begin audio processing
    ac.start();

    // ramp the gain to 0.9f over 500 ms
    gainEnvelope.addSegment(0.9f, 500.0f);

    // ramp the gain to 0.0f over 500 ms
    gainEnvelope.addSegment(0.0f, 500.0f);
You can download this code online at evanxmerz.com/soundsynthjava/code/Envelope_Example.java.
The following image shows how the unit generators are connected in this patch.
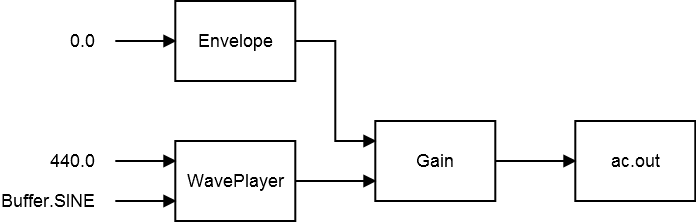
Unit generators in the envelopes example
Software synthesizers are incredibly versatile. With most hardware synthesizers the signals can only be routed in a preset way, or a set of preset ways. Modular synthesizers are more flexible, but they are limited by the space available, the number of slots for connections, and the cost of modules. In a software synthesis environment we can create as many modules as we like, and connect them however we like. So an Envelope can be used to control virtually any synthesis parameter, not just a prescribed set.
We can build on the previous example to control both the frequency and the gain using envelopes. To set up a frequency envelope, we need to add two lines of code to the previous example, and modify the WavePlayer declaration.
First, declare an Envelope called frequencyEnvelope. Set its starting value to 440.0f. Then modify the WavePlayer declaration. In place of the frequency 440.0f, put the name of the new Envelope, frequencyEnvelope. Then at the bottom of this block of code, add a segment to the envelope. Ramp to 2000.0f over 1000 milliseconds.
This block of code shows the final example. When you run it, you should hear a pitch that slides upward as it fades in and out.
  // create an AudioContext
  AudioContext ac = new AudioContext();

  // create an Envelope to control the frequency
  Envelope frequencyEnvelope = new Envelope(ac, 440.0f);

  // create a sine generator
  WavePlayer sine = new WavePlayer(ac, frequencyEnvelope, Buffer.SINE);

  // create an Envelope to control the gain
  Envelope gainEnvelope = new Envelope(ac, 0.0f);

  // create a Gain to control the sine volume
  Gain sineGain = new Gain(ac, 1, gainEnvelope);

  // add the sine generator as an input to the Gain
  sineGain.addInput(sine);

  // add the Gain as an input to the master output, ac.out
  ac.out.addInput(sineGain);

  // begin audio processing
  ac.start();

  // ramp the gain to 0.9f over 500 ms
  gainEnvelope.addSegment(0.9f, 500.0f);

  // ramp the gain to 0.0f over 500 ms
  gainEnvelope.addSegment(0.0f, 500.0f);

  // ramp the frequency up to 2000Hz over 1000 ms
  frequencyEnvelope.addSegment(2000.0f, 1000.0f);
You can download this code online at evanxmerz.com/soundsynthjava/code/Frequency_Envelope_Example.java.
One of the problems with additive synthesis is that each new sine wave only adds one new frequency component to the output spectrum. To build up realistic or complex sounds could require thousands of sine waves. Controlling that many sine generators in real time is a difficult task even for modern computers, and that's just for making one sound.
Many synthesists prefer modulation synthesis over additive synthesis because very little computation can yield harmonically rich sounds. In this chapter I will define digital modulation synthesis. Then I will show the types of spectra that can be generated by modulation synthesis. Finally I will demonstrate several types of modulation synthesis in code.
In modulation synthesis, a signal called the modulator is used to effect another signal, called the carrier. Typically each signal is a sine generator, and the modulator controls some parameter of the carrier. The modulator might control the amplitude, frequency, filter frequency, phase, or something else.
At first this may sound very similar to using an envelope. Isn't an envelope a type of modulation? Yes. It is almost the same technique. The only difference is that an envelope is typically triggered once, while a modulator is typically a continuous, looped signal.
If the modulator is used to control the amplitude of the carrier signal, and the modulator is a sine wave oscillating at 2Hz (2 oscillations per second), then the amplitude of the carrier signal will rise and fall twice in a second. This is a very familiar effect, and if the modulator is oscillating in the subaudible range (under 20Hz), we call this effect tremolo.
If the modulator is used to control the frequency of the carrier signal, and the modulator is a sine wave oscillating at 2Hz, then the frequency of the carrier will rise and fall twice a second. If the frequency of the modulator is under 20Hz, then this produces an effect called vibrato.
When the frequency of the modulator rises into the audible range, above 20Hz, then new frequencies are added to the carrier signal. These frequencies are called sidebands, and they have different characteristics based on the type of modulation synthesis. These sidebands are what make modulation synthesis so powerful. With a modulation synthesizer, we can create interesting, broad spectrum sounds with a small number of source signals.
The simplest form of modulation synthesis is amplitude modulation. Amplitude modulation occurs when the modulator controls the gain of the carrier.
Mathematically, amplitude modulation is very easy to understand. Audio is just a series of numbers that represent changes in air pressure over time. To control the amplitude of one piece of audio with another piece of audio, simply multiply the two together.
When the modulator is above 20Hz, sidebands are added to the signal at specific frequencies. If the carrier signal is a sine wave at frequency X and the modulator is a sine wave at frequency Y, then the sidebands occur at the frequencies X-Y and X+Y.
So if the carrier is a sine wave oscillating at 440Hz, and the modulator is a sine wave oscillating at 60Hz, then the sidebands would occur at 380Hz and 500Hz, as shown in the following spectrum.
Amplitude modulation sidebands
Notice that the previous image contains only two peaks, and neither occurs at the frequency of the carrier or the modulator. If the modulator is bipolar, meaning that it contains both positive and negative numbers, then the carrier signal is actually eliminated from the generated sound. This is a special case of amplitude modulation called ring modulation. If the modulator is unipolar, meaning that it contains only positive or only negative numbers, then the carrier frequency is preserved in the generated sound.
Amplitude modulation is easy to implement in Beads. Start with the first envelope example where we used an envelope to control the gain of a sound. Simply replace the envelope with a WavePlayer as shown in the following block of code.
// create an AudioContext
AudioContext ac = new AudioContext();

// create a sine generator
WavePlayer carrier = new WavePlayer(ac, 440.0f, Buffer.SINE);

// create a WavePlayer to control the gain
WavePlayer modulator = new WavePlayer(ac, 60.0f, Buffer.SINE);

// create a Gain to control the sine volume
Gain sineGain = new Gain(ac, 1, modulator);

// add the sine generator as an input to the Gain
sineGain.addInput(carrier);

// add the Gain as an input to the master output, ac.out
ac.out.addInput(sineGain);

// begin audio processing
ac.start();
You can download this code online at evanxmerz.com/soundsynthjava/code/Amp_Mod_Example_01.java.
When you run the program you should hear a tone that sounds a bit like a dial tone from an old telephone. That's no surprise, as dial tones are simply two sine waves multiplied together at approximately the same frequencies as I used here.
Try experimenting with the frequency of the modulator and the frequency of the carrier. How do they sound when they are close together? Far apart? How do they sound when one is a multiple of the other? When the modulator goes below 20Hz?
In frequency modulation synthesis, the modulator controls the frequency of the carrier.
Implementing frequency modulation is slightly more complex than implementing amplitude modulation. This example is the first situation where we will need to extend beyond the standard unit generators provided by the Beads library. In this case we're going to extend the Function class to create a custom unit generator on the fly, and then use it as we would any other unit generator.
To build a custom function, declare it, then override the calculate routine. The calculate method calculates the output of the new unit generator, using whatever other unit generators are provided in the function declaration. In this case, we pass in the modulator unit generator, a WavePlayer that generates a sine wave. To use the value of the modulator unit generator in a calculation, we simply reference x[0]. If we passed multiple unit generators into a custom function, then they would be accessed via x[1], x[2], x[3] and so on.
In this example, the modulator has a frequency of 220Hz. The math in the custom function dictates the strength of the oscillation and the center of oscillation. The center of oscillation is the fundamental frequency, which is 440Hz in this case. The modulation strength or modulation index is how much the modulator will effect the carrier. The modulation index is set to 200 in this case.
AudioContext ac = new AudioContext();

// create a WavePlayer to control the frequency
WavePlayer modulator = new WavePlayer(ac, 220.0f, Buffer.SINE);

Function frequencyModulation = new Function(modulator){
  @Override
  public float calculate()
  {
    // x[0] = modulator
    // 20.0f = modulation width
    // 440.0f = modulation center (carrier frequency)
    return (x[0] * 200.0f) + 440.0f;
  }
};

// create a sine generator
WavePlayer carrier = new WavePlayer(ac, frequencyModulation, Buffer.SINE);

// create a Gain to control the sine volume
Gain sineGain = new Gain(ac, 1, 0.9f);
sineGain.addInput(carrier);
ac.out.addInput(sineGain);

ac.start();
You can download this code online at evanxmerz.com/soundsynthjava/code/Freq_Mod_Example_01.java.
The following image shows how the unit generators are assembled in this example.

Frequency modulation unit generators
Where amplitude modulation generates only two sidebands, frequency modulation generates a whole range of sidebands. The carrier frequency remains in the generated signal, and new frequencies are added at each integer multiple of the modulator frequency. So if the carrier is a sine wave at 440Hz, and the modulator is a sine wave at 220Hz, then the generated sound would contain sidebands at 220Hz, 440Hz, 660Hz, 880Hz, and so on. The strength of each sideband gets smaller as they get farther away from the carrier frequency. The strength of the sidebands is determined by the modulation index, which is 200.0f in this case.
Frequency modulation sidebands
Amplitude modulation and frequency modulation are the two most popular forms of modulation synthesis, but they are not the only forms. Ring modulation is a variation on amplitude modulation. Filter modulation involves modulating the frequency of a filter applied to the carrier.
The great thing about Beads is that virtually any parameter of synthesis can be controlled with a modulator. I encourage you to try connecting modulators to effects, envelopes, and anything else you can think of.
Additive synthesis adds together multiple sounds to make new sounds. Subtractive synthesis takes a complex sound as input, then removes frequencies to make a new sound. Subtractive synthesis is typically implemented using filters. Filters boost or attenuate some frequencies in a sound. Subtractive synthesis occurs any time a sound is filtered.
Most audio filters share three basic properties: cutoff frequency, quality, and resonance.
For some filter types, the cutoff frequency of a filter is the point where frequencies will be boosted or attenuated. For other filter types, the cutoff frequency is the crossover point and all frequencies on one side will be attenuated.
The quality or Q of a filter is a way of describing its bandwidth. A filter with low Q will have a very wide bandwidth, and effect more frequencies. A filter with a high Q will have a very narrow bandwidth and effect fewer frequencies. Whether high or low Q is desirable is context dependent. Most filters have a control to allow users to adjust the Q.
The resonance of a filter is how much the cutoff frequency is emphasized by the filter. A high resonance setting means that the cutoff frequency will ring out when audio is passed through the filter.
Some filters may use other terms. Filters like a parametric equalizer may include adjustable bands that allow the user to tune the strength of specific frequency ranges. Commercial filters such as those used in the Massive synthesizer by Native Instruments sometimes include unusual terms that relate to a custom process that is in one particular filter. You can consult the documentation or a search engine when you see filter parameters you don't recognize, or you can just play with the filter until you figure it out.
The most common types of audio filters are probably low pass filters (LPF) and high pass filters (HPF). Low pass filters allow the frequencies below the cutoff to pass through while attenuating the high end. High pass filters allow the frequencies above the cutoff to pass through while attenuating the low end. Because of the characteristic shape of the attenuation curves, these filters are sometimes called low shelf or high shelf filters. The following diagram shows how frequencies are effected by low pass filters.
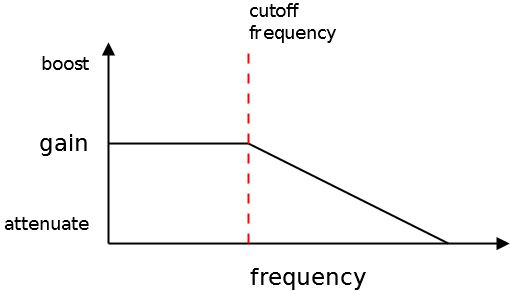
Frequency response of a low pass filter
Where low pass and high pass filters are designed to change a whole range of frequencies notch and peak filters are designed to effect only a narrow band of frequencies around the cutoff frequency. A notch filter attenuates frequencies around the cutoff. A peak filter boosts the frequencies around the cutoff. The width of the band that is effected is set by the Q.
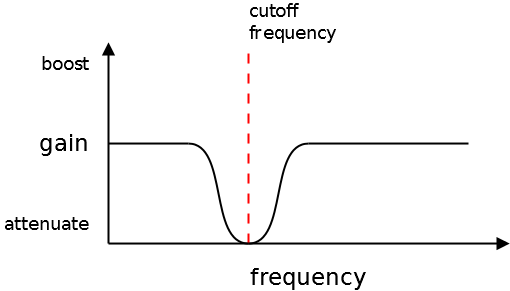
Frequency response of a notch filter
The other common type of filter you will see is a parametric filter, which is multiple filters working together in a parameterized way. Parametric and parameterized simply mean that the settings for each different band are controllable by the user.
There are many filters already implemented in Beads, including BiquadFilter, CombFilter, IIRFilter, LPRezFilter, and OnePoleFilter. I encourage you to read the documentation for each filter and experiment with them to hear the type of sound that each can produce. In this example we will apply the LPRezFilter to a single WavePlayer.
Start with the improved MIDI code from the chapter on MIDI input. We will connect this example to your MIDI keyboard using the code from that chapter. We will only make a few small changes to that code.
Start by creating an LPRezFilter and a Glide object in the top of the class.
Glide filterFrequencyGlide;
LPRezFilter lpf;
Then modify the code in the setup method. First change the waveform of the WavePlayer to Buffer.SAW. The saw waveform has more high frequency content than the sine waveform, so it will allow us to more clearly hear the impact of the low pass filter. Then instantiate the Glide and LPRezFilter objects and connect them to the WavePlayer.
// change the waveform to Buffer.SAW
// because it has more high frequency content than sine
sine = new WavePlayer(ac, 440.0f, Buffer.SAW);

// create a Glide to control the filter frequency
filterFrequencyGlide = new Glide(ac, 0.0f, 500.0f);

// create a low pass filter and add the sine as input
lpf = new LPRezFilter(ac, filterFrequencyGlide, 0.95f);
lpf.addInput(sine);

// set up the Gain and Glide objects and connect them
gainGlide = new Glide(ac, 0.0f, 50.0f);
sineGain = new Gain(ac, 1, gainGlide);
// set the low pass filter as input for the sine game
sineGain.addInput(lpf);
ac.out.addInput(sineGain);
Notice that the WavePlayer is added as an input to the LPRezFilter, then the LPRezFilter is added as input to the Gain. The WavePlayer is being passed through the filter before it goes on to the gain.
Finally, we need to tell the filter to do something when a key is pressed. Modify the keyDown and keyUp methods to cause a filter sweep up when a key is pressed, and a filter sweep down when a key is released.
  public void keyDown(int midiPitch)
  {
    if( sine != null && gainGlide != null )
    {
      lastKeyPressed = midiPitch;
      sine.setFrequency(pitchToFrequency(midiPitch));
      gainGlide.setValue(0.9f);

      // interrupt the filter frequency, then glide it to 5kHz
      filterFrequencyGlide.setValueImmediately(filterFrequencyGlide.getValue());
      filterFrequencyGlide.setValue(5000.0f);
    }
  }

  public void keyUp(int midiPitch)
  {
    if( gainGlide != null && midiPitch == lastKeyPressed )
    {
      gainGlide.setValue(0.0f);

      // sent the filter frequency back to zero
      filterFrequencyGlide.setValue(0.0f);
    }
  }
You can download the complete code online at evanxmerz.com/soundsynthjava/code/Subtractive_Example_01.java.
One of the most versatile filters in Beads is the BiquadFilter class. This class implements a digital biquadratic filter, which can be tuned to filter sounds in many ways.
In this example, we will use the BiquadFilter as a peak filter. A peak filter boosts the frequencies around the cutoff, while attenuating all other frequencies. If you turn up the Q enough, a peak filter can filter out almost all other frequencies other than the cutoff, even if you start with white noise.
To keep this example simple, start with the glide example from an earlier chapter. We will only make two small changes.
First, change the sine generator to a noise generator by changing the buffer to Buffer.NOISE, and the frequency to 1.0f. Then create a BiquadFilter object. The BiquadFilter constructor takes four arguments in this case. The first argument is the master AudioContext as usual. The second argument is the filter type BiquadFilter.BP_PEAK in this case. The third argument is the cutoff frequency, and the last argument is the filter quality.
The code for the main method is shown here.
    // create an AudioContext
    AudioContext ac = new AudioContext();

    // create a noise generator
    WavePlayer noise = new WavePlayer(ac, 1.0f, Buffer.NOISE);

    // create a Glide to control the gain - give it 5000ms ramp time
    Glide gainGlide = new Glide(ac, 0.0f, 5000.0f);

    // create a peak filter using the BiquadFilter object
    BiquadFilter peakFilter = new BiquadFilter(ac, BiquadFilter.BP_PEAK, 300.0f, 100.0f);

    // add the WavePlayer as input
    peakFilter.addInput(noise);

    // create a Gain to control the noise volume
    Gain gain = new Gain(ac, 1, gainGlide);

    // add the peak filter as an input to the Gain
    gain.addInput(peakFilter);

    // add the Gain as an input to the master output, ac.out
    ac.out.addInput(gain);

    // begin audio processing
    ac.start();

    // ramp the gain to 0.9f
    gainGlide.setValue(0.9f);
You can download this code online at evanxmerz.com/soundsynthjava/code/Peak_Filter_Example.java.
Experiment with the filter quality on the BiquadFilter object. What happens when the quality is set to 1.0f? How does the sound change as the quality rises?
I also encourage you to experiment with the other filter types.
Granular synthesis is a special case of additive synthesis. Sounds are added together to form more complex sounds. The only difference is that in granular synthesis the sounds are very short.
Granular synthesis begins with some source sound. That sound may be an oscillator as in previous examples in this book, but usually granular synthesis begins with an audio file. The source sound is broken into many tiny grains around 1 to 100 milliseconds in duration. These sounds are then recombined to form new sounds that share some of the characteristics of the source sound, and some characteristics of the granulation process.
Granular synthesis is popular because it is capable of generating such a wide range of sounds. Sometimes granular synthesis can sound like an evolving soundscape, or it can sound like rain pelting your bedroom window, or an alien voice coming to you across a vast distance.
Granular synthesis isn't just a sound mangling technique. It was inspired in part by sounds that occur in the real world. Consider the case of a dump truck with a load of gravel. When the drump truck drops its load of gravel, each pebble makes a sound when it hits the ground. The sound of each pebble hitting the ground can be thought of as a grain of sound, but we don't hear each individual pebble. We hear the larger sound complex of many pebbles hitting the ground.

A grain of sound
In granular synthesis, each small slice of an audio file is called a grain. When they are combined into a new sound, they are called a cloud.
Granular synthesis is controlled by a number of parameters. The source file and the synthesis parameters contribute equally to the overall sound. Position is the place in the source audio file from which a grain is extracted. Grain duration is the duration of a single grain pulled from the audio file. Grain interval is the amount of time that elapses between the playing of each grain. Some synthesizers allow the user to set the pan, loudness, and even envelope of each individual grain.
Usually a granular synthesizer sounds better if these parameters are slightly randomized. In Beads, there is a randomness parameter that allows a programmer to control how much each of these parameters should randomly vary for each grain.
Beads has a built-in class for granular synthesis called GranularSamplePlayer. The documentation says the following about GranularSamplePlayer.
GranularSamplePlayer plays back a Sample using granular synthesis. GranularSamplePlayer inherits its main behaviour from SamplePlayer but replaces the direct Sample lookup with a granular process. UGens can be used to control playback rate, pitch, loop points, grain size, grain interval, grain randomness and position (this last case assumes that the playback rate is zero).
This means that we can control the parameters of granulation using other Beads, such as Envelope, Glide, WavePlayer, or Function. In this example, however, I'm going to keep it as simple as possible. The parameters of granulation are hard coded to specific values using the Static UGen. The Static UGen is simply a holder for one value that doesn't change over time.
There are three basic steps in this example. First, the audio file is loaded into an instance of the Sample class. In my code I look for an audio file called "Tubes.wav". This must be a 16-bit, 44.1kHz wave file located in the root folder of your Eclipse project. You can create compatible audio files using Audacity. If you're using my example, then the sample is the late senator Ted Stevens telling the senate that the internet is a series of tubes.
After loading the audio file, the GranularSamplePlayer object is instantiated, then it is connected to the main output and the AudioContext is started.
This code listing shows all the code in the main method.
    // instantiate the AudioContext
    AudioContext ac = new AudioContext();

    // load the source sample from a file
    Sample sourceSample = null;
    try
    {
      sourceSample = new Sample("Tubes.wav");
    }
    catch(Exception e)
    {
      /*
       * If the program exits with an error message,
       * then it most likely can't find the file
       * or can't open it. Make sure it is in the
       * root folder of your project in Eclipse.
       * Also make sure that it is a 16-bit,
       * 44.1kHz audio file. These can be created
       * using Audacity.
       */
      System.out.println(e.getMessage());
      e.printStackTrace();
      System.exit(1);
    }

    // instantiate a GranularSamplePlayer
    GranularSamplePlayer gsp = new GranularSamplePlayer(ac, sourceSample);

    // tell gsp to loop the file
    gsp.setLoopType(SamplePlayer.LoopType.LOOP_FORWARDS);

    // set the grain size to a fixed 10ms
    gsp.setGrainSize(new Static(ac, 10.0f));

    // tell gsp to behave somewhat randomly
    gsp.setRandomness(new Static(ac, 1000.0f));

    // connect gsp to ac
    ac.out.addInput(gsp);

    // begin audio processing
    ac.start();
You can download this code online at evanxmerz.com/soundsynthjava/code/Granular_Example_01.java.
To modify this example, try attaching an Envelope to the grain size using the setGrainSize method. Also try attaching unit generators to the grain interval and pitch parameters using the setGrainInterval and setPitch methods respectively. Granular synthesis is incredibly versatile, so experiment until you can make lots of different kinds of sounds.
The last important part of writing a software synthesizer is saving the output to an audio file. In this chapter I'm going to show you how to set up Beads to render audio to a wave file.
To write audio output to a file, a program needs to route the audio to a RecordToSample unit generator. This requires two blocks of code. The first block sets up a RecordToSample object and a Sample object that will hold the actual audio data. The second block of code waits for user input to actually write the audio file. Fortunately, these two blocks of code will be virtually identical for every beads program so you will just need to copy and paste them into your program before and after the call to ac.start().
The following code listing shows the first block of code. Copy this somewhere before the call to ac.start() in your program. This code begins by declaring the RecordToSample and Sample objects. Then it calls constructors for each object within a try/catch block, which allows the program to handle any errors that may occur.
Notice the call to ac.out.addDependent(rts). This line of code says that the RecordToSample object is dependent on the AudioContext object, which means that it will be updated whenever the AudioContext is updated.
    // setup the recording unit generators
    RecordToSample rts = null;
    Sample outputSample = null;
    try
    {
      AudioFormat af = new AudioFormat(44100.0f, 16, 1, true, true);
      outputSample = new Sample(441, 1, 44100);
      rts = new RecordToSample(ac, outputSample, RecordToSample.Mode.INFINITE);
      rts.addInput(ac.out);
      ac.out.addDependent(rts);
    }
    catch (Exception e)
    {
      e.printStackTrace();
      System.exit(1);
    }
The following block of code is the second part of the saving code. Copy this somewhere after the call to ac.start() in your program. This block starts by setting up a Scanner object. Scanner is a library class that makes text input very easy. In this case, we set it up to read from System.in, which is the console for your program. It just waits until enter is pressed, then triggers the saving code.
The saving code stops the RecordToSample object using rts.pause(true), then it saves to disk using outputSample.write. The saved file should appear in the root directory of your Eclipse project.
    // set up a Scanner to take input from the user
    Scanner in = new Scanner(System.in);
    System.out.println("Press enter to save sound and end the program.");
    // wait until the user presses enter
    in.nextLine();

    // save the generated audio
    try
    {
      rts.pause(true);
      rts.clip();
      outputSample.write("output.wav", AudioFileType.WAV);
    }
    catch (Exception e)
    {
      e.printStackTrace();
    }
    rts.kill();
    System.exit(0);
You can download the complete code online at evanxmerz.com/soundsynthjava/code/Saving_Example_01.java.
There is one thing left out of both of these code blocks: import statements. If you don't import the correct packages from the Java and Beads libraries, then it won't know how to use these classes. Eclipse will automatically fix your imports using the shortcut Ctrl+Shift+O. A similar shortcut exists for NetBeans.
The Juno 60 is a classic synthesizer with an unforgettable sound. In this chapter, I'm going to show you how you can make a simplified digital imitation of a Juno 60 using Beads.
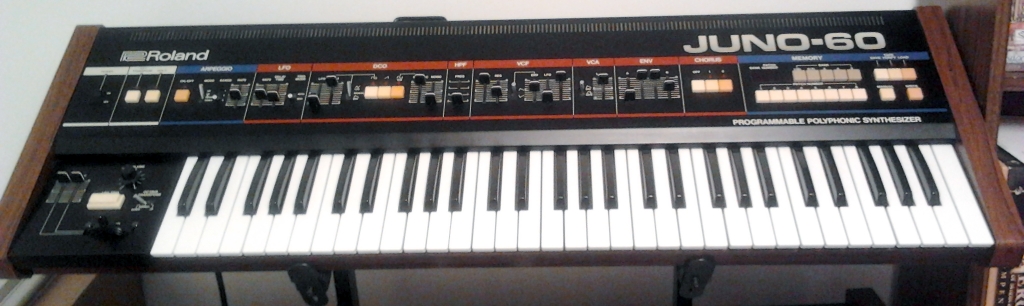
Roland Juno-60 from Wikimedia Commons
The Juno-60 has only one oscillator, but the oscillator can play a user-defined mix of three separate waveforms, which make it function like three oscillators. It can mix saw, square, and sub-square waves. The sub-square wave is a square wave one octave below the others.
The Juno-60 has one low frequency oscillator, or LFO. An LFO is an oscillator that oscillates at sub-audible frequencies. Since an LFO is sub-audible, it can't be used to generate sound, so an LFO is typically used to control other synthesis parameters. The LFO on the Juno-60 can be used to control pulse width modulation, or filter frequency.
The Juno-60 has both a low pass filter with resonance and a high pass filter. The frequency of each filter is controlled with a slider.
The Juno-60 has a single envelope, which can be mapped to the overall gain, or to the frequency of the low pass filter, or to both.
Finally, the Juno-60 has several other ways of modifying the sound, including chorus, an arpeggiator, and a pitch bend knob.
In this program I'm not going to build a general purpose simulation of the Juno-60. Rather, I will just build a program that runs one patch that could be set up on the Juno-60. Still, this program could easily be expanded to imitate other patches that can be set up on the Juno-60.
First, the program will need oscillators. We will ignore the sub oscillator for now, and just add a square and saw wave.
// the square and saw generators - this leaves out the sub generator and PWM
square = new WavePlayer(ac, 440.0f, Buffer.SQUARE);
saw = new WavePlayer(ac, 440.0f, Buffer.SAW);
Then the program will need an envelope. This envelope will be used to control both the overall gain, and the filter cutoff envelope. Values between 0 and 1 work well as envelope parameters, but they don't work as filter cutoff values. So I set up a custom function to translate the values of the envelope to frequencies betweeen 0 and 5000 hertz.
// the single envelope on a Juno 60
envelope = new Envelope(ac, 0.0f);

// set up a custom function to convert the envelope to frequency range
Function filterEnvelope = new Function(envelope)
{
  @Override
  public float calculate()
  {
    // x[0] = envelope
    // 5000.0f = maximum frequency
    // 20.0f = minimum frequency
    return (x[0] * 5000.0f) + 20.0f;
  }
};
Then the program will need filters. I used the BiquadFilter class for the high pass filter, and the LPRezFilter class for the low pass filter. Then I connected the signal chain from oscillators to filters to gain.
// set up the high pass filter and add the square and saw generators as input
hpf = new BiquadFilter(ac, BiquadFilter.BESSEL_HP, 100.0f, 1.0f);
hpf.addInput(square);
hpf.addInput(saw);

// set up the low pass filter and connect the hpf as input
lpf = new LPRezFilter(ac, filterEnvelope, 0.95f);
lpf.addInput(hpf);

// set up the Gain and connect it to the main output
vca = new Gain(ac, 1, envelope);
vca.addInput(lpf);
ac.out.addInput(vca);
Finally I added code to the keyDown and keyUp methods to handle MIDI events.
You can download this code online at evanxmerz.com/soundsynthjava/code/juno_60_01.java or copy from the full code listing that follows.
import java.awt.event.ActionEvent;
import java.awt.event.ActionListener;
import javax.sound.midi.ShortMessage;
import midi.MidiKeyboard;
import net.beadsproject.beads.core.AudioContext;
import net.beadsproject.beads.data.Buffer;
import net.beadsproject.beads.ugens.BiquadFilter;
import net.beadsproject.beads.ugens.Envelope;
import net.beadsproject.beads.ugens.Function;
import net.beadsproject.beads.ugens.Gain;
import net.beadsproject.beads.ugens.LPRezFilter;
import net.beadsproject.beads.ugens.WavePlayer;

public class juno_60_01
{
  WavePlayer square, saw;
  WavePlayer lfo;

  Envelope envelope;
  Gain vca;

  BiquadFilter hpf;
  LPRezFilter lpf;

  int lastKeyPressed = -1;

  public static void main(String[] args)
  {
    juno_60_01 synth = new juno_60_01();
    synth.setup();
  }

  // construct the synthesizer
  public void setup()
  {
    AudioContext ac = new AudioContext();

    // the square and saw generators - this leaves out the sub generator and PWM
    square = new WavePlayer(ac, 440.0f, Buffer.SQUARE);
    saw = new WavePlayer(ac, 440.0f, Buffer.SAW);

    // the single envelope on a Juno 60
    envelope = new Envelope(ac, 0.0f);

    // set up a custom function to convert the envelope to frequency range
    Function filterEnvelope = new Function(envelope)
    {
      @Override
      public float calculate()
      {
        // x[0] = envelope
        // 5000.0f = maximum frequency
        // 20.0f = minimum frequency
        return (x[0] * 5000.0f) + 20.0f;
      }
    };

    // set up the high pass filter and add the square and saw generators as input
    hpf = new BiquadFilter(ac, BiquadFilter.BESSEL_HP, 100.0f, 1.0f);
    hpf.addInput(square);
    hpf.addInput(saw);

    // set up the low pass filter and connect the hpf as input
    lpf = new LPRezFilter(ac, filterEnvelope, 0.95f);
    lpf.addInput(hpf);

    // set up the Gain and connect it to the main output
    vca = new Gain(ac, 1, envelope);
    vca.addInput(lpf);
    ac.out.addInput(vca);

    // set up the keyboard input
    MidiKeyboard keys = new MidiKeyboard();
    keys.addActionListener(new ActionListener(){
      @Override
      public void actionPerformed(ActionEvent e)
      {
        // if the event is not null
        if( e != null )
        {
          // if the event is a MIDI event
          if( e.getSource() instanceof ShortMessage )
          {
            // get the MIDI event
            ShortMessage sm = (ShortMessage)e.getSource();

            // if the event is a key down
            if( sm.getCommand() == MidiKeyboard.NOTE_ON && sm.getData2() > 1 )
              keyDown(sm.getData1());
            // if the event is a key up
            else if( sm.getCommand() == MidiKeyboard.NOTE_OFF )
              keyUp(sm.getData1());
          }
        }
      }
    });

    ac.start();
  }

  private float pitchToFrequency(int midiPitch)
  {
    /*
     *  MIDI pitch number to frequency conversion equation from
     *  http://newt.phys.unsw.edu.au/jw/notes.html
     */
    double exponent = (midiPitch - 69.0) / 12.0;
    return (float)(Math.pow(2, exponent) * 440.0f);
  }

  public void keyDown(int midiPitch)
  {
    if( square != null && saw != null && envelope != null )
    {
      lastKeyPressed = midiPitch;
      square.setFrequency(pitchToFrequency(midiPitch));
      saw.setFrequency(pitchToFrequency(midiPitch));

      // attack segment
      envelope.addSegment(0.5f, 0.1f);
      // decay segment
      envelope.addSegment(0.3f, 0.1f);
    }
  }

  public void keyUp(int midiPitch)
  {
    if( envelope != null && midiPitch == lastKeyPressed )
    {
      // release segment
      envelope.addSegment(0.0f, 0.5f);
    }
  }
}
In this chapter we will synthesize kick and snare sounds using Beads.
The sound of a drum set is very familiar to listeners of western music. The drum set was standardized some time in the early 20th century to include a kick drum, snare drum, high hat, toms, and cymbals. Since then it has been used in virtually every genre of popular music, from jazz, to swing, to rock. When electronics began invading popular music, the drum set was reinvented as a virtual instrument in the form of drum machines and performable samplers. Still, even modern popular electronic music usually includes a sound like a kick drum on the strong beats, and a sound like a snare drum on the weak beats.
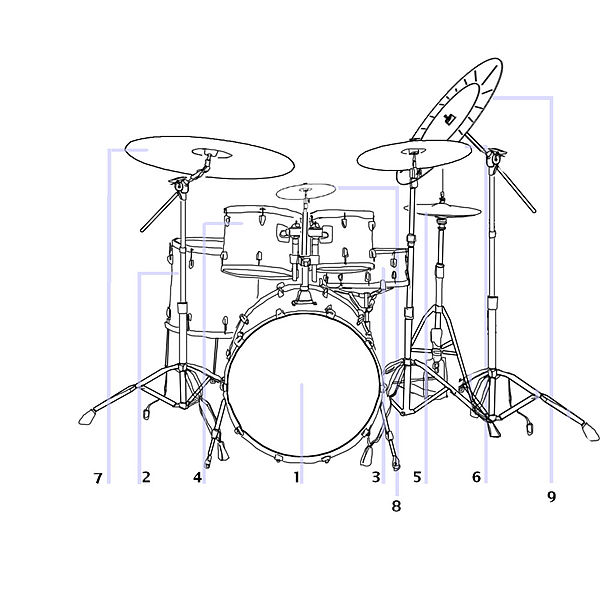
Drum kit from Wikimedia Commons
The kick drum or bass drum is the largest drum in the drum set. When hit, it produces a deep, rumbling tone along with the slap of the mallet. To synthesize it, our program will need a tone generator and a low pass filter, as shown in the following block of code.
// set up the envelope for kick gain
kickGainEnvelope = new Envelope(ac, 0.0f);
// construct the kick WavePlayer
kick = new WavePlayer(ac, 100.0f, Buffer.SINE);
// set up the filters
kickFilter = new BiquadFilter(ac, BiquadFilter.BESSEL_LP, 500.0f, 1.0f);
kickFilter.addInput(kick);
// set up the Gain
kickGain = new Gain(ac, 1, kickGainEnvelope);
kickGain.addInput(kickFilter);

// connect the gain to the main out
ac.out.addInput(kickGain);
The snare drum is a medium sized tom with snares attached to the bottom. When a snare drum is hit, the tom generates a tone and the snares rattle to generate noise. To simulate a snare drum, our program will use two oscillators. One will generate a sine tone, and the other will generate noise. Similar to the kick drum, both oscillators will be passed through a filter as shown in the following block of code.
// set up the snare envelope
snareGainEnvelope = new Envelope(ac, 0.0f);
// set up the snare WavePlayers
snareNoise = new WavePlayer(ac, 1.0f, Buffer.NOISE);
snareTone = new WavePlayer(ac, 200.0f, Buffer.SINE);
// set up the filters
snareFilter = new BiquadFilter(ac, BiquadFilter.BP_SKIRT, 2500.0f, 1.0f);
snareFilter.addInput(snareNoise);
snareFilter.addInput(snareTone);
// set up the Gain
snareGain = new Gain(ac, 1, snareGainEnvelope);
snareGain.addInput(snareFilter);

// connect the gain to the main out
ac.out.addInput(snareGain);
The tone of these drums is only part of the equation though. Drums are not continuous tones like those of an organ or a violin. Rather, drum sounds start very abruptly then trail off very quickly. In the keyDown method, we must open the envelopes very quickly, then let them decay very quickly, then let them trail off over slightly more time. This is shown in the following block of code. This code also filters out incoming MIDI events to only trigger the kick when a C is pressed, and only trigger the snare when an E is pressed.
public void keyDown(int midiPitch)
{
  // kick should trigger on C
  if( midiPitch % 12 == 0 )
  {
    // attack segment
    kickGainEnvelope.addSegment(0.5f, 2.0f);
    // decay segment
    kickGainEnvelope.addSegment(0.2f, 5.0f);
    // release segment
    kickGainEnvelope.addSegment(0.0f, 50.0f);
  }

  // snare should trigger on E
  if( midiPitch % 12 == 4 )
  {
    // attack segment
    snareGainEnvelope.addSegment(0.5f, 2.00f);
    // decay segment
    snareGainEnvelope.addSegment(0.2f, 8.0f);
    // release segment
    snareGainEnvelope.addSegment(0.0f, 80.0f);
  }
}
You can download this code online at evanxmerz.com/soundsynthjava/code/drum_machine_01.java.
import java.awt.event.ActionEvent;
import java.awt.event.ActionListener;
import javax.sound.midi.ShortMessage;
import midi.MidiKeyboard;
import net.beadsproject.beads.core.AudioContext;
import net.beadsproject.beads.data.Buffer;
import net.beadsproject.beads.ugens.BiquadFilter;
import net.beadsproject.beads.ugens.Envelope;
import net.beadsproject.beads.ugens.Gain;
import net.beadsproject.beads.ugens.WavePlayer;

public class drum_machine_01
{
  WavePlayer kick, snareNoise, snareTone;
  Envelope kickGainEnvelope, snareGainEnvelope;
  Gain kickGain, snareGain;
  BiquadFilter kickFilter, snareFilter;

  public static void main(String[] args)
  {
    drum_machine_01 synth = new drum_machine_01();
    synth.setup();
  }

  // construct the synthesizer
  public void setup()
  {
    AudioContext ac = new AudioContext();

    // set up the envelope for kick gain
    kickGainEnvelope = new Envelope(ac, 0.0f);
    // construct the kick WavePlayer
    kick = new WavePlayer(ac, 100.0f, Buffer.SINE);
    // set up the filters
    kickFilter = new BiquadFilter(ac, BiquadFilter.BESSEL_LP, 500.0f, 1.0f);
    kickFilter.addInput(kick);
    // set up the Gain
    kickGain = new Gain(ac, 1, kickGainEnvelope);
    kickGain.addInput(kickFilter);

    // connect the gain to the main out
    ac.out.addInput(kickGain);


    // set up the snare envelope
    snareGainEnvelope = new Envelope(ac, 0.0f);
    // set up the snare WavePlayers
    snareNoise = new WavePlayer(ac, 1.0f, Buffer.NOISE);
    snareTone = new WavePlayer(ac, 200.0f, Buffer.SINE);
    // set up the filters
    snareFilter = new BiquadFilter(ac, BiquadFilter.BP_SKIRT, 2500.0f, 1.0f);
    snareFilter.addInput(snareNoise);
    snareFilter.addInput(snareTone);
    // set up the Gain
    snareGain = new Gain(ac, 1, snareGainEnvelope);
    snareGain.addInput(snareFilter);

    // connect the gain to the main out
    ac.out.addInput(snareGain);

    // set up the keyboard input
    MidiKeyboard keys = new MidiKeyboard();
    keys.addActionListener(new ActionListener(){
      @Override
      public void actionPerformed(ActionEvent e)
      {
        // if the event is not null
        if( e != null )
        {
          // if the event is a MIDI event
          if( e.getSource() instanceof ShortMessage )
          {
            // get the MIDI event
            ShortMessage sm = (ShortMessage)e.getSource();

            // if the event is a key down
            if( sm.getCommand() == MidiKeyboard.NOTE_ON && sm.getData2() > 1 )
              keyDown(sm.getData1());
            // if the event is a key up
            else if( sm.getCommand() == MidiKeyboard.NOTE_OFF )
              keyUp(sm.getData1());
          }
        }
      }
    });

    ac.start();
  }

  public void keyDown(int midiPitch)
  {
    // kick should trigger on C
    if( midiPitch % 12 == 0 )
    {
      // attack segment
      kickGainEnvelope.addSegment(0.5f, 2.0f);
      // decay segment
      kickGainEnvelope.addSegment(0.2f, 5.0f);
      // release segment
      kickGainEnvelope.addSegment(0.0f, 50.0f);
    }

    // snare should trigger on E
    if( midiPitch % 12 == 4 )
    {
      // attack segment
      snareGainEnvelope.addSegment(0.5f, 2.00f);
      // decay segment
      snareGainEnvelope.addSegment(0.2f, 8.0f);
      // release segment
      snareGainEnvelope.addSegment(0.0f, 80.0f);
    }
  }

  public void keyUp(int midiPitch)
  {
    // do nothing
  }
}
In this project I'm going to demonstrate how to add tempo synchronized effects to your synthesizers.
The Clock bead generates java events that are synchronized with the AudioContext object. It can be used to add tempo and beat constrained effects to your sounds.
A Clock object generates two levels of timing information. The beat level is the main pulse for your sound. The tick level is smaller than the beat level. You can use the setTicksPerBeat method to set the number of ticks that should occur during each beat.
Instantiating a Clock bead is easy. Just call the constructor, passing it the AudioContext, and the number of milliseconds between beats.
The tricky part about using the Clock bead is setting up another bead that listens for events and handles them in some way. In this project we want to synchronize a filter to open and close alternately on each beat. We say a filter is open if the cutoff frequency is relatively high. We say a filter is closed if the cutoff frequency is relatively low. So on each beat the cutoff frequency should alternate between high and low.
The following block of code shows how to create a custom function that listens to a Clock object and responds by altering the frequency of a filter.
    // set up a custom function to convert the LFO to frequency range
    Function filterLFO = new Function(square)
    {
      private int tick = 0;
      private float minimumFrequency = 100.0f;
      private float range = 1500.0f;

      @Override
      public float calculate()
      {
        return minimumFrequency + (tick * range);
      }

      @Override
      public void messageReceived(Bead msg)
      {
        if( this.tick == 1 ) this.tick = 0;
        else this.tick = 1;
      }
    };
    // add filterLFO as a dependent to the AudioContext
    ac.out.addDependent(filterLFO);

    // set up a clock to keep time
    beatClock = new Clock(ac, 250.0f);
    beatClock.setTicksPerBeat(1);
    beatClock.addMessageListener(filterLFO);
    ac.out.addDependent(beatClock);
The custom function is called filterLFO because it will act as a low frequency oscillator that will control the cutoff frequency of a filter. It has tick, minimumFrequency, and range properties that control how the frequency value changes. In this case, the output frequency alternates between 100Hz and 1600Hz.
The calculate method returns the current cutoff frequency. The messageReceived method just alternates the tick variable between zero and one each time it receives a message. A message is generated by the Clock on every tick, not just every beat. In this project I set the number of ticks per beat to one so that the filter frequency will only change on every beat.
There are two calls to addDependent in this example. These simply tell the AudioContext to update these beads.
You can download this code online at evanxmerz.com/soundsynthjava/code/space_pad_01.java.
import java.awt.event.ActionEvent;
import java.awt.event.ActionListener;
import javax.sound.midi.ShortMessage;
import midi.MidiKeyboard;
import net.beadsproject.beads.core.AudioContext;
import net.beadsproject.beads.core.Bead;
import net.beadsproject.beads.data.Buffer;
import net.beadsproject.beads.ugens.Clock;
import net.beadsproject.beads.ugens.Envelope;
import net.beadsproject.beads.ugens.Function;
import net.beadsproject.beads.ugens.Gain;
import net.beadsproject.beads.ugens.LPRezFilter;
import net.beadsproject.beads.ugens.WavePlayer;

public class space_pad_01
{
  WavePlayer square, saw;

  Envelope gainEnvelope;
  Gain gain;

  LPRezFilter lpf;
  WavePlayer lpfLFO;

  int lastKeyPressed = -1;

  Clock beatClock;

  public static void main(String[] args)
  {
    space_pad_01 synth = new space_pad_01();
    synth.setup();
  }

  // construct the synthesizer
  public void setup()
  {
    AudioContext ac = new AudioContext();

    // the square and saw generators
    square = new WavePlayer(ac, 440.0f, Buffer.SQUARE);
    saw = new WavePlayer(ac, 440.0f, Buffer.SAW);

    // set up a custom function to convert the LFO to frequency range
    Function filterLFO = new Function(square)
    {
      private int tick = 0;
      private float minimumFrequency = 100.0f;
      private float range = 1500.0f;

      @Override
      public float calculate()
      {
        return minimumFrequency + (tick * range);
      }

      @Override
      public void messageReceived(Bead msg)
      {
        if( this.tick == 1 ) this.tick = 0;
        else this.tick = 1;
      }
    };
    // add filterLFO as a dependent to the AudioContext
    ac.out.addDependent(filterLFO);

    // set up a clock to keep time
    beatClock = new Clock(ac, 250.0f);
    beatClock.setTicksPerBeat(1);
    beatClock.addMessageListener(filterLFO);
    ac.out.addDependent(beatClock);

    // set up the low pass filter and connect the hpf as input
    lpf = new LPRezFilter(ac, filterLFO, 0.95f);
    lpf.addInput(square);
    lpf.addInput(saw);

    // the gain envelope
    gainEnvelope = new Envelope(ac, 0.0f);

    // set up the Gain and connect it to the main output
    gain = new Gain(ac, 1, gainEnvelope);
    gain.addInput(lpf);
    ac.out.addInput(gain);

    // set up the keyboard input
    MidiKeyboard keys = new MidiKeyboard();
    keys.addActionListener(new ActionListener(){
      @Override
      public void actionPerformed(ActionEvent e)
      {
        // if the event is not null
        if( e != null )
        {
          // if the event is a MIDI event
          if( e.getSource() instanceof ShortMessage )
          {
            // get the MIDI event
            ShortMessage sm = (ShortMessage)e.getSource();

            // if the event is a key down
            if( sm.getCommand() == MidiKeyboard.NOTE_ON && sm.getData2() > 1 )
              keyDown(sm.getData1());
            // if the event is a key up
            else if( sm.getCommand() == MidiKeyboard.NOTE_OFF )
              keyUp(sm.getData1());
          }
        }
      }
    });

    ac.start();
    beatClock.start();
  }

  private float pitchToFrequency(int midiPitch)
  {
    /*
     *  MIDI pitch number to frequency conversion equation from
     *  http://newt.phys.unsw.edu.au/jw/notes.html
     */
    double exponent = (midiPitch - 69.0) / 12.0;
    return (float)(Math.pow(2, exponent) * 440.0f);
  }

  public void keyDown(int midiPitch)
  {
    if( square != null && saw != null && gainEnvelope != null )
    {
      lastKeyPressed = midiPitch;
      square.setFrequency(pitchToFrequency(midiPitch));
      saw.setFrequency(pitchToFrequency(midiPitch));

      // interrupt the envelope
      gainEnvelope.clear();
      // attack segment
      gainEnvelope.addSegment(0.5f, 50.0f);
    }
  }

  public void keyUp(int midiPitch)
  {
    // release segment
    if( midiPitch == lastKeyPressed && gainEnvelope != null )
      gainEnvelope.addSegment(0.0f, 1750.0f);
  }
}
In this project, I demonstrate how to add an arpeggiator to a synthesizer.
This project is similar to the previous one, except this time we will use the Clock object to control the frequency of a WavePlayer, rather than the frequency of a filter.
Arpeggios are groups of notes played sequentially rather than at the same time. Any type of chord can be arpeggiated, or just a perfect fifth or an octave can be repeated sequentially. Since arpeggiation is an effect that unfolds over time, it makes sense to use the Clock object to implement it.
Like the previous project, this program will create a custom function that will act as a listener to the Clock. When the clock generates a tick, the function will respond by modifying the frequency of a WavePlayer.
You can download this code online at evanxmerz.com/soundsynthjava/code/arpeggiator_01.java.
import java.awt.event.ActionEvent;
import java.awt.event.ActionListener;
import javax.sound.midi.ShortMessage;
import midi.MidiKeyboard;
import net.beadsproject.beads.core.AudioContext;
import net.beadsproject.beads.core.Bead;
import net.beadsproject.beads.data.Buffer;
import net.beadsproject.beads.ugens.Clock;
import net.beadsproject.beads.ugens.Envelope;
import net.beadsproject.beads.ugens.Function;
import net.beadsproject.beads.ugens.Gain;
import net.beadsproject.beads.ugens.LPRezFilter;
import net.beadsproject.beads.ugens.WavePlayer;

public class arpeggiator_01
{
  float frequency = 100.0f;
  int tick = 0;
  Function arpeggiator;
  WavePlayer square;

  Envelope gainEnvelope;
  Gain gain;

  int lastKeyPressed = -1;

  Clock beatClock;

  public static void main(String[] args)
  {
    arpeggiator_01 synth = new arpeggiator_01();
    synth.setup();
  }

  // construct the synthesizer
  public void setup()
  {
    AudioContext ac = new AudioContext();

    // the gain envelope
    gainEnvelope = new Envelope(ac, 0.0f);

    // set up a custom function to arpeggiate the pitch
    arpeggiator = new Function(gainEnvelope)
    {
      @Override
      public float calculate()
      {
        return frequency * (1 + tick);
      }

      @Override
      public void messageReceived(Bead msg)
      {
        tick++;
        if( tick >= 4 ) tick = 0;
      }
    };
    // add arpeggiator as a dependent to the AudioContext
    ac.out.addDependent(arpeggiator);

    // the square generator
    square = new WavePlayer(ac, arpeggiator, Buffer.SQUARE);

    // set up a clock to keep time
    beatClock = new Clock(ac, 500.0f);
    beatClock.setTicksPerBeat(4);
    beatClock.addMessageListener(arpeggiator);
    ac.out.addDependent(beatClock);

    // set up the Gain and connect it to the main output
    gain = new Gain(ac, 1, gainEnvelope);
    gain.addInput(square);
    ac.out.addInput(gain);

    // set up the keyboard input
    MidiKeyboard keys = new MidiKeyboard();
    keys.addActionListener(new ActionListener(){
      @Override
      public void actionPerformed(ActionEvent e)
      {
        // if the event is not null
        if( e != null )
        {
          // if the event is a MIDI event
          if( e.getSource() instanceof ShortMessage )
          {
            // get the MIDI event
            ShortMessage sm = (ShortMessage)e.getSource();

            // if the event is a key down
            if( sm.getCommand() == MidiKeyboard.NOTE_ON && sm.getData2() > 1 )
              keyDown(sm.getData1());
            // if the event is a key up
            else if( sm.getCommand() == MidiKeyboard.NOTE_OFF )
              keyUp(sm.getData1());
          }
        }
      }
    });

    ac.start();
    beatClock.start();
  }

  private float pitchToFrequency(int midiPitch)
  {
    /*
     *  MIDI pitch number to frequency conversion equation from
     *  http://newt.phys.unsw.edu.au/jw/notes.html
     */
    double exponent = (midiPitch - 69.0) / 12.0;
    return (float)(Math.pow(2, exponent) * 440.0f);
  }

  public void keyDown(int midiPitch)
  {
    if( square != null && gainEnvelope != null )
    {
      lastKeyPressed = midiPitch;

      // restart the arpeggiator
      frequency = pitchToFrequency(midiPitch);
      tick = -1;
      beatClock.reset();

      // interrupt the envelope
      gainEnvelope.clear();
      // attack segment
      gainEnvelope.addSegment(0.5f, 10.0f);
    }
  }

  public void keyUp(int midiPitch)
  {
    // release segment
    if( midiPitch == lastKeyPressed && gainEnvelope != null )
      gainEnvelope.addSegment(0.0f, 50.0f);
  }
}
In this project, I will show you how to build a synthesizer patch that randomly triggers notes in time with a beat. Although this is similar to the arpeggiator, this program will use an array of synthesizers to support multiple simultaneous tones.
An inner class is a class inside another class. Inner classes can be useful for encapsulating complex subtasks that take place in that class. In sound synthesis, inner classes are useful for encapsulating any group of unit generators that occurs multiple times in that file.
To create a synthesizer that supports multiple simultaneous tones, we can encapsulate our synthesizer in an inner class. The program can store an array of the inner class, then trigger successive elements in the array each time a note is triggered.
In this program, I created an inner class called RandomSynth. This is a sine generator that is randomly transposed to other octaves of the last key pressed. The constructor of RandomSynth takes an AudioContext object, then sets up all the components in the synthesizer, and connects the output to the AudioContext.
The only new parts of RandomSynth are the TapIn and TapOut objects. These are used to add a delay effect to a sound. Notice in the constructor that, after constructing the three delay objects, I connect both the original sound and the delayed sound to the AudioContext. The TapIn and TapOut classes delay a sound, but they don't retain the original sound, so we must pass that through as well. Take some time to study how the sound flows through the TapIn, to the TapOut, to the Gain, then both to the output, and back in through the TapIn.
In the main body of the program, I create an array of type RandomSynth that will hold duplicate synthesizers for each possible voice. I also create another inner class called MessageListener, which will listen to the Clock object, and trigger notes.
You can download this code online at evanxmerz.com/soundsynthjava/code/ambient_jam_01.java.
import java.awt.event.ActionEvent;
import java.awt.event.ActionListener;
import javax.sound.midi.ShortMessage;
import midi.MidiKeyboard;
import net.beadsproject.beads.core.AudioContext;
import net.beadsproject.beads.core.Bead;
import net.beadsproject.beads.data.Buffer;
import net.beadsproject.beads.ugens.Clock;
import net.beadsproject.beads.ugens.Envelope;
import net.beadsproject.beads.ugens.Gain;
import net.beadsproject.beads.ugens.TapIn;
import net.beadsproject.beads.ugens.TapOut;
import net.beadsproject.beads.ugens.WavePlayer;

public class ambient_jam_01
{
  /*
   * The total number of synthesizers.
   * This is equivalent to the number
   * of voices in a synthesizer. This
   * patch can have up to this many
   * notes going at once.
   */
  int count = 5;

  // the current synthesizer
  int current = 0;

  /*
   *  This array of synthesizers will allow
   *  the program to trigger multiple tones
   *  that may overlap.
   */
  RandomSynth[] synth;

  // the last key pressed on the midi keyboard
  int lastKeyPressed = -1;

  // the time keeper
  Clock beatClock;

  public static void main(String[] args)
  {
    ambient_jam_01 synth = new ambient_jam_01();
    synth.setup();
  }

  // construct the synthesizer
  public void setup()
  {
    AudioContext ac = new AudioContext();

    // initialize the array of synthesizers
    synth = new RandomSynth[count];
    for( int i = 0; i <: count; i++ ) synth[i] = new RandomSynth(ac);

    // create a class to listen to the Clock
    class MessageListener extends Bead
    {
      @Override
      public void messageReceived(Bead message)
      {
        if( Math.random() <: 0.75 && lastKeyPressed != -1 )
        {
          // trigger a synth note
          synth[current].triggerRandomTone(lastKeyPressed);

          // increment the current counter in a loop
          current++;
          if( current >= count ) current = 0;
        }
      }
    }

    // set up a clock to keep time
    beatClock = new Clock(ac, 250.0f);
    beatClock.setTicksPerBeat(1);
    beatClock.addMessageListener(new MessageListener());
    ac.out.addDependent(beatClock);

    // set up the keyboard input
    MidiKeyboard keys = new MidiKeyboard();
    keys.addActionListener(new ActionListener(){
      @Override
      public void actionPerformed(ActionEvent e)
      {
        // if the event is not null
        if( e != null )
        {
          // if the event is a MIDI event
          if( e.getSource() instanceof ShortMessage )
          {
            // get the MIDI event
            ShortMessage sm = (ShortMessage)e.getSource();

            // if the event is a key down
            if( sm.getCommand() == MidiKeyboard.NOTE_ON && sm.getData2() > 1 )
              keyDown(sm.getData1());
            // if the event is a key up
            else if( sm.getCommand() == MidiKeyboard.NOTE_OFF )
              keyUp(sm.getData1());
          }
        }
      }
    });

    ac.start();
    beatClock.start();
  }

  private float pitchToFrequency(int midiPitch)
  {
    /*
     *  MIDI pitch number to frequency conversion equation from
     *  http://newt.phys.unsw.edu.au/jw/notes.html
     */
    double exponent = (midiPitch - 69.0) / 12.0;
    return (float)(Math.pow(2, exponent) * 440.0f);
  }

  public void keyDown(int midiPitch)
  {
    lastKeyPressed = midiPitch;
  }

  public void keyUp(int midiPitch)
  {
    // nothing here
  }

  /**
   * RandomSynth
   *
   * This class encapsulates the randomized synthesizer
   * that will be used in this file. This class will
   * encapsulate a rather complex signal path which
   * will be duplicated in an array to enable
   * overlapping notes.
   *
   */
  class RandomSynth
  {
    private WavePlayer toneGenerator;
    private Envelope gainEnvelope;
    private Gain gain;

    // objects for adding delay
    private TapIn delayIn;
    private TapOut delayOut;
    private Gain delayGain;

    public RandomSynth(AudioContext ac)
    {
      // set up basic tone generation
      this.toneGenerator = new WavePlayer(ac, 440.0f, Buffer.SINE);
      this.gainEnvelope = new Envelope(ac, 0.0f);
      this.gain = new Gain(ac, 1, gainEnvelope);
      this.gain.addInput(this.toneGenerator);

      // set up the delay (note the signal path)
      this.delayIn = new TapIn(ac, 500.0f);
      this.delayIn.addInput(this.gain);
      this.delayOut = new TapOut(ac, delayIn, 125.0f);
      this.delayGain = new Gain(ac, 1, 0.5f);
      this.delayGain.addInput(this.delayOut);
      this.delayIn.addInput(this.delayGain);

      // connect the non-delayed signal to the master output
      ac.out.addInput(this.gain);

      // connect the delay output to the master output
      ac.out.addInput(this.delayGain);
    }

    public void triggerRandomTone(int midiPitch)
    {
      // possibly transpose the pitch by several octaves
      int transposition = (int)(12 * ((int)Math.floor(Math.random() * 5)) - 2);
      int newMidiPitch = midiPitch + transposition;

      // set the frequency of the tone generator
      this.toneGenerator.setFrequency(pitchToFrequency(newMidiPitch));

      // add segments to the envelope
      this.gainEnvelope.addSegment(0.5f, 15.0f);
      this.gainEnvelope.addSegment(0.1f, 30.0f);
      this.gainEnvelope.addSegment(0.0f, 300.0f);
    }
  }
}
In this example, we're going to use granular synthesis to make a soundscape from an audio file.
There are many ways to create crashing, tumultuous waves of sound, but one of the easiest is to use granular synthesis. By controlling the properties of granular synthesis over time we can reshape audio into something new and abstract, while still retaining some of its original character.
In this project, I use two low frequency oscillators (LFOs) to control the parameters of granulation. Remember, LFOs are oscillators with sub-audible frequencies. LFOs change slowly over time. It's easy to set a WavePlayer to oscillate at less than 20Hz, but the output waveform isn't quite correct. By default, sine waves are bipolar, they generate both positive and negative values as the sine function oscillates between -1 and 1. Negative values won't work as synthesis parameters. It doesn't make sense to have a grain duration of -10 milliseconds.
So we need to convert the values from the WavePlayers into values more appropriate for granulation using custom functions. In this project I set up two LFOs, and two custom functions to convert the values from those LFOs. Then I use the LFOs to control grain duration and grain interval. Grain duration is the length in time of a single grain. Grain interval is the length in time between subsequent grains.
You can download this code online at evanxmerz.com/soundsynthjava/code/LFO_Granulation_01.java.
import net.beadsproject.beads.core.AudioContext;
import net.beadsproject.beads.data.Buffer;
import net.beadsproject.beads.data.Sample;
import net.beadsproject.beads.ugens.Function;
import net.beadsproject.beads.ugens.Gain;
import net.beadsproject.beads.ugens.GranularSamplePlayer;
import net.beadsproject.beads.ugens.SamplePlayer;
import net.beadsproject.beads.ugens.Static;
import net.beadsproject.beads.ugens.WavePlayer;

public class LFO_Granulation_01
{
  public static void main(String[] args)
  {
    // instantiate the AudioContext
    AudioContext ac = new AudioContext();

    // load the source sample from a file
    Sample sourceSample = null;
    try
    {
      sourceSample = new Sample("Tubes.wav");
    }
    catch(Exception e)
    {
      /*
       * If the program exits with an error message,
       * then it most likely can't find the file
       * or can't open it. Make sure it is in the
       * root folder of your project in Eclipse.
       * Also make sure that it is a 16-bit,
       * 44.1kHz audio file. These can be created
       * using Audacity.
       */
      System.out.println(e.getMessage());
      e.printStackTrace();
      System.exit(1);
    }

    // instantiate a GranularSamplePlayer
    GranularSamplePlayer gsp = new GranularSamplePlayer(ac, sourceSample);

    // tell gsp to loop the file
    gsp.setLoopType(SamplePlayer.LoopType.LOOP_FORWARDS);

    // set up a custom function to convert a WavePlayer LFO to grain duration values
    WavePlayer wpGrainDurationLFO = new WavePlayer(ac, 0.03f, Buffer.SINE);
    Function grainDurationLFO = new Function(wpGrainDurationLFO)
    {
      @Override
      public float calculate()
      {
        return 1.0f + ((x[0]+1.0f) * 50.0f);
      }
    };
    // set the grain size to the LFO
    gsp.setGrainSize(grainDurationLFO);

    // set up a custom function to convert a WavePlayer LFO to grain interval values
    WavePlayer wpGrainIntervalLFO = new WavePlayer(ac, 0.02f, Buffer.SINE);
    Function grainIntervalLFO = new Function(wpGrainIntervalLFO)
    {
      @Override
      public float calculate()
      {
        return 1.0f + ((x[0]+1.0f) * 50.0f);
      }
    };
    // set the grain size to the LFO
    gsp.setGrainInterval(grainIntervalLFO);

    // tell gsp to behave somewhat randomly
    gsp.setRandomness(new Static(ac, 10.0f));

    // set up a gain
    Gain gain = new Gain(ac, 1, 0.5f);
    gain.addInput(gsp);

    // connect the Gain to ac
    ac.out.addInput(gain);

    // begin audio processing
    ac.start();
  }
}
import java.awt.event.ActionEvent;
import java.awt.event.ActionListener;
import java.io.File;
import java.io.PrintWriter;
import java.util.ArrayList;
import java.util.HashMap;
import java.util.LinkedList;
import java.util.Queue;
import java.util.Scanner;

import javax.sound.midi.MidiDevice;
import javax.sound.midi.MidiMessage;
import javax.sound.midi.MidiSystem;
import javax.sound.midi.MidiUnavailableException;
import javax.sound.midi.Receiver;
import javax.sound.midi.ShortMessage;
import javax.sound.midi.Transmitter;

/**
 *
 * MidiKeyboard.
 *
 * This class encapsulates a MIDI device that is used for
 * piano key type input.
 *
 * I make no guarantees about this code, except that it
 * works well for using my nanoKey to control
 * Java synthesizers.
 *
 * Run the MidiKeyboardConfigure program to configure
 * your MIDI controller, or just call the configure
 * method on an instance of this class.
 *
 * @author Evan X. Merz
 *
 */
public class MidiKeyboard
{
  private String deviceName = "nanoKEY 1 KEYBOARD";

  private MidiDevice nkDevice;
  private Transmitter nkTransmitter;

  private ArrayList<ActionListener> listeners;

  private Queue<ShortMessage> midiQueue;
  public ShortMessage mostRecentMidiEvent;

  private boolean configured = false;

  // some constants that define NOTE_ON and NOTE_OFF events
  public static final int NOTE_ON = 0x90;
  public static final int NOTE_OFF = 0x80;

  public MidiKeyboard()
  {
    listeners = new ArrayList<ActionListener>();
    midiQueue = new LinkedList<ShortMessage>();
    mostRecentMidiEvent = null;
    configured = false;

    openDevice();

    // load mappings from file if the file exists
    try
    {
      String configFilename = System.getProperty("user.home") + "\\MidiKeyboard.java.cfg";
      File cfg = new File(configFilename);
      if( cfg.exists() )
      {
        Scanner in = new Scanner(cfg);

        // read the device name
        deviceName = in.nextLine();

        in.close();

        System.out.println("Config loaded successfully.");
        configured = true;
      }
    }
    catch(Exception ex)
    {
      System.out.println("Unable to load configuration file. Try running the config program again.");
      //ex.printStackTrace();
    }
  }

  private void openDevice()
  {
    // Obtain information about all the installed synthesizers.
    nkDevice = null;
    nkTransmitter = null;
    MidiDevice.Info[] infos = MidiSystem.getMidiDeviceInfo();
    for (int i = 0; i <: infos.length; i++)
    {
        try
        {
          MidiDevice device = MidiSystem.getMidiDevice(infos[i]);
            MidiDevice.Info d = infos[i];

            if( d.getName().contains(deviceName) )
            {
              System.out.println("Opening " + d.getName());
              System.out.println("  max receivers: " + device.getMaxReceivers());
              System.out.println("  max transmitters: " + device.getMaxTransmitters());

              nkDevice = device;

              nkTransmitter = device.getTransmitter();
              nkTransmitter.setReceiver(new MidiInputReceiver(device.getDeviceInfo().getName()));

              nkDevice.open();
            }
        }
        catch (MidiUnavailableException e)
        {
              // Handle or throw exception...
          System.out.println("Exception occurred while getting MIDI devices!");
          System.out.println(e.getMessage());
          e.printStackTrace();
        }
    }
  }

  public void addActionListener(ActionListener a)
  {
    if( a != null ) listeners.add(a);
  }

  /**
   * getMessage. Return the midi events in order.
   *
   * @return a ShortMessage containing a midi event
   */
  public ShortMessage getMessage()
  {
    if( !midiQueue.isEmpty() ) return midiQueue.remove();
    return null;
  }

  /**
   * getMessageCount.
   *
   * Get the number of stored MIDI messages.
   *
   * @return the number of stored MIDI messages
   */
  public int getMessageCount()
  {
    if( midiQueue != null ) return midiQueue.size();
    return 0;
  }

  /**
   * getMidiInputEvent. This method returns a
   * description of a MIDI event that is tailored
   * to the KORG nanoKontrol.
   *
   * @return an instance of NanokontrolEvent that describes the top midi message
   */
  public MidiInputEvent getMidiInputEvent()
  {
    if( configured && !midiQueue.isEmpty() ) return new MidiInputEvent(midiQueue.remove());
    return null;
  }

  /**
   * MidiInputReceiver. This class is the general purpos
   * Midi interpreter that will raise ActionEvents.
   *
   * @author Evan X. Merz
   */
  class MidiInputReceiver implements Receiver
  {
      public String name;

      public MidiInputReceiver(String name)
      {
          this.name = name;
      }

      public void send(MidiMessage message, long timeStamp)
      {
        try
        {
          ShortMessage sm = (ShortMessage) message;
          midiQueue.add(sm);
          mostRecentMidiEvent = sm;
          //System.out.println("command: " + sm.getCommand() + "  data1: " + sm.getData1() + "  data2: " + sm.getData2());

          // notify each listener
          ActionEvent ae = new ActionEvent(sm, 1, "keyboard");
          for( ActionListener a : listeners )
          {
            a.actionPerformed(ae);
          }

        }
        catch(Exception ex)
        {
          ex.printStackTrace();
        }
      }
      public void close() {}
  }

  // This utility learns controller numbers for each
  // knob/slider and save the mappings to a file in the user's directory.
  public void configure()
  {
    Scanner in = new Scanner(System.in);

    // Give option here to select midi device (maybe not nanokontrol)
    System.out.println("Discovered MIDI devices: ");
    // Obtain information about all the installed synthesizers.
    MidiDevice.Info[] infos = MidiSystem.getMidiDeviceInfo();
    for (int i = 0; i <: infos.length; i++)
    {
        try
        {
          MidiDevice device = MidiSystem.getMidiDevice(infos[i]);
            MidiDevice.Info d = infos[i];
            System.out.println((i+1) + ". " + d.getName() + " by " + d.getVendor());
        }
        catch (MidiUnavailableException e)
        {
              // Handle or throw exception...
          System.out.println("Exception occurred while getting MIDI devices!");
          System.out.println(e.getMessage());
          e.printStackTrace();
        }
    }
    System.out.print("Enter the number for the device you want to use for MIDI keyboard input: ");
    int newDeviceNumber = Integer.parseInt(in.nextLine());
    this.deviceName = infos[newDeviceNumber - 1].getName();

    // open the selected device
    openDevice();
    if( nkTransmitter != null )
    {
      ConfigureReceiver cr = new ConfigureReceiver();
      nkTransmitter.setReceiver(cr);

      in.close();

      try
      {
        // save to file
        String outputFilename = System.getProperty("user.home") + "\\MidiKeyboard.java.cfg";
        PrintWriter out = new PrintWriter(outputFilename);
        out.println(deviceName);

        out.close();
        configured = true;
        System.out.println("Configuration file saved to " + outputFilename + ".");
      }
      catch(Exception ex)
      {
        System.out.println("Unable to save configuration file!");
        ex.printStackTrace();
      }
    }
    else
    {
      System.out.println("Unable to configure. Cannot find " + deviceName + ".");
    }
  }

  /**
   * ConfigureReceiver. A Receiver used during the
   * configuration process.
   *
   * @author Evan X. Merz
   */
  class ConfigureReceiver implements Receiver
  {
    public int lastController = -1;

    @Override
      public void send(MidiMessage message, long timeStamp)
      {
        try
        {
          ShortMessage sm = (ShortMessage) message;
          lastController = sm.getData1();
        }
        catch(Exception ex)
        {
          ex.printStackTrace();
        }
      }
      public void close() {}
  }

  /**
   * MidiInputEvent. This class encapsulates a
   * ShortMessage that has been converted into
   * values appropriate to the Nanokontrol.
   *
   * Ex:
   * type = "slider"
   * index = 3;
   * value = 87;
   *
   */
  public class MidiInputEvent
  {
    public String type;
    public int index;
    public int value;

    public MidiInputEvent(ShortMessage sm)
    {
      // set the defaults
      type = "keyboard";
      index = sm.getData1();
      value = sm.getData2();
    }

    @Override
    public String toString()
    {
      return "MidiInputEvent[type=" + this.type + ", index=" + this.index + ", value=" + this.value + "]";
    }
  }
}
public class MidiKeyboardConfigure
{
  public static void main(String[] args)
  {
    MidiKeyboard mk = new MidiKeyboard();
    mk.configure();
    System.exit(0);
  }
}
import java.awt.event.ActionEvent;
import java.awt.event.ActionListener;
import java.io.File;
import java.io.PrintWriter;
import java.util.ArrayList;
import java.util.HashMap;
import java.util.LinkedList;
import java.util.Queue;
import java.util.Scanner;

import javax.sound.midi.MidiDevice;
import javax.sound.midi.MidiMessage;
import javax.sound.midi.MidiSystem;
import javax.sound.midi.MidiUnavailableException;
import javax.sound.midi.Receiver;
import javax.sound.midi.ShortMessage;
import javax.sound.midi.Transmitter;

/**
 *
 * MidiController.
 *
 * This class encapsulates a MIDI device that is used for
 * knob and slider input.
 *
 * I make no guarantees about this code, except that it
 * works well for using my nanoKontrol to control
 * Java synthesizers.
 *
 * Run the MidiControllerConfigure program to configure
 * your MIDI controller, or just call the configure
 * method on an instance of this class.
 *
 * @author Evan X. Merz
 *
 */
public class MidiController
{
  private String deviceName = "nanoKONTROL 1 SLIDER/KNOB";
  private int sliderCount = 9;
  private int knobCount = 9;

  private MidiDevice nkDevice;
  private Transmitter nkTransmitter;

  private ArrayList<ActionListener> listeners;

  private Queue<ShortMessage> midiQueue;
  public ShortMessage mostRecentMidiEvent;

  // knob/slider/buttom numbers
  private boolean configured = false;
  public HashMap<Integer, Integer> knobControl;
  public HashMap<Integer, Integer> sliderControl;

  public MidiController()
  {
    listeners = new ArrayList<ActionListener>();
    midiQueue = new LinkedList<ShortMessage>();
    mostRecentMidiEvent = null;

    openDevice();

    // load mappings from file if the file exists
    configured = false;
    knobControl = new HashMap<Integer, Integer>();
    sliderControl = new HashMap<Integer, Integer>();
    try
    {
      String configFilename = System.getProperty("user.home") + "\\MidiController.java.cfg";
      File cfg = new File(configFilename);
      if( cfg.exists() )
      {
        Scanner in = new Scanner(cfg);

        // read the device name
        deviceName = in.nextLine();
        // read the number of sliders
        sliderCount = Integer.parseInt(in.nextLine());
        // read the number of knobs
        knobCount = Integer.parseInt(in.nextLine());

        // read all slider controller numbers
        for( int i = 0; i <: sliderCount; i++ )
        {
          //sliderControl[i] = Integer.parseInt(in.nextLine());
          sliderControl.put(Integer.parseInt(in.nextLine()), i);
        }

        // read all knob controller numbers
        for( int i = 0; i <: knobCount; i++ )
        {
          //knobControl[i] = Integer.parseInt(in.nextLine());
          knobControl.put(Integer.parseInt(in.nextLine()), i);
        }

        in.close();

        System.out.println("Config loaded successfully.");
        configured = true;
      }
    }
    catch(Exception ex)
    {
      System.out.println("Unable to load configuration file. Try running the config program again.");
      //ex.printStackTrace();
    }

  }

  private void openDevice()
  {
    // Obtain information about all the installed synthesizers.
    nkDevice = null;
    nkTransmitter = null;
    MidiDevice.Info[] infos = MidiSystem.getMidiDeviceInfo();
    for (int i = 0; i <: infos.length; i++)
    {
        try
        {
          MidiDevice device = MidiSystem.getMidiDevice(infos[i]);
            MidiDevice.Info d = infos[i];

            if( d.getName().contains(deviceName) )
            {

              System.out.println("Opening " + d.getName());
              System.out.println("  max receivers: " + device.getMaxReceivers());
              System.out.println("  max transmitters: " + device.getMaxTransmitters());

              nkDevice = device;

              nkTransmitter = device.getTransmitter();
              nkTransmitter.setReceiver(new MidiInputReceiver(device.getDeviceInfo().getName()));

              nkDevice.open();
            }
        }
        catch (MidiUnavailableException e)
        {
              // Handle or throw exception...
          System.out.println("Exception occurred while getting MIDI devices!");
          System.out.println(e.getMessage());
          e.printStackTrace();
        }
    }
  }

  public void addActionListener(ActionListener a)
  {
    if( a != null ) listeners.add(a);
  }

  /**
   * getMessage. Return the midi events in order.
   *
   * @return a ShortMessage containing a midi event
   */
  public ShortMessage getMessage()
  {
    if( !midiQueue.isEmpty() ) return midiQueue.remove();
    return null;
  }

  /**
   * getMessageCount.
   *
   * Get the number of stored MIDI messages.
   *
   * @return the number of stored MIDI messages
   */
  public int getMessageCount()
  {
    if( midiQueue != null ) return midiQueue.size();
    return 0;
  }

  /**
   * getMidiInputEvent. This method returns a
   * description of a MIDI event that is tailored
   * to the KORG nanoKontrol.
   *
   * @return an instance of NanokontrolEvent that describes the top midi message
   */
  public MidiInputEvent getMidiInputEvent()
  {
    if( configured && !midiQueue.isEmpty() ) return new MidiInputEvent(midiQueue.remove());
    return null;
  }

  /**
   * MidiInputReceiver. This class is the general purpos
   * Midi interpreter that will raise ActionEvents.
   *
   * @author Evan X. Merz
   */
  class MidiInputReceiver implements Receiver
  {
      public String name;

      public MidiInputReceiver(String name)
      {
          this.name = name;
      }

      public void send(MidiMessage message, long timeStamp)
      {
        try
        {
          ShortMessage sm = (ShortMessage) message;
          midiQueue.add(sm);
          mostRecentMidiEvent = sm;
          //System.out.println("command: " + sm.getCommand() + "  data1: " + sm.getData1() + "  data2: " + sm.getData2());

          // notify each listener
          //ActionEvent ae = new ActionEvent(this, 1, "nanokontrol");
          // 2015-01-24 - changed for more versatility
          ActionEvent ae = new ActionEvent(sm, 1, "controller");
          for( ActionListener a : listeners )
          {
            a.actionPerformed(ae);
          }

        }
        catch(Exception ex)
        {
          ex.printStackTrace();
        }
      }
      public void close() {}
  }

  // This utility learns controller numbers for each
  // knob/slider and save the mappings to a file in the user's directory.
  public void configure()
  {
    Scanner in = new Scanner(System.in);

    // Give option here to select midi device (maybe not nanokontrol)
    System.out.println("Discovered MIDI devices: ");
    // Obtain information about all the installed synthesizers.
    MidiDevice.Info[] infos = MidiSystem.getMidiDeviceInfo();
    for (int i = 0; i <: infos.length; i++)
    {
        try
        {
          MidiDevice device = MidiSystem.getMidiDevice(infos[i]);
            MidiDevice.Info d = infos[i];
            System.out.println((i+1) + ". " + d.getName() + " by " + d.getVendor());
        }
        catch (MidiUnavailableException e)
        {
              // Handle or throw exception...
          System.out.println("Exception occurred while getting MIDI devices!");
          System.out.println(e.getMessage());
          e.printStackTrace();
        }
    }
    System.out.print("Enter the number for the device you want to use for MIDI controller input (knobs and sliders): ");
    int newDeviceNumber = Integer.parseInt(in.nextLine());
    deviceName = infos[newDeviceNumber - 1].getName();

    // Prompt for the number of knobs and the number of sliders
    System.out.print("Enter the number of sliders: ");
    sliderCount = Integer.parseInt(in.nextLine());
    System.out.print("Enter the number of knobs: ");
    knobCount = Integer.parseInt(in.nextLine());

    // open the selected device
    openDevice();
    if( nkTransmitter != null )
    {
      int[] sliderControl = new int[sliderCount];
      int[] knobControl = new int[knobCount];

      ConfigureReceiver cr = new ConfigureReceiver();
      nkTransmitter.setReceiver(cr);

      // prompt the user
      for( int i = 0; i <: sliderCount; i++ )
      {
        System.out.print("Move slider " + (i + 1) + " then press enter:");
        in.nextLine();
        sliderControl[i] = cr.lastController;

        System.out.println(cr.lastController);
      }
      for( int i = 0; i <: knobCount; i++ )
      {
        System.out.print("Move knob " + (i + 1) + " then press enter:");
        in.nextLine();
        knobControl[i] = cr.lastController;

        System.out.println(cr.lastController);
      }
      in.close();

      try
      {
        // save to file
        String outputFilename = System.getProperty("user.home") + "\\MidiController.java.cfg";
        PrintWriter out = new PrintWriter(outputFilename);
        out.println(deviceName);
        out.println(sliderCount);
        out.println(knobCount);
        for( int i = 0; i <: sliderCount; i++ )
        {
          out.println(sliderControl[i]);
        }
        for( int i = 0; i <: knobCount; i++ )
        {
          out.println(knobControl[i]);
        }

        out.close();
        configured = true;
        System.out.println("Configuration file saved to " + outputFilename + ".");
      }
      catch(Exception ex)
      {
        System.out.println("Unable to save configuration file!");
        ex.printStackTrace();
      }
    }
    else
    {
      System.out.println("Unable to configure. Cannot find " + deviceName + ".");
    }
  }

  /**
   * ConfigureReceiver. A Receiver used during the
   * configuration process.
   *
   * @author Evan X. Merz
   */
  class ConfigureReceiver implements Receiver
  {
    public int lastController = -1;

    @Override
      public void send(MidiMessage message, long timeStamp)
      {
        try
        {
          ShortMessage sm = (ShortMessage) message;
          lastController = sm.getData1();
        }
        catch(Exception ex)
        {
          ex.printStackTrace();
        }
      }
      public void close() {}
  }

  /**
   * MidiInputEvent. This class encapsulates a
   * ShortMessage that has been converted into
   * values appropriate to the Nanokontrol.
   *
   * Ex:
   * type = "slider"
   * index = 3;
   * value = 87;
   *
   */
  public class MidiInputEvent
  {
    public String type;
    public int index;
    public int value;

    public MidiInputEvent(ShortMessage sm)
    {
      // set the defaults
      type = "other";
      index = sm.getData1();
      value = sm.getData2();

      int data1 = sm.getData1();

      if( sliderControl.containsKey(data1) )
      {
        index = sliderControl.get(data1);
        type = "slider";
      }
      if( knobControl.containsKey(data1) )
      {
        index = knobControl.get(data1);
        type = "knob";
      }
    }

    @Override
    public String toString()
    {
      return "MidiInputEvent[type=" + this.type + ", index=" + this.index + ", value=" + this.value + "]";
    }
  }
}
public class MidiControllerConfigure
{
  public static void main(String[] args)
  {
    MidiController mi = new MidiController();
    mi.configure();
    System.exit(0);
  }
}
Evan X. Merz holds a doctorate in Algorithmic Composition from the University of California at Santa Cruz. He has taught synthesis, programming, and artificial intelligence at various universities in the Bay Area. He presents annually on topics such as artificial creativity and synthesis at conferences for musical metacreation. His music has been performed internationally. For more about him, including updates to this book, see evanxmerz.com.