Tagged "web design"
Pride in Software Craftsmanship

As I spend more and more time in Silicon Valley, my views on software management are changing. I read Radical Candor recently, and while I agree with everything in it, I feel like it over-complicates things.
This meditation has been pushed in part by my passion for food. I like going to new restaurants. It brings me joy to try something new, even if it's not a restaurant that would ever be considered for a Michelin Star. Even crappy looking restaurants can serve great food.
I am often awed by the disconnect between various parts of the restaurant business and the quality of the food. Some restaurants are spotlessly clean, have have beautiful decor, and amazing service… but the food is mediocre. The menu is bland and uninspired, and the food itself is prepared with all the zeal that a minimum wage employee can manage.
Then I'll go to a dirty looking greek joint down the road, and the service will be awful… but the menu is inspired. It's not the standard "greek" menu, but it's got little variations on the dishes. And when the food comes out (finally), maybe it isn't beautiful on the plate, but the flavors come together to make something greater than the ingredients and the recipe.
What seems to distinguish a good restaurant from a crappy one is pride. At restaurants that I return to, there is someone there, maybe a manager, maybe a cook, maybe the chef who designed the menu, who takes great pride in his work.
There's a diner by my old house, for instance, where the food is … diner food. There's no reason to go back to the restaurant… except for the manager. The man who runs the floor, seats the patrons, deals with the kitchen, and does all the little things that make a restaurant tick. He manages to make that particular diner worth going to. And for a guy who has two young kids, that's terrific.
I am starting to think that the same basic principle applies to software engineers. I've met brilliant engineers with all sorts of characteristics. Some of them have a lot of education and read all the latest guides. Others have little education, and don't read at all. The main thing that makes them good engineers is that they take pride in their work. They care about the quality of their work, regardless of how many people are going to use it, or how much time they put into it. They write quality code because their work matters.
So when it comes to managing software projects, I'm starting to think that all of these systems boil down to two basic steps.
- Put your engineers in a position to take pride in their work.
- Get out of the way.
Obviously, the first step is non-trivial. It's why there are so many books on the topic. But at the end of the day, pride is what matters.
Tips for Managing Joins in Looker
Looker is a fantastic product. It really makes data and visualizations much more manageable. The main goal of Looker is to allow people who aren't data analysts to do some basic data analysis. To some extent, it achieves this, but there are limits to how far this can go. Ultimately, Looker is a big graphical user interface for writing SQL and generating charts. Under-the-hood, it's programmable by data engineers, but it's limited by the fact that non-technical users are using it.
The major design challenge for Looker is joins. A data engineer writes the joins into what Looker calls "explores". Explores are rules for how data can be explored, but ultimately just a container for joins. When someone creates a new chart, they start by selecting an explore, and thus selecting the joins that will be used in the chart.
They pick the join from a dropdown under the word "Explore". This is the main design bottleneck. Such a UI encourages users to have only a limited number of joins that can fit in the vertical resolution of the screen. This means limiting the number of explores, and hence limiting the ways tables are joined. This encourages using pre-existing joins for new charts.
This creates two problems.
- A non-technical user will not understand the implication of choosing an explore. They may not see that the explore they chose limits how the data can be analyzed. In fact, a non-savvy user may pick the wrong explore entirely, and create a chart that is entirely wrong.
- The joins may evolve over time. A programmer might change a join for a new chart, and this may make old charts incorrect.
The problem is that SQL joins are fundamentally interpretations of the data. Unless a join occurs on id fields AND is a one-to-one relationship, then a join interprets the data in some way.
So how can you limit the negative impact of re-using joins?
1. Encourage simple charts
Encourage your teammates to make charts as simple as possible. If possible, a chart should show a single quantity as it changes over a single dimension. This should eliminate or minimize the use of joins in the chart, thus making it far more future-proof.
2. Give explores long, verbose names
Make explore names as descriptive as possible. Try to communicate the choice that a user is making when they choose an explore. For instance, you might name one explore "Products Today" and another one "Product Events Over Time". These names might indicate that the first explore looks at the products table, but the second explore shows events relating to products joined with a time dimension.
One of the mistakes I made while first starting out with Looker is naming the explores with single word names. I now see that short names create maintenance nightmares. Before assessing the problems with a given chart, I need to know which explore the maker chose for it, and because the names were selected so poorly, the choice was often incorrect.
I hope these ideas help you find a path to a maintainable data project. To be honest, I have a lot of digging-out to do!
SoundCloud, I love you, but you're terrible
I finally started using SoundCloud for a new electro project called Fynix. I casually used it in the past under my own name, in order to share WIP tracks, or just odd stuff that didn't fit on bandcamp. But I never used it seriously until recently. Now I am using it every day, and trying to connect with other artists. I am remixing one track a week, listening to everything on The Upload, and liking/commenting as much as I can.
SoundCloud is the best social network for musicians right now. But it still has a terrible identity crisis. Most of the services seem to be aimed at listeners, or aimed at nobody in particular.
So in this post, I'm going to vent about SoundCloud. It's a good platform, but with a few changes it could be great.
1. I am an artist. Stop treating me like a listener.
Is it really that difficult for you to recognize that I am a musician, and not a listener? I've uploaded 15 tracks. It seems like a pretty simple conditional check to me. So why is my home feed cluttered up with reposts? Why can't I easily find the new tracks by my friends?
This is the core underlying problem with SoundCloud. It has two distinct types of users, and yet it treats all users the same.
2. Your "Who to Follow" recommendations suck. They REALLY suck.
I've basically stopped checking "Who to Follow" even though I want to connect with as many musicians as possible. The recommendations seem arbitrary and just plain stupid.
The main problem is that, as a musician, I want to follow other musicians. I want to follow people who will interact with me, and who will promote my work as much as I promote theirs. Yet, the "Who to Follow" list is full of seemingly random people.
Is this person from the same city as me? No. Do they follow lots of people / will they follow back? No. Are they working in a genre similar to mine? No. Do they like and comment on lots of tracks? No.
So why the heck would I want to follow them?
3. Where are my friends latest tracks?
This last one is just infuriating. When I log in, I want to see the latest tracks posted by my friends. So I go to my homescreen, and it is pure luck if I can find something posted by someone I actually talk to on SoundCloud. It's all reposts. Even if I unfollow all the huge repost accounts, I am stuck looking at reposts by my friends, rather than their new tracks.
Okay, so let's click the dropdown and go to the list of users I am "following". Are they sorted by recent activity? No. They are sorted by the order in which I followed them. To find out if they have new tracks, I must click on them individually and check their profiles. Because that is really practical.
Okay, so maybe there's a playlist of my friends tracks on the Discover page? Nope. It's all a random collection of garbage.
As far as I can tell, there is no way for me to listen to my friends' recent tracks. This discourages real interactions.
Ultimately, the problem is data, and intelligence. SoundCloud has none. You could blame design for these problems. The website shows a lack of direction, as if committees are leading the product in lots of different directions. SoundCloud seems to want to focus on listeners, to compete in the same space as Spotify.
But even if that's the case, it should be trivial to see that I don't use the website like a regular listener. I use it like a musician. I want to connect and interact with other musicians.
And this is such a trivial data/analytics problem that I can only think that they aren't led by data at all. Maybe this is just what I see because I lead our data team, but it seems apparent to me that data is either not used, or used poorly in all these features.
For instance, shouldn't the "Who to Follow" list be based on who I have followed in the past? I've followed lots of people who make jazz/electro music, yet no jazz/electro artists are in my "Who to Follow" list. I follow people who like and comment on my tracks, yet I am told to follow people who follow 12 people and have never posted a comment.
The most disappointing thing is that none of this is hard.
4. Oh yeah, and your browser detection sucks.
When I am browsing your site on my tablet, I do not want to use the app. I do not want your very limited mobile site. I just want the regular site (and yes, I know I can get it with a few extra clicks, but it should be the default).
Introduction to HTML
In this post, I'm going to introduce HTML, and demonstrate how it acts as the skeleton for all pages on the internet.
TLDR: HTML defines the structure of the page
HTML is used to define the structure of a web page. It's the structure that your styles (css), and code (JavaScript) sits on top of. The CSS styles the html elements. The code allows interaction with html elements.
What is HTML?
HTML stands for Hyper Text Markup Language. The unusual phrase "hyper text" means "more than text". Hyper text can be contrasted to plain text. You read plain text in a printed book. The words string together to form a story. But what if you want to know more about a topic? What if you want a definition for a term? What if you want to email the author? HTML gives web programmers the ability to "mark up" the text in a way that allows web browsers to add additional functionality to a text document.
HTML is one of the key inventions that enabled the web to become so popular. The ability to add cross-references directly in a document enables all sorts of connections and interactions that were formerly impossible. Nearly every page on the internet is made using HTML.
What are HTML elements?
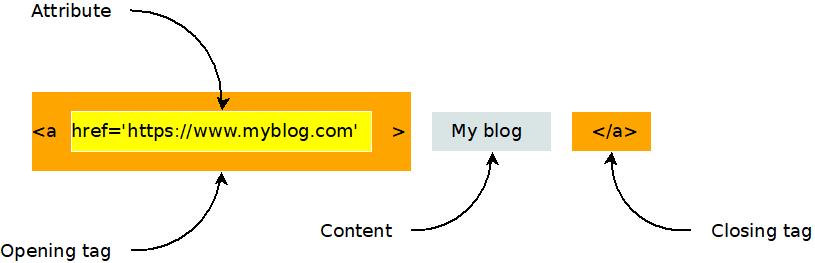
The classic example of a hyper text element is a link. When links were invented, they were called "anchors", as if the author is anchoring a bit of text to another document. When you want to add a link to an html document you use the anchor or "a" element. Here's an example.
<a href='https://www.myblog.com'>My blog</a>
Wow, that's pretty confusing, isn't it? But take a moment to look more closely. What parts of it do you see?
An html element can have an opening tag, any number of attributes, content, and a closing tag, as shown in this diagram.
Here's another example of an html element. It's the image, or "i" element.
<img src="https://www.evanxmerz.com/images/AnchorTag_01.jpg" alt="Anchor tag diagram"/>
Notice that the image element shown here doesn't have a closing tag. This is the shortened form of an html element that doesn't need any content. It ends with "/>" and omits the content and closing tag.
The structure of an html document
HTML documents are composed of numerous html elements in a text file. The HTML elements are used to lay out the page in a way that the web browser can understand.
<!DOCTYPE html>
This must be the first line in every modern html document. It tells web browsers that the document is an html document.
<HTML>
The html element tells the browser where the HTML begins and ends.
<HEAD>
The head element tells the browser about what other resources are needed by this document. This includes styles, javascript files, fonts, and more.
<BODY>
The body element contains the content that will actually be shown to a user. This is where you put the stuff that you want to show to the user.
An example html document
Here's an example html document that contains all of the basic elements that are required to lay out a simple HTML document.
I want you to do something strange with this example. I want you to duplicate it by creating an html document on your computer and typing in the text in this example. Don't copy-paste it. When you copy-paste text, you are only learning how to copy-paste. That won't help you learn to be a programmer. Type this example into a new file. This helps you remember the code and gets you accustomed to actually being a programmer.
What about typos though? Wouldn't it be easier and faster to copy-paste? Yes, it would be easier and faster to copy-paste, however, typos are a natural part of the programming experience. Learning the patience required to hunt down typos is part of the journey.
Here are step-by-step instructions for how to do this exercise on a Windows computer.
- Open Windows Explorer
- Navigate to a folder for your html exercises
- Right click within the folder.
- Hover on "New"
- Click "Text Document"
- Rename the file to "hello_world.html"
- Right click on the new file.
- Hover over "Open With"
- Click Visual Studio Code. You must have installed Visual Studio Code to do this.
Now type the following text into the document.
<!DOCTYPE html>
<html>
  <head>
    <title>Hello, World in HTML</title>
  </head>
  <body>
    Hello, World!
  </body>
</html>
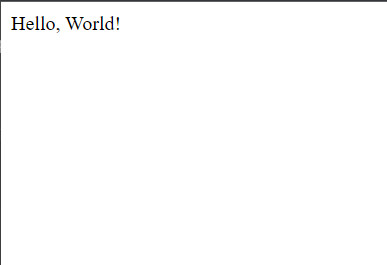
Congratulations, you just wrote your first web page!
Save it and double click it in Windows Explorer. It should open in Google Chrome, and look something like this.
There are many HTML elements
There are all sorts of different html elements. There's the "p" element for holding a paragraph of text, the "br" element for making line breaks, and the "style" element for incorporating inline css styles. Later in this text we will study some additional elements. For making basic web pages, we're going to focus on two elements: "div" and "span".
If you want to dig deeper into some other useful HTML elements, see my post on other useful html elements.
What is a div? What is a span?
That first example is pretty artificial. The body of the page only contains the text "Hello, World!". In a typical web page, there would be additional html elements in the body that structure the content of the page. This is where the div and span elements come in handy!
In the "div" element, the "div" stands for Content Division. Each div element should contain something on the page that should be separated from other things on the page. So if you had a menu on the page, you might put that in a div, then you might put the blog post content into a separate div.
The key thing to remember about the "div" element is that it is displayed in block style by default. This means that each div element creates a separate block of content from the others, typically by using a line break.
<div>This is some page content.</div>
<div>This is a menu or something.</div>
The "span" element differs from the div element in that it doesn't create a new section. The span element can be used to wrap elements that should be next to each other.
<span>This element</span> should be on the same line as <span>this element</span>.
An example will make this more clear.
Another example html document
Again, I want you to type this into a new html file on your computer. Call the file "divs_and_spans.html". Copy-pasting it won't help you learn.
<!DOCTYPE html>
<html>
  <head>
    <title>Divs and spans</title>
  </head>
  <body>
    <div>
      This is a div and <span>this is a span</span>.
    </div>
    <div>
      This is another div and <span>this is another span</span>.
    </div>
  </body>
</html>
Here's what your page should look like.

It's not very exciting, is it? But most modern webpages are built using primarily the elements I've introduced to you on this page. The power of html isn't so much in the expressivity of the elements, but in how they can be combined in unique, interesting, and hierarchical ways to create new structures.
Summary
In this section I introduced Hyper Text Markup Language, aka HTML. Here are the key points to remember.
- HTML is the skeleton of a web page.
- HTML elements usually have opening and closing tags, as well as attributes.
- HTML documents use the head and body elements to structure the page.
- Div and span elements can be used to structure the body of your webpage.
More
Introduction to CSS
In this post, I'm going to introduce CSS, and demonstrate how it can be used to apply styles to a web page.
TLDR: CSS defines the look and feel of a web page
After building the structure of a page using HTML, you can add styles to HTML elements using CSS. If HTML is a car's frame, then CSS is the body shape, the paint job, and the rims.
What is CSS?
CSS stands for Cascading Style Sheets. Programmers and web designers use CSS to describe the colors, fonts, and positions of HTML elements. Web browsers interpret the CSS on a page to show those styles to viewers.
CSS can be added to an HTML document in multiple ways. It can be added directly to HTML elements using inline styles, it can be added to the head section using style elements, or it can be included from another file.
A simple inline css example
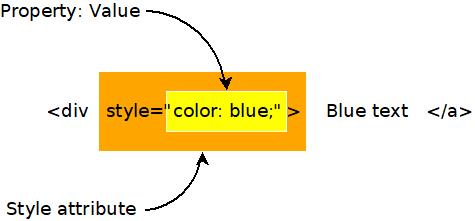
Here's an example of a very simple use of inline css using the style attribute on an element. All it does is set the font color to blue.
<div style="color: blue;">This text should be blue.</div>
To try this in your own html file, just type that code within the body section of the page. If you did it right, then the text should appear blue.
There are three important parts of this inline css. The first is the style attribute on the div element. Use the style attribute to apply inline styles. The second is the word "color", which specifies which property of the element that should be styled. The third important bit is the word "blue", which specifies the color. There are many ways to specify colors in CSS, and using names is the simplest.
I'm introducing inline styles here because they are useful for debugging, however, inline styles are impractical for a number of reasons, so we're going to look at a few other ways of incorporating CSS into an HTML document.
A simple CSS style element example
CSS styles can also be included in a document using the HTML style element. Usually such styles are placed in the head section of the document.
Using the HTML style element like this is generally discouraged, however, because the styles are not reusable in other documents. That's why styles are usually stored in separate files that can be included in any HTML document.
It's good to know about style elements, however, because they are sometimes used in emails. When creating a beautiful email, you don't have access to other files, so style elements are sometimes the best option.
<style>
  span {
    background-color: red;
  }
</style>
This CSS rule sets the background color to red for all span elements on a page. Here's how it might look in a full HTML document.
<!DOCTYPE html>
<html>
  <head>
    <title>Divs and spans</title>
    <style>
      span {
        background-color: red;
      }
    </style>
  </head>
  <body>
    <div>
      This is a div and <span>this is a span</span>.
    </div>
    <div>
      Notice that <span>all span elements on the page receive the style indicated in the rule above</span>. This is due to how CSS selectors work.
    </div>
  </body>
</html>
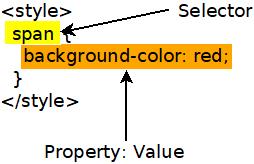
Here's a graphic showing how that style breaks down into parts. The selector is used to select which elements will recieve the style. The property and value describe the style to apply, just like when using inline styles.
What are selectors?
The problem with inline CSS is that it clutters up the code for your webpage, and it's not reusable. A single style declaration can be twenty or more lines long. That's a lot to insert into an HTML element, and adding it makes the code difficult to read. Also, inline styles only apply to the element they are on. If you want to use an inline style twice, then you have to duplicate it, which is a big no-no in programming. Fortunately, there are other ways to write CSS.
CSS can be included in a "style" HTML element. CSS written in the style element uses syntax called "selectors" to apply styles to specific elements on a page.
For example, say you wanted all span elements on your page to have a larger font. You might include something like the following in the head section of your HTML document.
<style>
  span {
    font-size: 2em;
  }
</style>
That selector selects all elements with a given tag name. You could use "div" to style all divs, or "h1" to style all h1 elements. But what if you want to be more specific what if you only want to style some elements of a given type?
If you want to be more specific, then you can add class or id attributes to your html, then use those attributes in your CSS selectors.
Here's an example that shows a class attribute on a div and a selector that uses the class value. Notice that the class name is preceded by a period in the selector.
<style>
  div.blueText {
    color: blue;
  }
</style>
<div class="blueText">This text should be blue</div>
Here's an example that shows how to use the id attribute and selector. Notice that the hashtag symbol precedes the id in the css selector
<style>
  #blueText {
    color: blue;
  }
</style>
<div id="blueText">This text should be blue</div>
Usually class is used when you want to have many things that share the same style. The id attribute is used when you are styling something that is unique on the page.
Including CSS in a separate file
Inline styles and style elements are not the most common way of including styles in a web page. Usually styles are imported from a stylesheet file that contains CSS and ends with the .css extension.
Type the following code into a file named css_example.css.
span.blue {
  color: blue;
}
span.red {
  color: red;
}
#title {
  font-size: 2rem;
}
Now type the following code into a file named css_example.html.
<!DOCTYPE html>
<html>
<head>
<title>CSS Example</title>
<link rel="stylesheet" href="css_example.css">
</head>
<body>
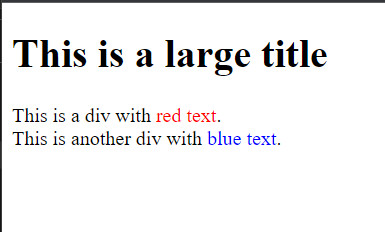
<h1 id="title">This is a large title</h1>
<div>
This is a div with <span class="red">red text</span>.
</div>
<div>
This is another div with <span class="blue">blue text</span>.
</div>
</body>
</html>
If you did it all correctly, then you should end up with something like this, when opened in a web browser.
What are all the CSS properties?
CSS can be used to style just about any aspect of an HTML element. With CSS you can create shadows, animations, and nearly anything else you see on the web. In my posts I'm going to focus on the most common CSS properties, but if you want to see the complete list of things that can be styled with CSS, then check out MDN's comprehensive list of CSS properties.
Summary
- CSS is the style layer of the web.
- CSS is usually imported into an HTML file from a separate CSS file.
- The element, class, and id selectors allow you to target your styles to specific elements.
More
CSS is quite large and complex, but you don't have to know everything about it to use it effectively. You only need to know the fundamentals, and be able to use web search to find the other stuff.
Other useful HTML elements
In this post, I'm going to introduce some HTML elements that are still useful in the modern web development, even if they aren't used as often as div or span.
TLDR: These HTML elements are useful for accessibility and search engine optimization
You can build most webpages using only div and span elements, along with the structural elements html, head, and body. However, it's important to know about other elements if you want your page to rank highly in Google search results, or you want your page to be accessible to people with disabilities.
Headings and titles
Heading elements are used to show titles or subtitles. They are important to your visitors because they make text more readable. They are important to Google because Google uses them to understand the content of your pages.
Heading elements are h1, h2, h3, h4, and h5. The h1 element is the top level title of the page, and should only occur once on a page, otherwise Google Search Console will show a warning for that page, and you won't rank as highly in web searches.
Here's an example of an h1 element.
<h1>I'm a page title that can be seen by the visitor</h1>
It's important to note that there IS an actual title element in HTML. When the title element appears in the header, it is used to set the text that is shown in the tab of your web browser.
<title>This is the text at the top of the tab</title>
Paragraphs in HTML
Before CSS was invented and standardized, there were lots of HTML elements used to format text. You can still use some of these, but it is widely discouraged. The "b" element bolds the enclosed text. The "i" element applies italics to the enclosed text. The "br" element adds a newline. You should never use any of those elements, but there is one element that is still quite useful.
The "p" tag is used to enclose a paragraph of text. It is useful as something separate from a div because it includes useful browser default styles, and because it serves as a good way to style the body text for your page.
<p>I'm a paragraph with some nice browser default styles.</p>
Browser defaults are a complex and controversial topic. Each browser starts with its own set of default styles so that a basic HTML page will be readable. There are many modern packages that override or eliminate these styles so that they don't interfere with a site's custom styles. I don't have a strong opinion on browser defaults in either direction.
Lists in HTML
Lists are another bit of semantic HTML that are still widely used. There are two types of lists in HTML, ordered lists and unordered lists. These can be represented by the "ol" and "ul" elements respectively. List items can be represented by the "li" element.
So what's the difference between the two list types? Ordered lists are numbered, while unordered lists are bulleted.
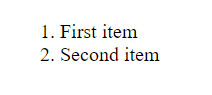
<ol>
  <li>First item</li>
  <li>Second item</li>
</ol>
If you drop that into an HTML file then you will see something like the following.
I encourage you to replace the "ol" elements with "ul" and see what happens.
Nav, main, and footer elements in HTML
Finally, I want to recommend using the elements nav, main, and footer. These elements are used to encapsulate the navigation portion of the page, the main content of the page, and the footer of the page. These elements are absolutely VITAL for accessibility, as they tell screen readers about which part of the page they are reading. You need to remember accessibility for two reasons. It is important to allow as many people as possible to access your site, and Google will penalize you if you don't.
They are used just like divs.
<nav>
  <ul>
    <li>Menu item 1</li>
    <li>Menu item 2</li>
    <li>etc</li>
  </ul>
</nav>
Introduction to JavaScript
In this post, I'm going to introduce the JavaScript programming language and show you a few ways it's commonly used on the web.
WARNING: Some prior programming required!
I'm not introducing programming in general. This isn't a good first tutorial for someone who has never written a line of code in their life. I'm assuming that you know what functions are, and that methods and subroutines are the same thing. I'm assuming that you've written at least a little of some kind of code in the past.
TLDR: JavaScript is the engine of a webpage
HTML is used to define the structure of a web page. CSS defines the look and feel of a page. JavaScript defines how a page acts and responds to user input.
If a web page is a car, then HTML is the frame, CSS is the body, and JavaScript is the engine.
A haiku about JavaScript
Dearest Javascript,
You are my favorite tool
that costs me nothing.
Why not Java?
JavaScript has nothing to do with Java. The name JavaScript came about as an attempt to steal some of the hype around the Java programming language in the 1990s. In the 30 years since then, their positions have entirely flipped, with JavaScript now being the programming language that sees tons of innovation and market support, while Java is withering. Why has this happened? Why has JavaScript been so successful?
In my opinion, Java has been uniquely unsuccessful as a language because it has refused to grow and innovate. Java set some standards and some conventions for the language, and even thirty years later, the committees who guide specification for that language continue to be far too conservative.
If you're a Java programmer and you don't agree with me, then I encourage you to try Microsoft C#. That's the fun language that Java could have been.
And why is that?
C# and JavaScript have become incredibly open-ended. You can write code in lots of different ways, using features borrowed from other cool languages and frameworks. Both are sort of like Frankenstein's monster inasmuch as they are collections of mismatched parts that come together to form a surprisingly intimidating beast.
And this scares some people.
But, much like Shelley's actual monster, they are actually quite nice, and I hope to convey that to you in this introduction.
But what is JavaScript?
It's a programming language that runs in the web browser and on nearly every device that exists. On a webpage, you include JavaScript within the script element, or by including code in an external file. There's more to it than that, but let's learn by doing.
A JavaScript function
One of the key responsibilities of JavaScript is to respond to user input. Beside a few basic interactions, like clicking a link or a dropdown, every action that occurs on a webpage is handled by custom event handlers that are usually written in JavaScript. In this case, we're going to write a script that handles a click event.
When the user clicks on something, the browser creates what is called a click event. It then runs a bit of code called a function that is tied to that event. Here's the click handler function that we're going to write.
function showWarningOnClick() {
  alert("Warning! The elders of the internet have been notified!");
}
That might look like nonsense to you, so let's break it down. This graphic shows how each of the pieces come together.
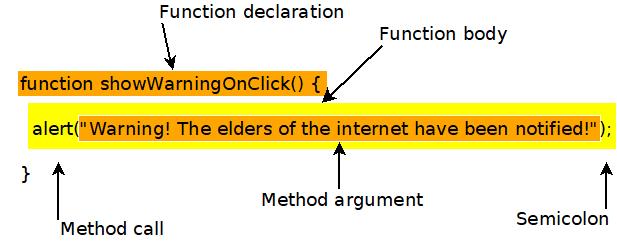
The first line is the function declaration. The word "function" declares that the next word is the name of a function. So "showWarningOnClick" is the name of the function. The parentheses, "()", would enclose the method arguments, if we needed any. The open bracket, "{", indicates that the next line will be the first line of the function body.
The second line is the actual code that is executed by this function. In this case, it calls another function. It calls "alert", with the argument "Warning! The elders of the internet have been notified!". Notice that the argument is enclosed with parentheses. Then the line ends with a semicolon. Most lines of JavaScript code must end in a semicolon.
That's the code that we will run when a button is clicked. We will see in the next section how we can trigger that function using a button.
A JavaScript event
The following line of code creates a button and adds a handler for the onClick event.
<button onClick="showWarningOnClick();">Don't click me</button>
Notice that the button isn't created using a div or span element, as you might expect. When creating buttons, it's good to use the button element if you can. This element is friendly to screen readers, and other accessibility technology.
The only attribute given is "onClick", and it's set to call the function that we defined earlier. The onClick attribute tells the browser what to do when the button is clicked.
It's important to note that onClick events can be attached to any elements. They aren't something unique to buttons. You can attach methods to the onClick attributes of divs or spans, or any other HTML elements.
Responding to a click event in JavaScript
So let's put it all together. The code should look something like this. And as a reminder, please type this in, don't copy paste it. The point is to learn, and you will learn and remember more if you type it out.
<!DOCTYPE html>
<html>
  <head>
    <title>JavaScript Hello World</title>
    <script>
      function showWarningOnClick() {
        alert("Warning! The elders of the internet have been notified!");
      }
    </script>
  </head>
  <body>
    <div>
      <button onClick="showWarningOnClick();">Don't click me</button>
    </div>
  </body>
</html>
When you run it, by double clicking it and opening it in a web browser, you should see a single button in the upper left that says "DOn't click me". Click it, and you should see a little popup with the message "Warning! The elders of the internet have been notified!".
Summary
JavaScipt is a fun, open-ended programming language that is particularly useful in web browsers. In this post we learned about JavaScript functions and event handlers.
More
Here are some other introductions to JavaScript from around the web. I suggest that you spend time to check them out, even if you found this really easy. It's good to go over the fundamentals often, and it's particularly good to get multiple perspectives.
- MDN introduction to JavaScript. I link to MDN in every post because it's the most reliable source.
- Introduction to JavaScript from javascript.info.
- Introduction to JavaScript from freecodecamp. Some of what he says in this video is a bit misleading, but it's still a good place to start.