
20 questions you should answer before your senior fullstack programmer interview
I've been writing up some questions to help some friends prepare for interviews. I thought it might be worthwhile to share them here. I think that most senior fullstack developers should be able to answer these questions, and I think they're worth reviewing before you go into an interview.
20 fullstack engineer review questions
- What do the HTTP response codes beginning with 1-5 indicate?
- Name 5 different types of databases. Give examples of each.
- Name three different Chrome developer tools or extensions that you use for debugging. When do you use each? Why?
- What is the Big O access time for an array, a linked list, a hashmap, and a binary search tree?
- How does the schema differ between relational databases and document stores? When does this matter?
- Name three different types of caching that come into play in any web request.
- What is database sharding? Why does it matter? How does it differ between relational databases and NoSQL document stores?
- What is the difference between a traditional row-store database and a columnar database? Why would you choose one over the other?
- How fast are the fasts sorts we know about in Big O notation? Name one sort that is that fast.
- What is binary search? Can you walk through an example? When is binary search useful?
- What is the most complex operation to perform on a binary search tree? Why?
- What is a database index? When is it appropriate to use one? How are database indexes implemented?
- What is a DNS?
- What is a CDN? When is it useful?
- How does Java scale differently from JavaScript? Why?
- Name three frameworks for building websites. Which do you prefer? Why?
- What is vertical scaling? What is horizontal scaling?
- What are the security concerns that arise when using a package manager like npm?
- What is a serverless environment? What performance concerns arise when deploying a website using serverless technologies?
- What are the advantages and disadvantages of a REST API versus a GraphQL API? Why would you choose one over the other?
Bonus questions
Some of these are more about your informed opinion than about being right or wrong, but I still think it's important to review them and have a prepared answer.
- Name three different cloud service providers. Which do you prefer? Why?
- What is your preferred IDE? Why?
- How do you determine when a feature can be used in a given browser?
- When is a key-value store a good choice?
- What is your favorite programming language? Why?
Project: Client-side web form
This post contains the second assignment in my free web programming course.
Project: Client-side web form
Forms are how users enter data on the web. When you register for a website, you enter your username and email into a web form. When you buy an item from a web store, you send your payment information using a web form.
Generally speaking web forms have input components on them like text boxes and dropdowns and buttons. But this isn't always the case. Web forms can be cleverly hidden using JavaScript and CSS.
Typically a web form submits data to a server, which processes that data and responds to the user with something interesting. For instance, you might submit your username and password and get back an authentication token that allows you to use the private portion of a website.
Requirements
I want you to build a single web page using html and javascript only.
It should have three things on it.
- A page title in h1 tags.
- A label that reads "title:".
- An input text box.
- A submit button.
When the button is clicked, the title of the page should change to the title entered by the user without reloading the page.
Also, the user input must validated. The user should be prevented from using dirty words like "MacOS" and "iphone". Don't let them use either of those words in any capitalization. If those words occur in the input, then a red error message should be displayed underneath the text box that reads "Please refrain from using dirty words such as 'MacOS' and 'iphone'.".
Extra credit
For extra credit, make the form beautiful using CSS. Be creative, but try to make something that a typical web user might like.
How to Debug a webpage in Chrome
In this post, I'm going to show you several ways to debug javascript in Google Chrome.
TLDR: Shift + ctrl + c
Open the javascript console using the shortcut shift + ctrl + c. That means, press all three at the same time. If you're on a Mac, use cmd rather than ctrl.
Inspecting an element to add new styles
Open the dom example that we wrote in What is the DOM?. In this post, we'll use that page to explore three ways to find out what's going on in a webpage. The code should look something like this.
<!DOCTYPE html>
<html>
  <head>
    <title>How to modify the DOM using JavaScript</title>
  </head>
  <body>
    <div id="post">
      Lorem ipsum dolor sit amet, consectetur adipiscing elit, sed do eiusmod tempor incididunt ut labore et dolore magna aliqua. Ut enim ad minim veniam, quis nostrud exercitation ullamco laboris nisi ut aliquip ex ea commodo consequat. Duis aute irure dolor in reprehenderit in voluptate velit esse cillum dolore eu fugiat nulla pariatur. Excepteur sint occaecat cupidatat non proident, sunt in culpa qui officia deserunt mollit anim id est laborum.
    </div>
    <script>
      let blogPost = document.getElementById("post");
      let copyrightNotice = document.createElement("p")
      copyrightNotice.innerHTML = "Copyright " + new Date().getFullYear() + " by the author";
      blogPost.append(copyrightNotice);
    </script>
  </body>
</html>
After opening it in Chrome, right click on the copyright notice, then click "Inspect" in the popup menu. The html for the element you clicked should appear in the "Elements" tab of the browser console. It should look something like this but there are several places where the console can appear.
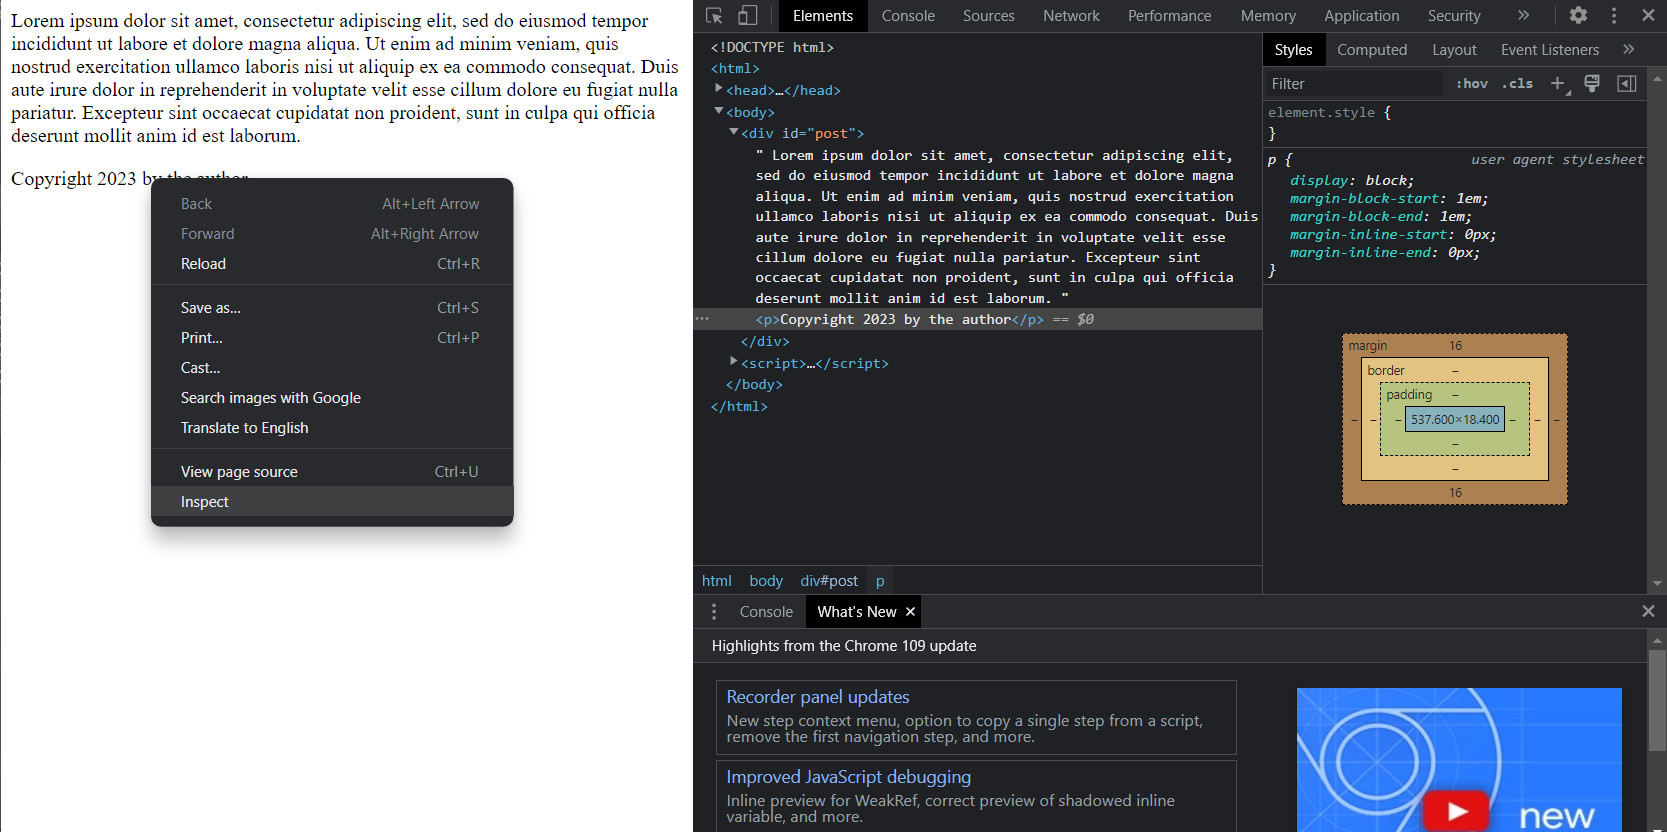
Any time you are confused about an element, inspecting it is a good place to start. In the browser console, you should be able to see the html for the element, as well as any attached css. In fact, you can actually add new styles using the browser console. Notice in the "Styles" tab where it says "element.style" and there are empty braces. Any CSS you type in there will be applied to the selected element. Styles can also be toggled on and off. This can be exceptionally handy when trying to figure out why your page doesn't look quite right.
Go ahead and try it. Enter "font-weight: 800" into element.style. What happens?
Debugging using console.log
The most basic way to debug JavaScript is to put some console.log statements into your code, then open the console and see what they print. Calling console.log tells the browser to print whatever you pass in in the JavaScript console. You can console.log just about anything, but the web browser will format variables automatically if you put them in an object using curly braces.
So the following console.log call isn't very useful.
console.log('HERE!');
Whereas the following console.log call will allow you to examine the object passed int.
console.log({ confusingVariable });
Add the following line of code to the dom example after it sets the copyrightNotice variable.
console.log({ copyrightNotice });
Then reload the page and use shift + ctrl + c to open the browser console, or shift + cmd + c on a Mac. You may have to expand the window and click over to the tab that says "Console".
You should see something that says "{ copyrightNotice: p }", and if you expand it, then you should be able to see all the properties associated with that variable. It's not particularly useful in this simple example, but I use this technique virtually every day as a web programmer.
Debugging using the Chrome debugger
Keep the dom example open in Chrome. Then press shift + ctrl + c to open the browser console. Navigate over to the "Sources" tab. This tab is the built in debugger provided by Google Chrome. In this debugger, you can add breakpoints to your code, and the browser will stop at the breakpoints and allow you to examine the state of your code. It's okay if this looks very confusing. We don't need to do much with it.
There are three things you need to be able to do. First, you need to be able to navigate to the sources tab. Then you need to find the line numbers, because you need to click them. This is much more difficult in a typical web page that has many files. Finally, you need to know how to continue running the page after it stops at your breakpoints.
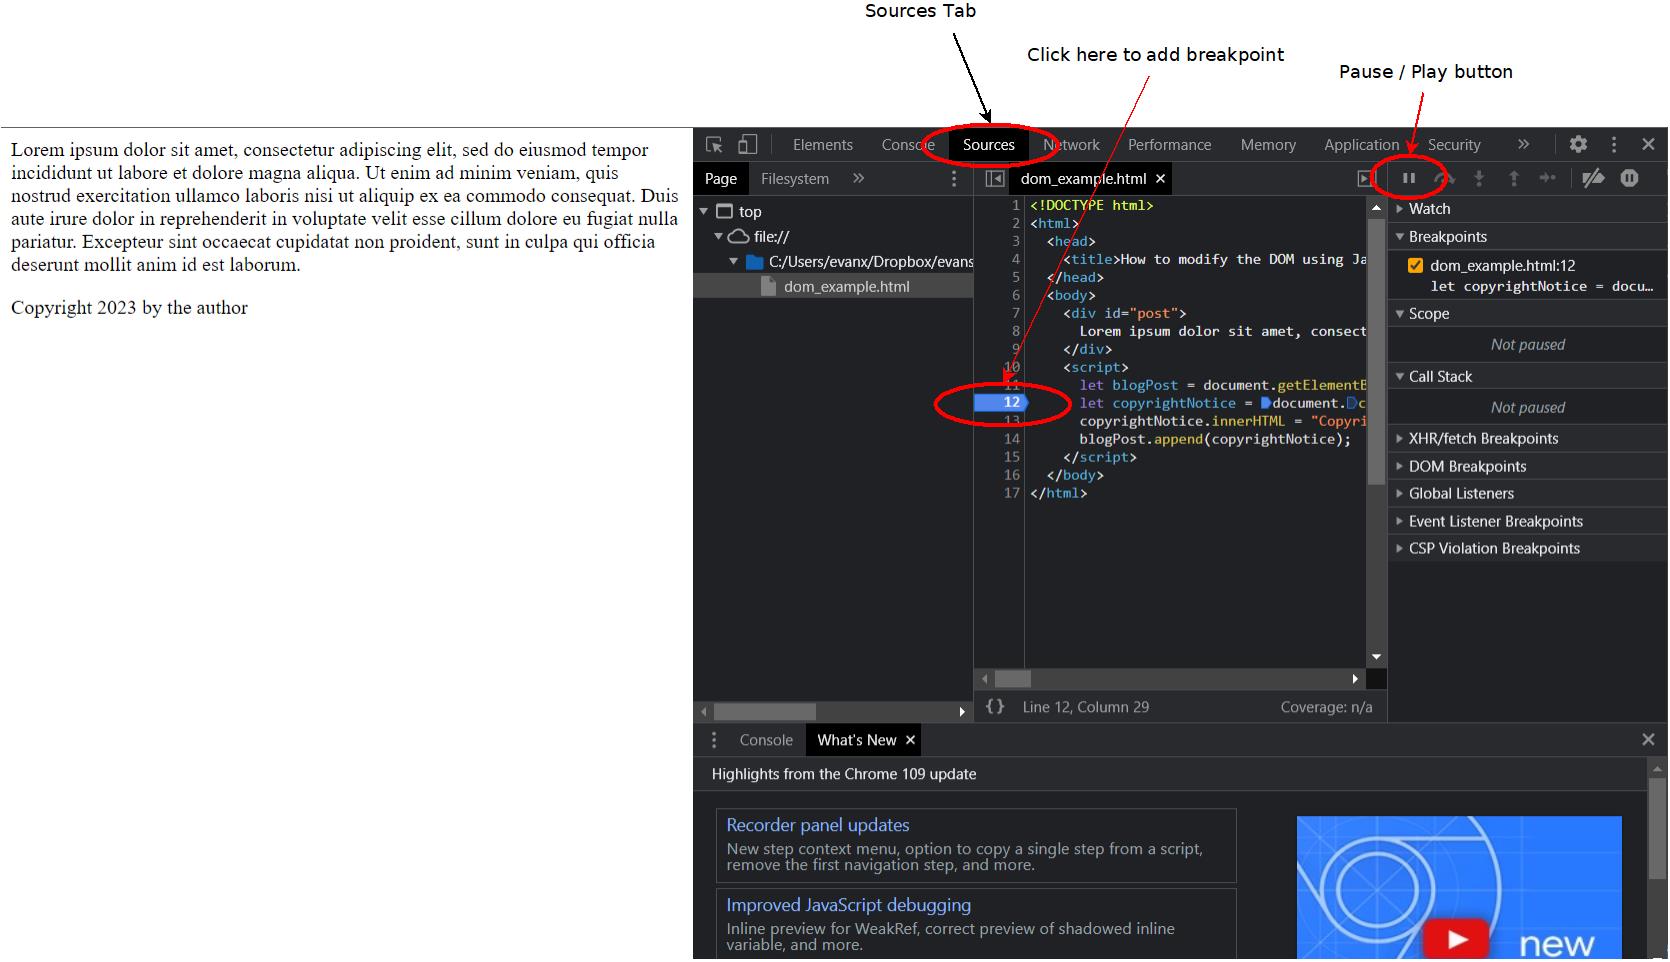
After you've opened up the page, click line 12 to set a breakpoint there. In this case, that code has already been run, so reload the page to make it run again. When you do so, you should see something like the following.
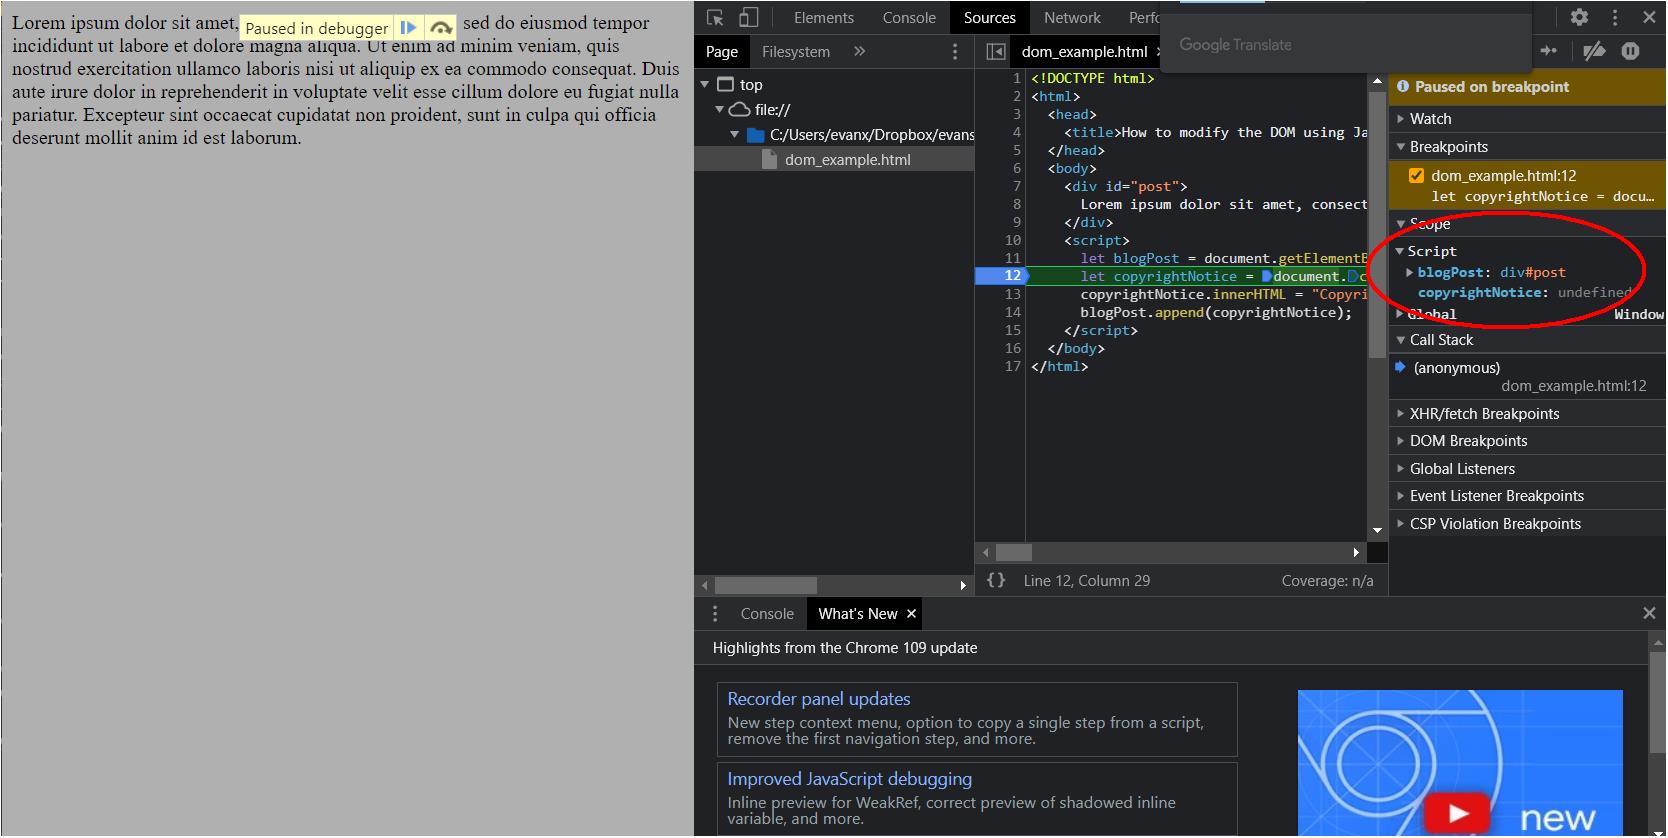
Notice the area that I've circled in that screenshot. It's where you can see the state of your code. All of your variables should appear there and you should also see their values. Notice that copyrightNotice is undefined in this case. That's because Chrome pauses before running the code at the line where you placed your breakpoint. If you place a breakpoint on the next line, then press the play/pause button to resume execution, the value for copyrightNotice should be filled in.
The Chrome debugger is a great way to examine the state of your code.
What is the DOM?
In this post, I'm going to introduce the Document Object Model, which is better known as the DOM.
TLDR: The DOM is the way a webpage is represented within a browser
The DOM is a bit of structured data that holds a representation of a webpage in order to enable programs to be able to manipulate it.
It's a bit like a 3d model that you might use in a 3d printer. The 3d printer is the display device, like a web browser. The 3d model is needed by the 3d printer for it to be able to do anything. You can manipulate the 3d model to make the 3d printer do what you want.
Why should we care about the DOM?
Why does the DOM matter? Can't we go about writing web code without knowing about the DOM?
The DOM matters because it is the representation of a web page that we can work with in JavaScript. It's true that, as a web programmer of over twenty years now, I have probably explicitly thought about the DOM only a handful of times. But I use it every day, and in the dark ages of JavaScript, we had to work with it very directly. These days we use packages like React or jQuery to wrap add a convenient layer of abstraction above the DOM. Still, in this post I'm going to show you how to use the DOM the old fashioned way.
This is still very important to know because occasionally you do have to do it, even when using the modern libraries for interacting with the DOM.
Finding elements in the DOM in JavaScript
In JavaScript, the DOM is stored as a global variable named "document". So when you want to do something with the DOM, you use the document variable.
One of the things you must be able to do is find the HTML element that you want to work with. The document gives us several handy methods to find elements by their id or class attributes. The getElementById method returns the first element found with the matching id attribute. Since id attributes should be unique, this should be the only element with that id in the document.
So to find a document with the id "elephant", you'd use the following line of code.
let elephantElement = document.getElementById("elephant");
This line of code contains a few things that might look unfamiliar to anyone who hasn't used JavaScript before. Here's a diagram that breaks it down.
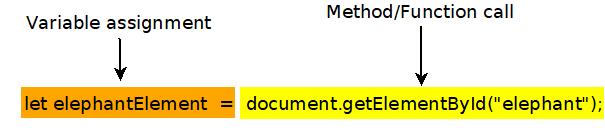
The word "let" is a reserved word that indicates that the next word is a locally scoped variable. Don't worry if you don't know what "locally scoped" means. In this case, it just means that it's not a global variable, like document. Then the word "elephantElement" is the variable name, and the equals sign indicates that whatever is returned by the expression on the right should be stored in the variable on the left.
The id attribute isn't the only way to find elements. JavaScript also specifies a way to get elements with the same class attribute using the getElementsByClassName method. Notice that "Elements" is plural because the method returns an array, as many elements may share a class.
let elephantElements = document.getElementsByClassName("elephant");
The structure of this line of code is essentially the same as the previous one. The only difference is the name of the method that is called, the name of the variable, and the type of the variable.
How to modify a webpage using JavaScript
You can also use JavaScript to change the content of a webpage. When you've located the element you want to change, you can use the innerHTML method to get or set the content of that element. Like much of the JavaScript in this post, this is considered a bad thing to do these days. Typically you'd use the methods in a UI framework like React to mutate the page.
let elephantElement = document.getElementById("elephant");
elephantElement.innerHTML = "Is this an elephant?"
You can also add elements to the page using the createElement and append methods. This blurb appends a copyright notice to a blog post.
let blogPost = document.getElementById("post");
let copyrightNotice = document.createElement("p")
copyrightNotice.innerHTML = "Copyright " + new Date().getFullYear() + " by the author";
blogPost.append(copyrightNotice);
Let's put that into a real HTML file to see it in action. Here's the full example. If you've typed it in correctly, then you should see a copyright notice at the bottom of a paragraph of latin.
<!DOCTYPE html>
<html>
  <head>
    <title>How to modify the DOM using JavaScript</title>
  </head>
  <body>
    <div id="post">
      Lorem ipsum dolor sit amet, consectetur adipiscing elit, sed do eiusmod tempor incididunt ut labore et dolore magna aliqua. Ut enim ad minim veniam, quis nostrud exercitation ullamco laboris nisi ut aliquip ex ea commodo consequat. Duis aute irure dolor in reprehenderit in voluptate velit esse cillum dolore eu fugiat nulla pariatur. Excepteur sint occaecat cupidatat non proident, sunt in culpa qui officia deserunt mollit anim id est laborum.
    </div>
    <script>
      let blogPost = document.getElementById("post");
      let copyrightNotice = document.createElement("p")
      copyrightNotice.innerHTML = "Copyright " + new Date().getFullYear() + " by the author";
      blogPost.append(copyrightNotice);
    </script>
  </body>
</html>
Summary
The DOM is the internal model of a webpage stored in the web browser. It can be manipulated using JavaScript methods such as getElementById, innerHTML, and append.
More
Introduction to JavaScript
In this post, I'm going to introduce the JavaScript programming language and show you a few ways it's commonly used on the web.
WARNING: Some prior programming required!
I'm not introducing programming in general. This isn't a good first tutorial for someone who has never written a line of code in their life. I'm assuming that you know what functions are, and that methods and subroutines are the same thing. I'm assuming that you've written at least a little of some kind of code in the past.
TLDR: JavaScript is the engine of a webpage
HTML is used to define the structure of a web page. CSS defines the look and feel of a page. JavaScript defines how a page acts and responds to user input.
If a web page is a car, then HTML is the frame, CSS is the body, and JavaScript is the engine.
A haiku about JavaScript
Dearest Javascript,
You are my favorite tool
that costs me nothing.
Why not Java?
JavaScript has nothing to do with Java. The name JavaScript came about as an attempt to steal some of the hype around the Java programming language in the 1990s. In the 30 years since then, their positions have entirely flipped, with JavaScript now being the programming language that sees tons of innovation and market support, while Java is withering. Why has this happened? Why has JavaScript been so successful?
In my opinion, Java has been uniquely unsuccessful as a language because it has refused to grow and innovate. Java set some standards and some conventions for the language, and even thirty years later, the committees who guide specification for that language continue to be far too conservative.
If you're a Java programmer and you don't agree with me, then I encourage you to try Microsoft C#. That's the fun language that Java could have been.
And why is that?
C# and JavaScript have become incredibly open-ended. You can write code in lots of different ways, using features borrowed from other cool languages and frameworks. Both are sort of like Frankenstein's monster inasmuch as they are collections of mismatched parts that come together to form a surprisingly intimidating beast.
And this scares some people.
But, much like Shelley's actual monster, they are actually quite nice, and I hope to convey that to you in this introduction.
But what is JavaScript?
It's a programming language that runs in the web browser and on nearly every device that exists. On a webpage, you include JavaScript within the script element, or by including code in an external file. There's more to it than that, but let's learn by doing.
A JavaScript function
One of the key responsibilities of JavaScript is to respond to user input. Beside a few basic interactions, like clicking a link or a dropdown, every action that occurs on a webpage is handled by custom event handlers that are usually written in JavaScript. In this case, we're going to write a script that handles a click event.
When the user clicks on something, the browser creates what is called a click event. It then runs a bit of code called a function that is tied to that event. Here's the click handler function that we're going to write.
function showWarningOnClick() {
  alert("Warning! The elders of the internet have been notified!");
}
That might look like nonsense to you, so let's break it down. This graphic shows how each of the pieces come together.
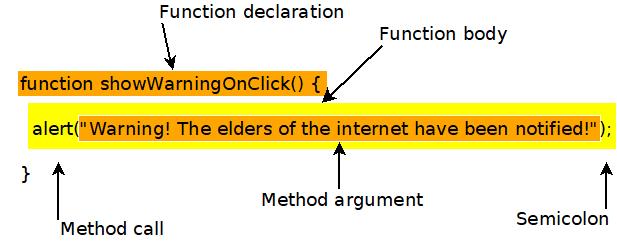
The first line is the function declaration. The word "function" declares that the next word is the name of a function. So "showWarningOnClick" is the name of the function. The parentheses, "()", would enclose the method arguments, if we needed any. The open bracket, "{", indicates that the next line will be the first line of the function body.
The second line is the actual code that is executed by this function. In this case, it calls another function. It calls "alert", with the argument "Warning! The elders of the internet have been notified!". Notice that the argument is enclosed with parentheses. Then the line ends with a semicolon. Most lines of JavaScript code must end in a semicolon.
That's the code that we will run when a button is clicked. We will see in the next section how we can trigger that function using a button.
A JavaScript event
The following line of code creates a button and adds a handler for the onClick event.
<button onClick="showWarningOnClick();">Don't click me</button>
Notice that the button isn't created using a div or span element, as you might expect. When creating buttons, it's good to use the button element if you can. This element is friendly to screen readers, and other accessibility technology.
The only attribute given is "onClick", and it's set to call the function that we defined earlier. The onClick attribute tells the browser what to do when the button is clicked.
It's important to note that onClick events can be attached to any elements. They aren't something unique to buttons. You can attach methods to the onClick attributes of divs or spans, or any other HTML elements.
Responding to a click event in JavaScript
So let's put it all together. The code should look something like this. And as a reminder, please type this in, don't copy paste it. The point is to learn, and you will learn and remember more if you type it out.
<!DOCTYPE html>
<html>
  <head>
    <title>JavaScript Hello World</title>
    <script>
      function showWarningOnClick() {
        alert("Warning! The elders of the internet have been notified!");
      }
    </script>
  </head>
  <body>
    <div>
      <button onClick="showWarningOnClick();">Don't click me</button>
    </div>
  </body>
</html>
When you run it, by double clicking it and opening it in a web browser, you should see a single button in the upper left that says "DOn't click me". Click it, and you should see a little popup with the message "Warning! The elders of the internet have been notified!".
Summary
JavaScipt is a fun, open-ended programming language that is particularly useful in web browsers. In this post we learned about JavaScript functions and event handlers.
More
Here are some other introductions to JavaScript from around the web. I suggest that you spend time to check them out, even if you found this really easy. It's good to go over the fundamentals often, and it's particularly good to get multiple perspectives.
- MDN introduction to JavaScript. I link to MDN in every post because it's the most reliable source.
- Introduction to JavaScript from javascript.info.
- Introduction to JavaScript from freecodecamp. Some of what he says in this video is a bit misleading, but it's still a good place to start.